
Seat Ibiza (6F) 2017-2026 Owner's Manual: Luggage compartment shelf
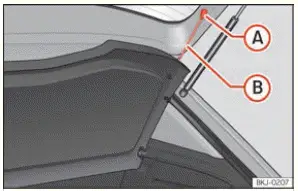
Fig. 136 In the luggage compartment: removing and installing the shelf.
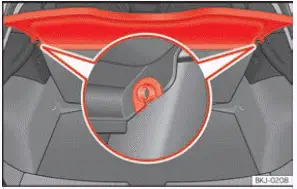
Fig. 137 In the luggage compartment: removing and installing the shelf.
The luggage compartment shelf separates the visible luggage area from the passenger compartment and helps conceal items stored in the rear of the Seat Ibiza. The shelf is supported at both sides of the luggage compartment and connected to the rear lid by retaining cords. It can be removed when additional loading space is needed, for example when transporting bulky objects that would otherwise interfere with its normal position. When removing or refitting the shelf, handle it carefully to avoid damaging the supporting fittings or retaining cords.
Removing
- First, disconnect the retaining cord loops identified by B in Fig. 136 from their corresponding hooks A on the rear lid. Release both loops carefully so that the shelf is no longer attached to the lid. Avoid pulling forcefully on the cords or their attachment points.
- Grip the rear shelf and lift it upwards to release it from the side supports shown in Fig. 137. Once the shelf is completely free of the supporting fittings, carefully remove it from the luggage compartment. Keep the shelf level while lifting it out to prevent its edges from catching on the surrounding trim.
If necessary, the removed rear shelf can be stored beneath the double floor of the luggage compartment, provided that the Seat Ibiza is equipped with the corresponding storage arrangement. This allows the shelf to remain inside the vehicle while freeing the upper luggage area for larger items. Before storing it, make sure the designated compartment is accessible and that the shelf can be placed inside without being forced or bent.
Fitting
- Hold the luggage compartment shelf horizontally and position it so that the recesses on its sides align with the supporting fittings illustrated in Fig. 137. Guide the shelf into the supports and press it gently downwards until it engages securely. Check that both sides are correctly seated and that the shelf is properly supported before continuing.
- Reconnect the retaining straps or cord loops identified by B in Fig. 136 to their attachment points on the rear lid. Make sure both connections are secure and that the cords are correctly positioned. When properly fitted, the retaining cords allow the shelf to move with the rear lid as intended.
WARNING Animals and loose, unsecured or incorrectly positioned objects on the luggage compartment shelf can cause serious injuries during sudden steering manoeuvres, heavy braking or a collision. The rear shelf is not designed to restrain cargo. Items placed on it may be thrown into the passenger compartment when the vehicle changes speed or direction abruptly. To reduce the risk of injury, keep the shelf free of objects that could become dangerous during an accident.
- Never leave hard, sharp-edged or heavy objects loose on the rear shelf, whether individually or inside bags. A bag does not provide adequate protection against the movement of its contents during emergency braking or a collision. Store these items securely in the luggage compartment instead.
- Never transport animals on the rear shelf. The shelf does not provide a safe or suitable place for an animal, and sudden vehicle movements could cause the animal to fall or be thrown into the passenger compartment. Animals must be transported using an appropriate, secure arrangement.
NOTICE
- Before closing the rear lid, check that the luggage compartment shelf is correctly installed in both side supports and that its retaining cords are properly attached. An incorrectly positioned shelf may interfere with the closing movement of the lid or become damaged when the lid is lowered.
- If the luggage compartment is filled beyond the space available beneath the shelf, luggage may press against it and prevent it from sitting correctly in its supports. Excessive pressure can cause the shelf to bend, become displaced or suffer permanent damage. Do not use the shelf to compress or hold down an oversized load.
- Remove the rear shelf whenever the luggage compartment is loaded too high for the shelf to remain in its normal position. This prevents unnecessary pressure on the shelf and its supporting fittings and allows bulky cargo to be accommodated without damaging the component.
Note If you place clothing or other lightweight articles on the rear shelf, make sure they do not obstruct the driver's view through the rear window. Rearward visibility must remain adequate for safe driving. Avoid stacking items on the shelf or positioning them where they could interfere with the view of traffic behind the Seat Ibiza.
Store the rear shelf
Depending on the equipment fitted to the Seat Ibiza, the luggage compartment includes a dedicated space beneath the variable luggage compartment floor for storing the removable rear shelf. This arrangement is useful when the shelf has been taken out to accommodate taller cargo but you still want to keep it in the vehicle. The storage procedure applies only to versions equipped with the corresponding compartment.
- Remove the side cover by sliding it upwards until it is released from its normal position. Handle the cover carefully and make sure it is completely free before attempting to place the rear shelf in the storage area.
- Insert the removed luggage compartment shelf into the space provided beneath the variable floor. Position it carefully within the designated storage area so that it fits correctly without being forced against the surrounding trim or other components.
- Refit the side cover in its original position after the shelf has been stored. Make sure the cover is properly seated and that the stored shelf does not interfere with its installation.

 Variable luggage compartment floor
Fig. 138 Variable luggage compartment floor: A raised position; B lowered position.
Fig. 139 Variable boot floor: tilted position.
The variable luggage compartment floor allows t ...
See also:
Honda Civic Owners Manual. Operating Android Auto with Voice Recognition
Press and hold the talk button to operate Android Auto with your voice.
Below are examples of commands you can give with
voice recognition:
Reply to text.
Call my wife.
Navigate to Honda.
Play my music.
Send a text message to my wife.
Call flower shop.
For more information, pl ...
