Honda Civic Service Manual: Driver's Side Airbag Removal and Installation
751107 LEFT

Removal
|

|
SRS components are located in this area. Review the SRS component
locations and the precautions and procedures before doing repairs
or service.
|
|
|
|
If replacing the side airbag after deployment, refer to Component
Removal, Installation, and Inspection After Deployment for a complete
list of other parts that must also be replaced.
|
|
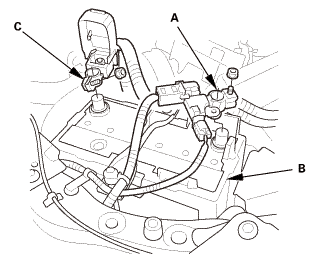
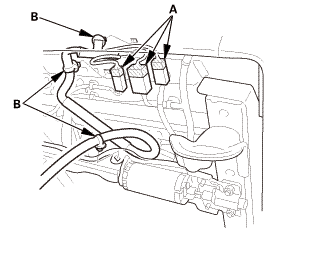
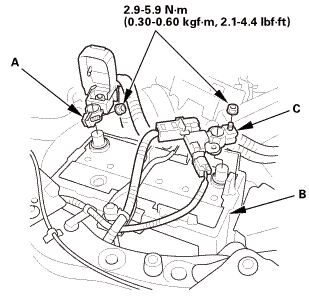
| 1. |
Battery Terminal (SRS) - Disconnection |
|
|
|
1.
|
Make sure the ignition switch is in LOCK (0).
|
|
2.
|
Disconnect and isolate the negative cable and battery sensor
(A) from the battery (B).
|
|
NOTE: Always disconnect the negative side first.
|
|
3.
|
Disconnect the positive cable (C) from the battery.
|
|
4.
|
Wait at least 3 minutes before starting work.
|
|
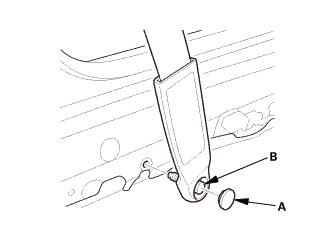
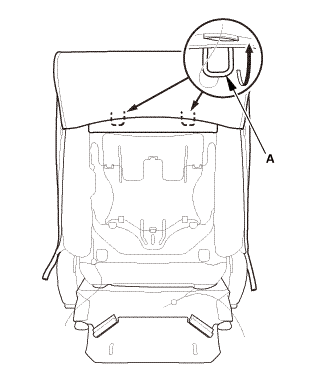
| 2. |
Front Seat Belt Lower Anchor Bolt - Driver's Side |
|
|
|
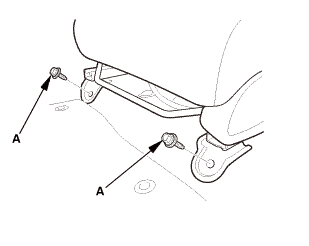
1.
|
Remove the lower anchor cap (A).
|
|
2.
|
Remove the lower anchor bolt (B).
|
|
|
|
|
1.
|
Remove the anchor cover (A).
|
|
|
|
|
2.
|
Remove the lower anchor bolt (A).
|
|
|
|
|
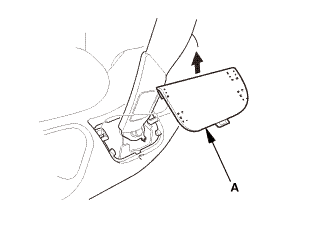
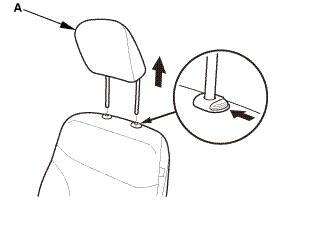
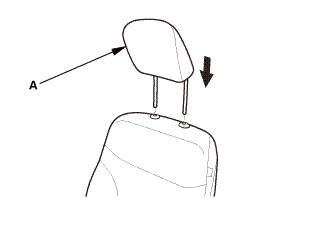
1.
|
Remove the headrest restraint (A).
|
|
| 4. |
Front Seat - Driver's Side |
|
|
|
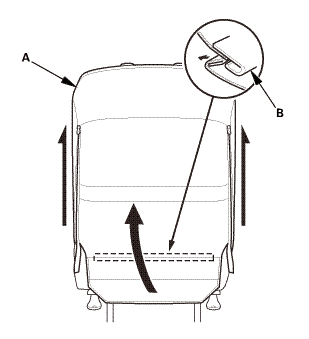
1.
|
Remove both seat track end covers (A).
|
|
|
Front side
Rear side
|
|
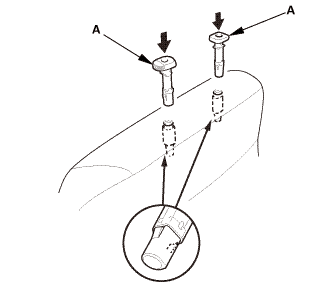
2.
|
Remove the seat mounting bolts (A).
|
|
|
Power seat
Manual seat
|
|
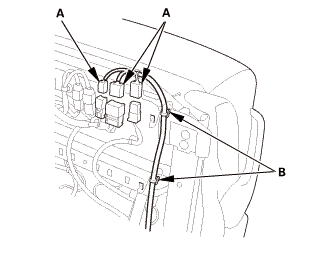
3.
|
Disconnect the connectors (A).
|
|
| 5. |
Front Seat-Back As Needed - Driver's Side |
|
2-door, 4-door (power seat)

4-door (manual seat)
|
|
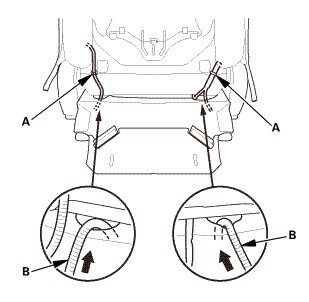
1.
|
Release the strap(s) (A).
|
|
|
2-door, 4-door (manual seat)
4-door (power seat)

|
|
2.
|
Detach the connector clip (A) and the harness clips (B), and
release the holder(s) (C).
|
|
3.
|
With seat heater: Disconnect the connector (D), and detach the
harness clip(s) (E), then release the holder(s) (F).
|
|
|
|
|
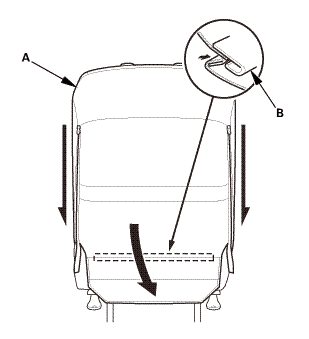
4.
|
Unzip the seat-back cover (A).
|
|
5.
|
Release the hook strip (B).
|
|
|
|
|
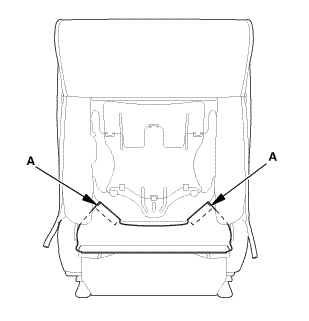
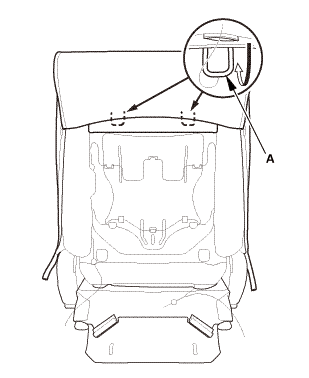
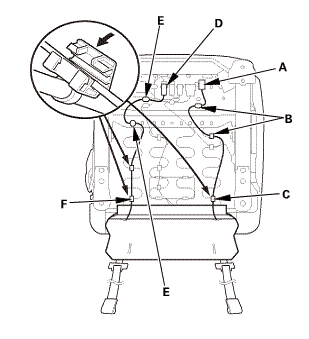
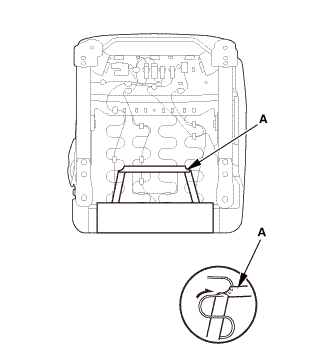
6.
|
Release the hook strips (A).
|
|
|
|
|
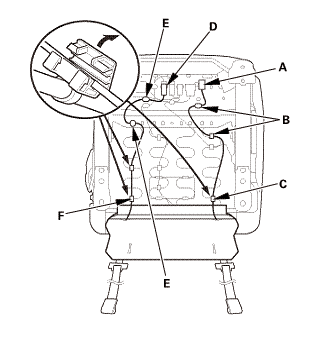
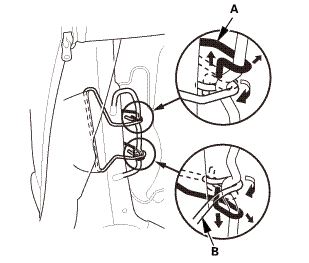
7.
|
Detach the harness clip(s) (A).
|
|
8.
|
Pull out the harness(es) (B).
|
|
|
|
|
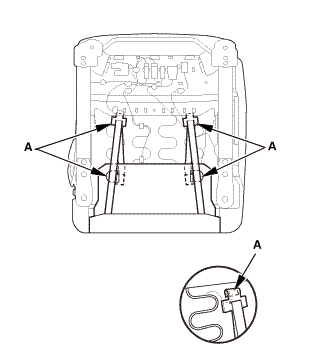
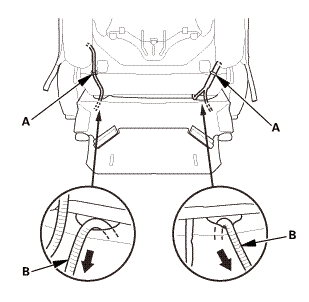
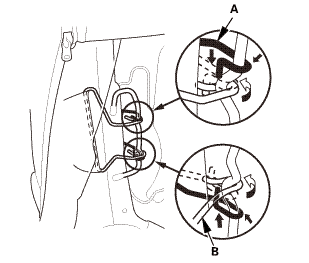
9.
|
Release airbag attachment wires A and B.
|
|
|
|
|
10.
|
Release the hooks (A).
|
|
|
|
|
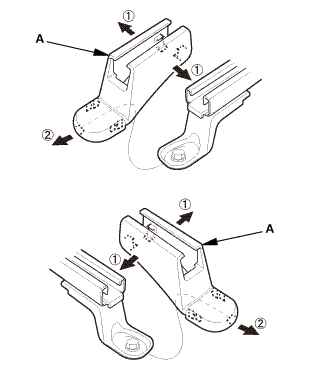
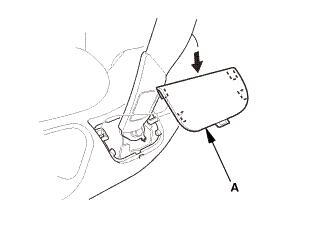
1.
|
Remove the headrest guides (A).
|
|
| 7. |
Front Seat-Back Cover/Pad - Driver's Side |
|
|
|
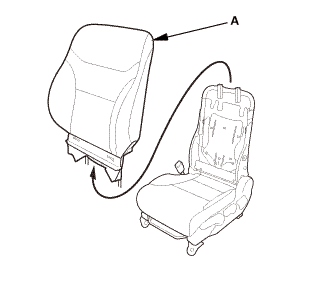
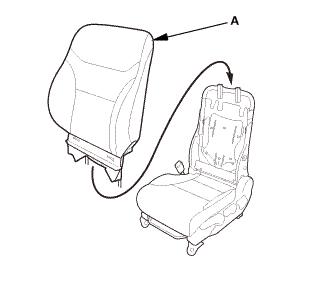
1.
|
Remove the seat-back cover/pad (A).
|
|
|
|
|
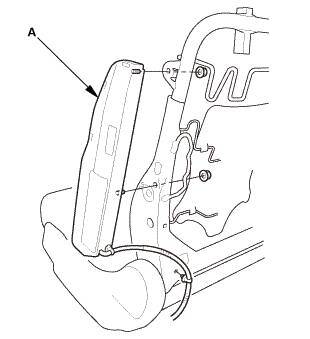
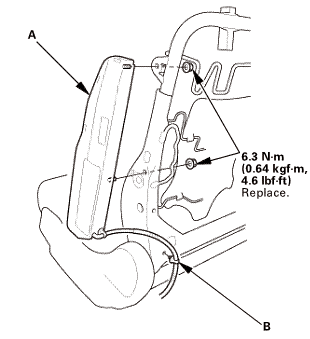
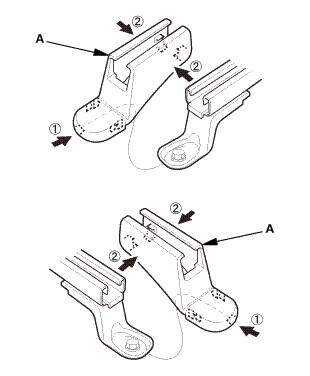
1.
|
Remove the side airbag (A).
|
|

Installation
|
NOTE: SRS components are located in this area. Review the SRS component
locations and the precautions and procedures before doing repairs or service.
|
|
|
|
|
If the side airbag lid is secured with tape, remove the
tape.
|
|
|
|
Do not open the lid on the side airbag cover.
|
|
|
|
Make sure that the seat-back cover/pad is installed properly.
Improper installation may prevent proper deployment.
|
|
|
|
Be sure to install the harness so that they are not pinched
or interfering with other parts.
|
|
|
1.
|
Install the side airbag (A), then tighten the new mounting nuts.
|
|
| 2. |
Front Seat-Back Cover/Pad - Driver's Side |
|
|
|
1.
|
Install the seat-back cover/pad (A).
|
|
|
|
|
1.
|
Install the headrest guides (A).
|
|
| 4. |
Front Seat-Back As Needed - Driver's Side |
|
|
|
1.
|
Install the hooks (A).
|
|
|
|
|
2.
|
Install airbag attachment wires A and B.
|
|
|
|
|
3.
|
Install the harness clip(s) (A).
|
|
4.
|
Install the harness(es) (B).
|
|
|
|
|
5.
|
Install the hook strips (A).
|
|
|
|
|
6.
|
Zip the seat-back cover (A).
|
|
7.
|
Install the hook strip (B).
|
|
|
2-door, 4-door (manual seat)
4-door (power seat)
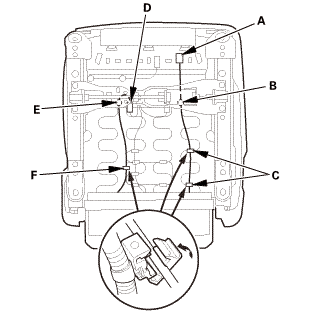
|
|
8.
|
Install the connector clip (A), the harness clip(s) (B), and
the holder(s) (C).
|
|
9.
|
With seat heater: Connect the connector (D), and install the
harness clip(s) (E) and the holder(s) (F).
|
|
|
2-door, 4-door (power seat)
4-door (manual seat)
|
|
10.
|
Install the strap(s) (A).
|
|
| 5. |
Front Seat - Driver's Side |
|
Power seat
Manual seat
|
|
1.
|
Connect the connectors (A).
|
|
2.
|
Install the clips (B).
|
|
|
Front side
 mmu....in mmu....in
Rear side
|
|
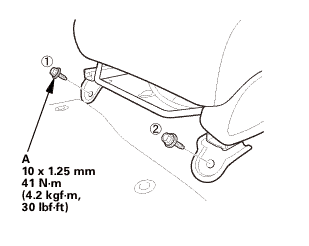
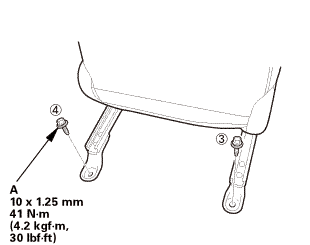
3.
|
Install the seat mounting bolts (A).
|
|
NOTE:
|
|
|
Tighten the bolts by hand first, then tighten
them to the specified torque.
|
|
|
|
Tighten the seat mounting bolts to the specified
torque in the sequence shown. Slide the seat all
the way back and tighten 1 and 2, then slide it
forward and tighten 3 and 4.
|
|
|
|
|
|
|
4.
|
Install both seat track end covers (A).
|
|
|
|
|
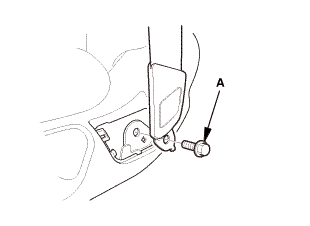
1.
|
Install the headrest restraint (A).
|
|
| 7. |
Front Seat Belt Lower Anchor Bolt - Driver's Side |
|
|
|
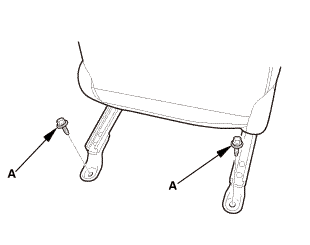
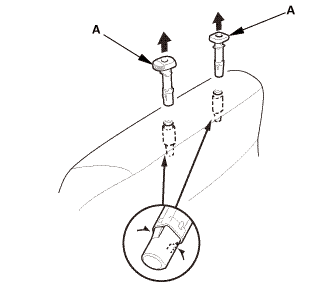
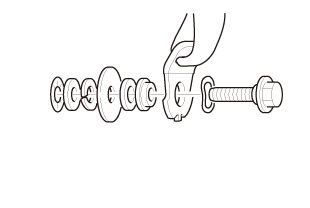
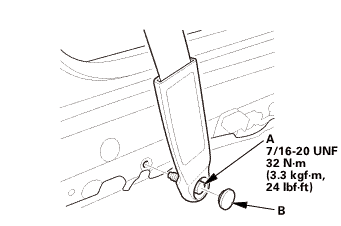
1.
|
Assemble the washer, the collar, and the bushing on the lower
anchor bolt as shown.
|
|
NOTE: Apply medium strength liquid thread lock to the lower anchor
bolt before reinstallation.
|
|
|
|
|
2.
|
Install the lower anchor bolt (A).
|
|
3.
|
Install the anchor cover (B).
|
|
|
 nmimm nmimm
|
|
1.
|
Install the lower anchor bolt (A).
|
|
|
|
|
2.
|
Install the anchor cover (A).
|
|
| 8. |
Battery Terminal (SRS) - Reconnection |
|
 (o.2ao.sam. (o.2ao.sam.
|
|
NOTE: If the battery performs abnormally, test the battery.
|
|
1.
|
Clean the battery terminals.
|
|
2.
|
Connect the positive cable (A) to the battery (B).
|
|
NOTE: Always connect the positive side first.
|
|
3.
|
Connect the negative cable and battery sensor (C) to the battery.
|
|
4.
|
Apply multipurpose grease to the terminals to prevent corrosion.
|
|
|
|
|
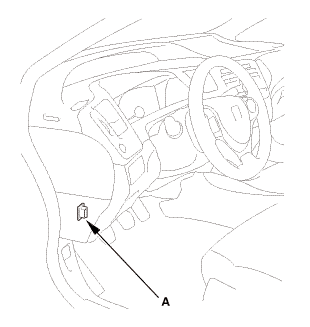
1.
|
Connect the HDS to the data link connector (DLC) (A) located
under the driver's side of the dashboard.
|
|
2.
|
Turn the ignition switch to ON (II).
|
|
3.
|
Make sure the HDS communicates with the vehicle. If it does not
communicate, go to the DLC circuit troubleshooting.
|
|
|
|
1.
|
Clear the DTC(s) by following the screen prompts on the HDS.
|
|
2.
|
Turn the ignition switch to LOCK (0), then wait for 10 seconds.
|
|
| 11. |
Confirm Proper SRS Operation |
|
|
Turn the ignition switch to ON (II), and check that the SRS indicator
comes on for about 6 seconds and then goes off.
|
|
Before scrapping any front airbags, side airbags, side curtain airbags,
driver's seat belt outer lap tensioner, or front seat belt tensioners (including
those in a whole veh ...
751108 RIGHT
Removal
NOTE:
SRS components are located in this area. Review the SRS component
locations and ...
See also:
Honda Civic Owners Manual. Windshield Wiper/Washer
The windshield wipers and washers can be
used when the ignition switch is in ON
*1.
MIST
The wipers run at high speed until you release
the lever.
Wiper switch (OFF, INT*2/AUTO*3, LO,
HI)
Move the lever up or down to change the
wiper settings.
Adjusting wiper operation*
Turn the adjus ...
 Airbag and Tensioner Disposal - in the Vehicle ('13-'14)
 Front Passenger's Side Airbag Removal and Installation