Honda Civic Service Manual: Radiator Fan Motor Removal and Installation (Except K24Z7)
1151A2

| 1. |
Battery Terminal - Disconnection |
|
|
|
1.
|
Make sure the ignition switch is in LOCK (0), or the vehicle
ignition in the OFF mode.
|
|
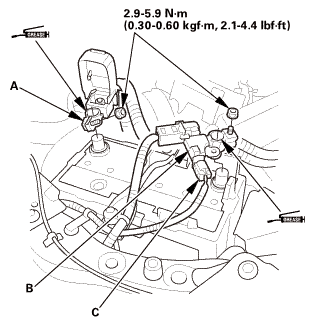
2.
|
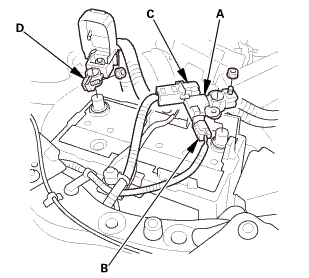
Disconnect and isolate the negative cable with the battery sensor
(A) from the battery.
|
|
NOTE:
|
|

|
Always disconnect the negative side first.
|
|
|
|
To protect the battery sensor connector (B) from
damage, do not hold it when removing the negative
terminal.
|
|
|
|
Do not disconnect the battery sensor from the
negative terminal (C).
|
|
|
|
3.
|
Disconnect the positive cable (D) from the battery.
|
|
|

|
|
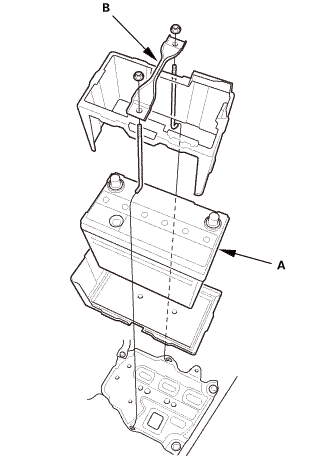
1.
|
Remove the battery setting plate (A) and the battery (B).
|
|
|
|
|
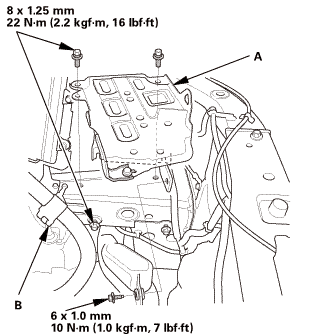
1.
|
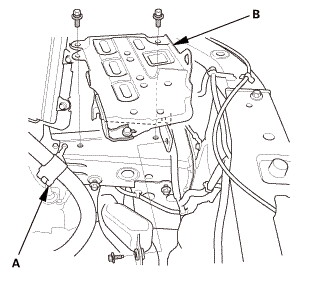
Remove the harness clamp (A).
|
|
2.
|
Remove the battery base (B).
|
|
|
|
|
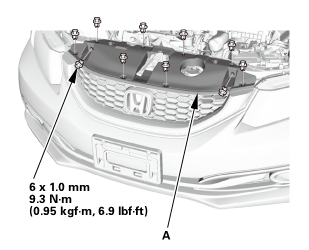
1.
|
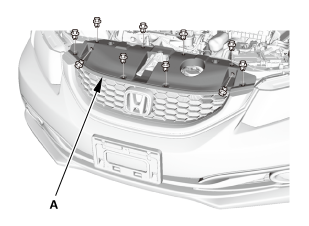
Remove the front grille cover (A).
|
|
|

|
|
2.
|
If necessary, remove the front bumper upper duct (A).
|
|
|
|
|
1.
|
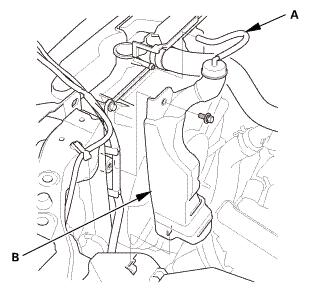
Disconnect the coolant reservoir hose (A).
|
|
2.
|
Remove the coolant reservoir (B).
|
|
| 6. |
Radiator Mounting Bracket, Upper Both |
|
|
|
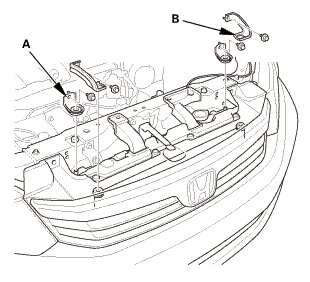
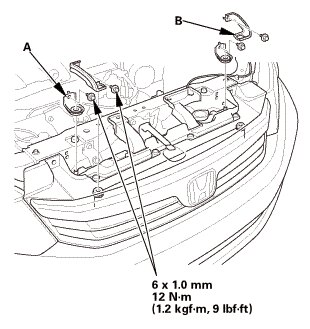
1.
|
Remove the radiator mount upper brackets/cushions (A), and the
A/C condenser upper mount brackets (B).
|
|
|
|
|
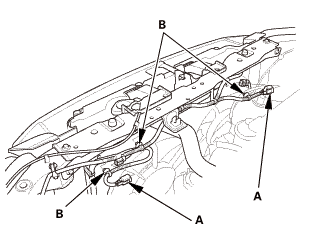
1.
|
Disconnect the connectors (A).
|
|
2.
|
Remove the harness clamps (B).
|
|
|
|
|
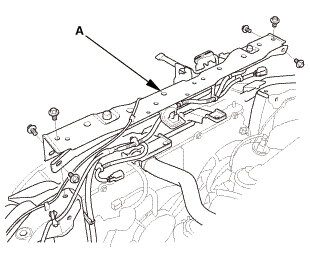
3.
|
Remove the bulkhead (A).
|
|
| 8. |
A/C Condenser Fan Shroud Assembly |
|
|
|
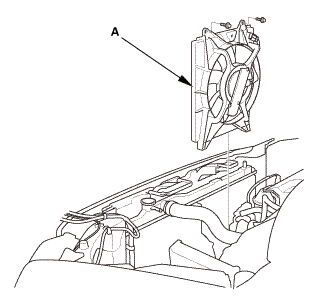
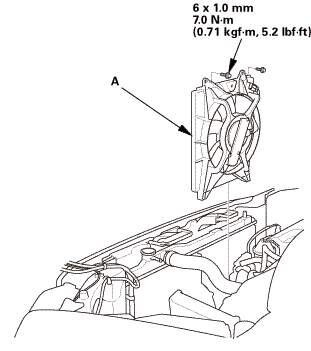
1.
|
Remove the A/C condenser fan shroud assembly (A).
|
|
| 9. |
Radiator Fan Shroud Assembly |
|
|
|
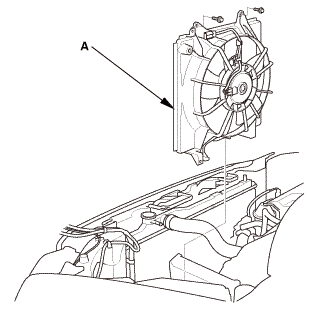
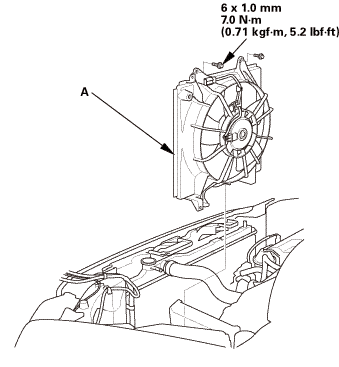
1.
|
Remove the radiator fan shroud assembly (A).
|
|
|

|
|
1.
|
Remove the radiator fan (A) from the radiator fan motor (B).
|
|
|
|
|
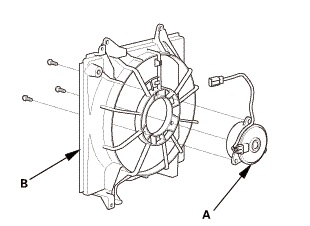
1.
|
Remove the radiator fan motor (A) from the radiator fan shroud
(B).
|
|

|
|
|
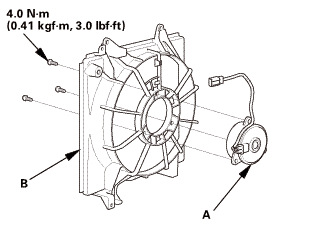
1.
|
Install the radiator fan motor (A) to the radiator fan shroud
(B).
|
|
|
|
|
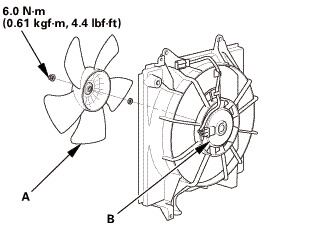
1.
|
Install the radiator fan (A) to the radiator fan motor (B).
|
|
| 3. |
Radiator Fan Shroud Assembly |
|
|
|
1.
|
Install the radiator fan shroud assembly (A).
|
|
| 4. |
A/C Condenser Fan Shroud Assembly |
|
|
|
1.
|
Install the A/C condenser fan shroud assembly (A).
|
|
| 5. |
Bulkhead - Installation |
|

|
|
1.
|
Install the bulkhead (A).
|
|
|

|
|
2.
|
Install the harness clamps (A).
|
|
3.
|
Connect the connectors (B).
|
|
| 6. |
Radiator Mounting Bracket, Upper Both |
|
|
|
1.
|
Install the radiator mount upper bracket/cushion (A), and the
brackets (B).
|
|
|

|
|
1.
|
Install the coolant reservoir (A).
|
|
2.
|
Connect the coolant reservoir hose (B).
|
|
|
|
|
1.
|
Install the front bumper upper duct (A).
|
|
|
|
|
2.
|
Install the front grille cover (A).
|
|
|
 mm22mminu.om.7mm mm22mminu.om.7mm
|
|
1.
|
Install the battery base (A).
|
|
2.
|
Install the harness clamp (B).
|
|
|
|
|
1.
|
Install the battery (A) and the battery setting plate (B).
|
|
NOTE: Do not deform the battery setting plate by over-tightening
the nuts.
|
|
| 11. |
Battery Terminal - Reconnection |
|
|
|
NOTE: If the battery performs abnormally, test the battery.
|
|
1.
|
Clean the battery terminals.
|
|
2.
|
Connect the positive cable (A) to the battery.
|
|
NOTE: Always connect the positive side first.
|
|
3.
|
Connect the negative cable and the battery sensor (B) to the
battery.
|
|
NOTE: To protect the battery sensor connector (C) from damage,
do not hold it when installing the negative terminal.
|
|
4.
|
Apply multipurpose grease to the terminals to prevent corrosion.
|
|
1.
Air Cleaner Assembly
1.
Disconnect the intake air duct (A) and the intake air pipe (B).
...
 Radiator Fan
 Radiator Fan Motor Removal and Installation (K24Z7)