Honda Civic Service Manual: Manual Transmission End Crankshaft Oil Seal Replacement - In Car (R18Z1 M/T)
111145 TRANSMISSION SIDE

Removal
|
|
|
1.
|
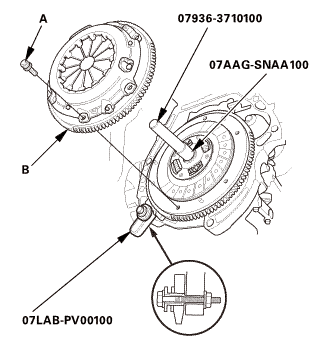
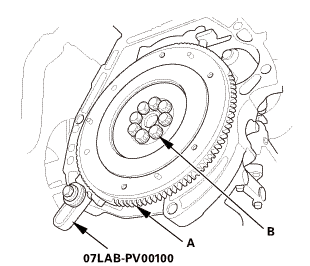
Install the ring gear holder.
|
|
2.
|
Install the clutch alignment shaft and the remover handle.
|
|
3.
|
To prevent warping, loosen the pressure plate mounting bolts
(A) in a crisscross pattern in several steps.
|
|
4.
|
Remove the pressure plate (B).
|
|
|
|
|
1.
|
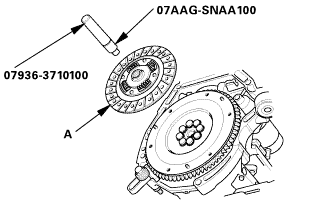
Remove the clutch disc (A), the clutch alignment shaft, and the
remover handle.
|
|
|
 n7lab-wnolun n7lab-wnolun
|
|
1.
|
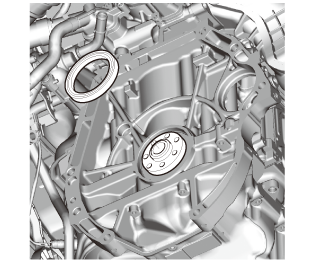
Remove the flywheel (A).
|
|
NOTE: Loosen the flywheel mounting bolts (B) in a crisscross
pattern in several steps.
|
|
2.
|
Remove the ring gear holder.
|
|
| 4. |
Crankshaft Oil Seal Transmission Side (In Car) |
|
|
|
1.
|
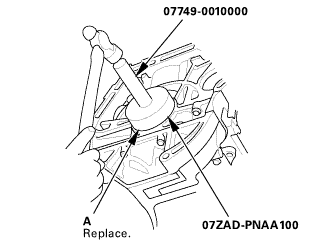
Remove the transmission end crankshaft oil seal.
|
|

Installation
| 1. |
Crankshaft Oil Seal Transmission Side (In Car) |
|
|
|
1.
|
Clean and dry the crankshaft oil seal housing.
|
|
2.
|
Apply a light coat of new engine oil to the crankshaft and to
the lip of the crankshaft oil seal.
|
|
3.
|
Use the driver handle, 15 x 135L and oil seal driver attachment,
96 mm to drive a new crankshaft oil seal (A) squarely into the engine
block to the specified installed height.
|
|
4.
|
Clean the excess oil off the crankshaft, and check that the oil
seal lip is not distorted.
|
|
|
|
|
1.
|
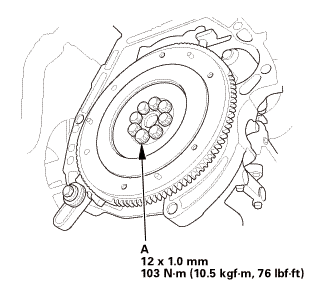
Install the flywheel (A) on the crankshaft, and install the mounting
bolts (B) finger-tight.
|
|
2.
|
Install the ring gear holder.
|
|
|
 :2minn-inno :2minn-inno
|
|
3.
|
Tighten the flywheel mounting bolts (A) in a crisscross pattern
in several steps.
|
|
|
 (pm (pm
|
|
1.
|
Temporarily install the clutch disc onto the splines of the transmission
mainshaft. Make sure the clutch disc slides freely on the mainshaft.
|
|
2.
|
Apply super high temp urea grease (P/N 08798-9002) to the splines
(A) of the clutch disc (B).
|
|
NOTE: Wipe off any excess grease.
|
|
3.
|
Install the clutch disc using the clutch alignment shaft and
the remover handle.
|
|
|
|
|
1.
|
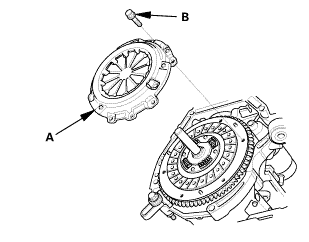
Install the pressure plate (A) and the mounting bolts (B) finger-tight.
|
|
|
 a7aag-suaa1aa a7aag-suaa1aa
|
|
2.
|
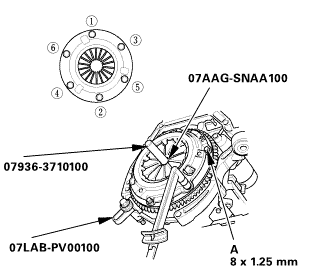
Torque the pressure plate mounting bolts (A) in a crisscross
pattern.
|
|
NOTE:
|
|

|
Tighten the bolts in several steps to prevent
warping the diaphragm spring.
|
|
|
|
Make sure that there is no clearance between
the pressure plate and the flywheel.
|
|
|
|
|
Specified Torque:
|
25 N·m (2.5 kgf·m, 18 lbf·ft)
|
|
|
|
|
3.
|
Remove the ring gear holder.
|
|
4.
|
Remove the clutch alignment shaft and the remover handle.
|
|
5.
|
Make sure the diaphragm spring fingers are all the same height.
|
|
View
1.
Clutch Housing Exploded View
Exploded View - Clutch Housing
nirrerem1alassemslvsmncoumersmar1assemalvnameoncum:u.20mmwashermminnommonsealreversegea ...
2131K5
1.
Steering Joint Cover
1.
Remove the steering joint cover (A).
2. ...
See also:
Honda Civic Owners Manual. Adjusting the Shoulder Anchor
The front seats have adjustable shoulder anchors to accommodate taller and
shorter
occupants.
1. Move the anchor up and down while
pulling the release outward.
2. Position the anchor so that the belt rests
across the center of your chest and over
your shoulder.
Adjusting the Shoulder ...
 Manual Transmission Disassembly and Reassembly (R18Z1 M/T)
 Manual Transmission Removal and Installation (K24Z7)