
Seat Ibiza (6F) 2017-2026 Owner's Manual: Front towing eye
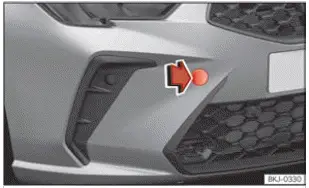
Fig. 155 Front bumper on right: remove the lid.
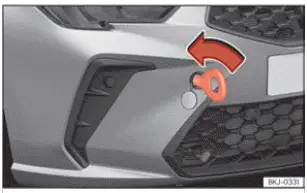
Fig. 156 Right side of the front bumper: towing
eye screwed in.
The threaded mounting point for the removable front towing eye is located on the right-hand side of the Seat Ibiza front bumper, behind a small protective cover, as illustrated in Fig. 155. The cover conceals the attachment point during normal vehicle use and must be removed before the towing eye can be installed. Take care when opening it to avoid damaging the retaining mechanism or the surrounding bumper surface.
The removable towing eye should always remain in the vehicle, stored with the on-board tool kit in the luggage compartment. Keeping it in its designated location ensures that the correct attachment is available if the Seat Ibiza needs to be recovered or towed following a breakdown. Do not substitute an unsuitable towing eye or attempt to attach towing equipment directly to other parts of the bumper.
Before installing or using the towing eye, read and observe the instructions and restrictions concerning towing the vehicle. The towing eye is designed for use at the specified attachment point, and its correct installation is essential for safely transferring towing forces to the vehicle. The condition of the vehicle, the towing equipment and the applicable towing requirements must all be considered before the operation begins.
Fitting the towing eye
1. Open the luggage compartment and remove the towing eye from the Seat Ibiza on-board tool kit. Check that the towing eye is in suitable condition and that its threaded section is clean and free from visible damage. Use the towing eye intended for the vehicle rather than an attachment of uncertain compatibility.
2. Locate the towing eye cover on the right-hand side of the front bumper. Press down on the left-hand side of the cover to release it from its retaining clips, as shown in Fig. 155. Carefully move the cover away from the opening and allow it to remain hanging from its attachment to the vehicle. Avoid pulling or twisting the cover unnecessarily, as this could damage its retaining parts or the bumper paintwork.
3. Insert the towing eye into the exposed threaded mounting point and screw it in by turning it anticlockwise, as illustrated in Fig. 156. Continue turning until the towing eye is fully seated in its housing. Use a suitable object to tighten it completely and securely, ensuring that the attachment cannot loosen under the forces generated during towing. The towing eye must be screwed in as far as it will go; partial engagement of the threads is not sufficient.
4. Once the towing operation has been completed, remove the towing eye by turning it clockwise. Use a suitable object if necessary to loosen the attachment carefully. Avoid applying force in the wrong direction or allowing the towing eye to strike the bumper while it is being removed. Unscrew it fully and withdraw it from the mounting point.
5. Refit the protective cover over the towing eye opening. Position it correctly in the bumper and press it into place until the retaining clips engage with an audible or noticeable click. Check that the cover is securely fitted and sits properly against the surrounding bumper surface.
6. Inspect the towing eye after use and clean it if necessary, particularly if dirt or moisture has accumulated on the threaded section. Return it to its designated storage location in the luggage compartment together with the other vehicle tools. Storing the towing eye correctly helps keep it available and in suitable condition for future use.
NOTICE The front towing eye must always be screwed completely into its mounting point and tightened firmly before any towing force is applied. If it is not fully engaged, the connection may loosen or the towing eye may suddenly pull out of its housing while the Seat Ibiza is being towed. This can damage the vehicle and towing equipment and create a dangerous situation for other road users. Never begin towing with a partially installed or inadequately tightened towing eye.
 Towing
Preliminary steps
Connect the tow cable or rigid tow bar only to the attachment points specifically provided for towing.
Depending on the Seat Ibiza equipment and the vehicle involved, the ap ...
 Rear towing eye
Fig. 157 Rear bumper on right: remove the lid.
Fig. 158 Right side of the rear bumper: towing
eye screwed in.
On Seat Ibiza vehicles equipped with a removable rear towin ...
See also:
Honda Civic Service Manual. Door Striker Adjustment
Adjustment
1.
Door Striker - Adjustment
mmmmmm
Make sure the door latches securely without slamming
it. If necessary, adjust the striker (A): The striker screws
are fixed, but the s ...
