Honda Civic Service Manual: Driver's Seat Cushion Heater Removal and Installation
859121 LEFT FRONT

Removal
|
SRS components are located in this area. Review the SRS component locations
and the precautions and procedures before doing repairs or service.
|
| 1. |
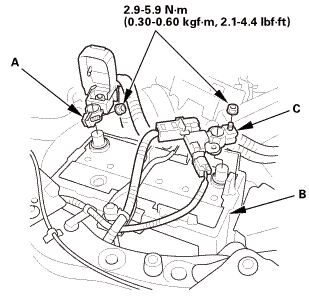
Battery Terminal (SRS) - Disconnection |
|
|
|
1.
|
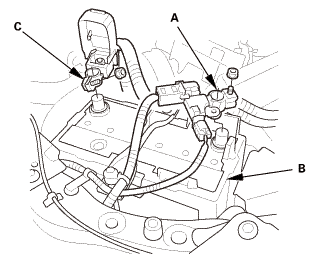
Make sure the ignition switch is in LOCK (0).
|
|
2.
|
Disconnect and isolate the negative cable and battery sensor
(A) from the battery (B).
|
|
NOTE: Always disconnect the negative side first.
|
|
3.
|
Disconnect the positive cable (C) from the battery.
|
|
4.
|
Wait at least 3 minutes before starting work.
|
|
| 2. |
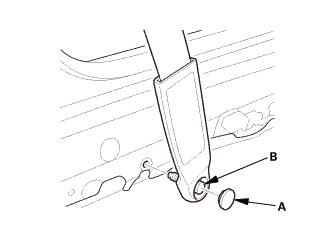
Front Seat Belt Lower Anchor Bolt - Driver's Side |
|
|
|
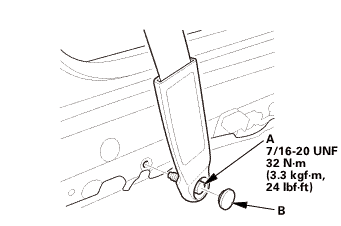
1.
|
Remove the lower anchor cap (A).
|
|
2.
|
Remove the lower anchor bolt (B).
|
|
|
|
|
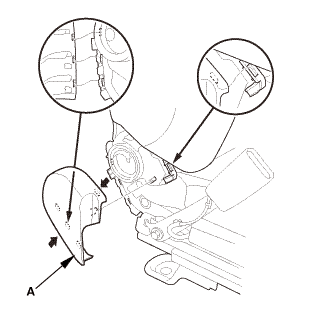
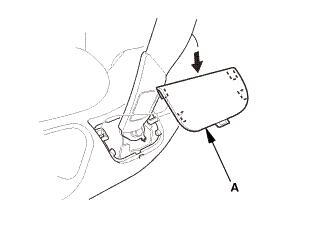
1.
|
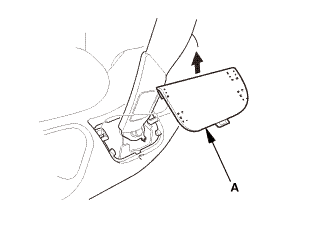
Remove the anchor cover (A).
|
|
|
|
|
2.
|
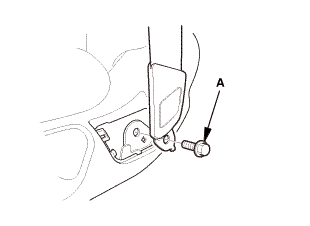
Remove the lower anchor bolt (A).
|
|
|
|
|
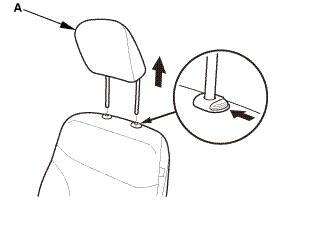
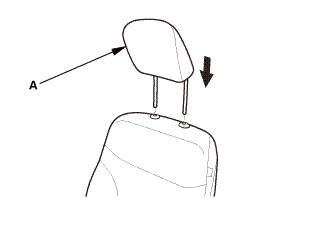
1.
|
Remove the headrest restraint (A).
|
|
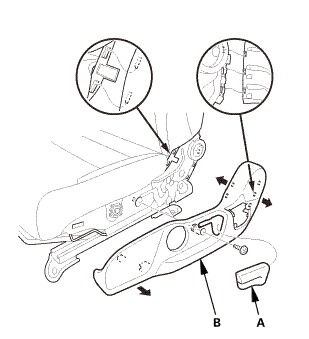
| 4. |
Front Seat - Driver's Side |
|
|
|
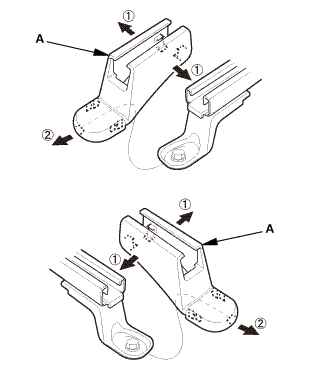
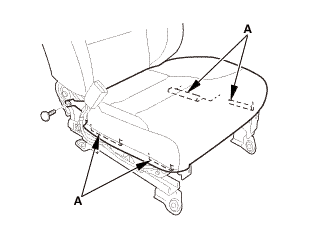
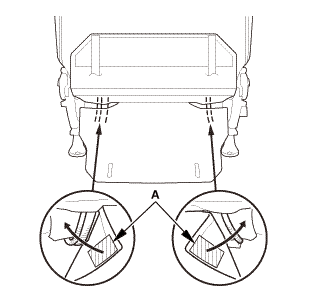
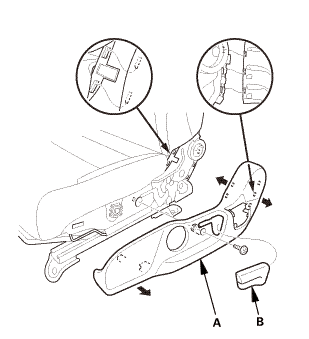
1.
|
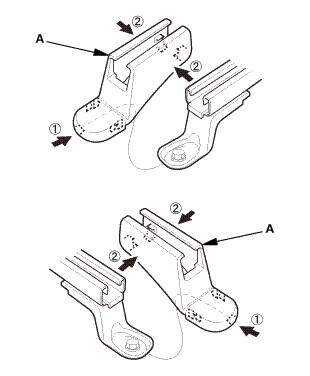
Remove both seat track end covers (A).
|
|
|
Front side
Rear side
|
|
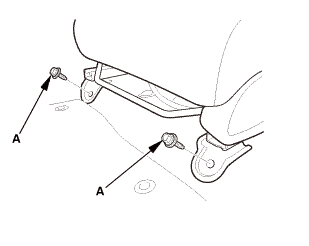
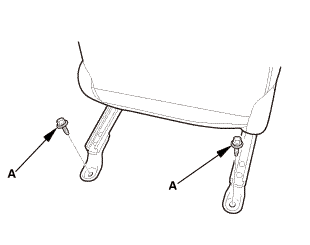
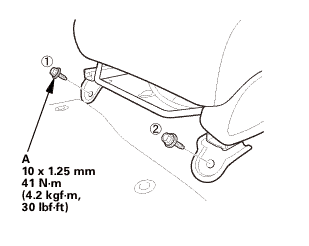
2.
|
Remove the seat mounting bolts (A).
|
|
|
Power seat
Manual seat
|
|
3.
|
Disconnect the connectors (A).
|
|
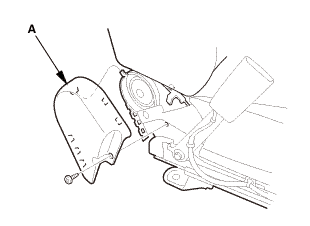
| 5. |
Front Cover - Driver's Side |
|
|
|
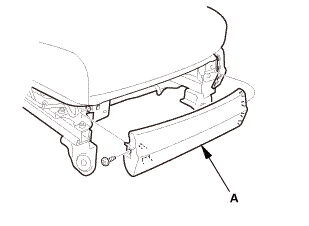
1.
|
Power seat: Remove the front cover (A).
|
|
| 6. |
Front Seat Recline Cover - Driver's Side |
|
Power seat
Manual seat
|
|
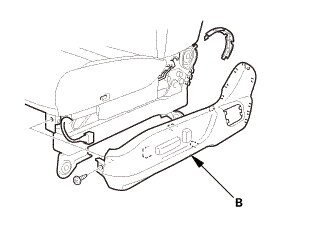
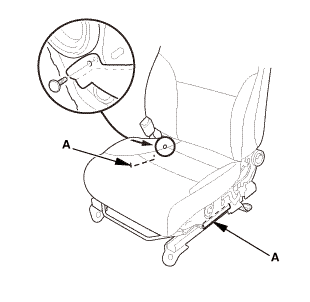
1.
|
Manual seat: Remove the recline knob (A).
|
|
2.
|
Remove the recline cover (B).
|
|
| 7. |
Front Seat Center Cover - Driver's Side |
|
Power seat
Manual seat

|
|
1.
|
Remove the center cover (A).
|
|
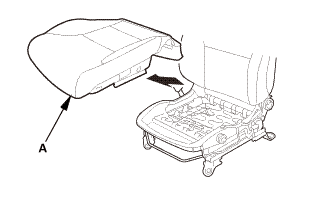
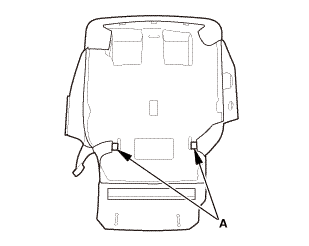
| 8. |
Front Seat Cushion - Driver's Side |
|
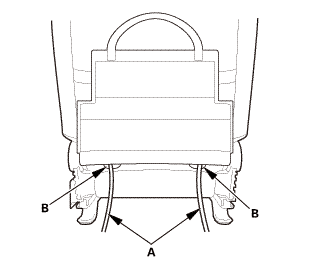
2-door, 4-door (power seat)

4-door (manual seat)

|
|
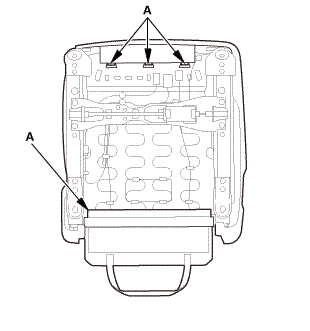
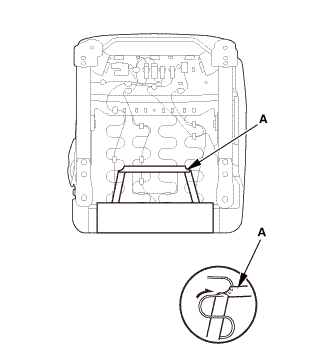
1.
|
Release the strap(s) (A).
|
|
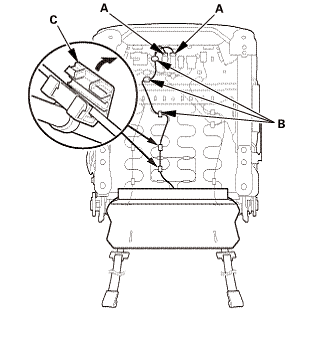
|
Power seat

Manual seat with seat heater
|
|
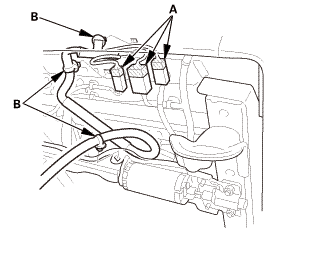
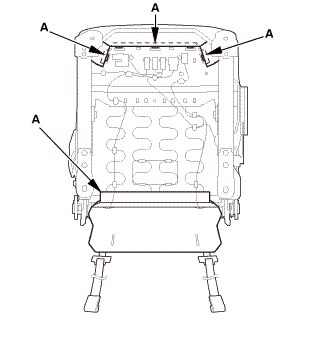
2.
|
With seat heater: Disconnect the connectors (A).
|
|
3.
|
With seat heater: Remove the clips (B).
|
|
4.
|
With seat heater: Remove the holders (C).
|
|
5.
|
Power seat: Disconnect the connectors (D).
|
|
6.
|
Power seat: Remove the clips (E) and the holders (F).
|
|
|
|
|
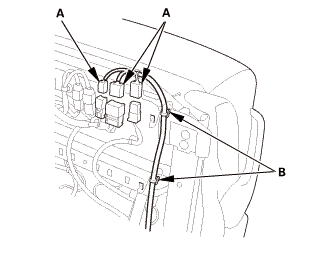
7.
|
Power seat: Pull out the harnesses (A) through the holes (B)
|
|
|

|
|
8.
|
Manual seat: Release the hook and loop fasteners (A).
|
|
|
Power seat
Manual seat
|
|
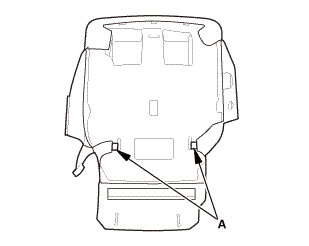
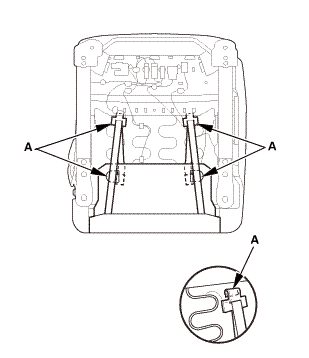
9.
|
Release the hook strips (A).
|
|
|
Power seat
Manual seat
|
|
10.
|
Release the hook strips (A).
|
|
|
|
|
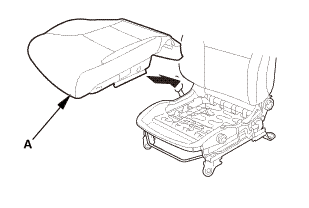
11.
|
Remove the seat cushion cover/pad (A).
|
|
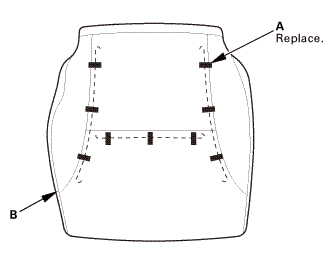
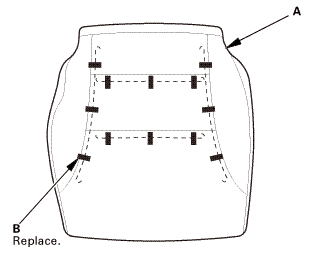
| 9. |
Front Seat Cushion Cover - Driver's Side |
|
|
|
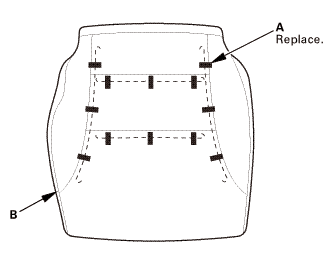
1.
|
Release the hooks (A).
|
|
|
Except Si (Fabric)
Except Si (Leather)
Si
|
|
2.
|
Remove the upholstery rings (A).
|
|
3.
|
Remove the seat cushion cover (B).
|
|
| 10. |
Seat Cushion Heater - Driver's Side |
|
|
|
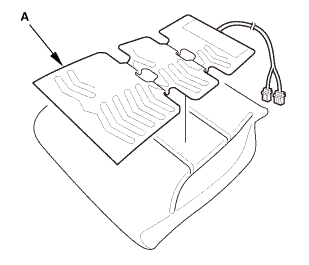
1.
|
Remove the seat cushion heater (A).
|
|
NOTE: The seat cushion heater is glued to the seat cushion pad.
When removing it, take care not to damage the seat cushion pad.
|
|

Installation
|
SRS components are located in this area. Review the SRS component locations
and the precautions and procedures before doing repairs or service.
|
| 1. |
Seat Cushion Heater - Driver's Side |
|
|
|
1.
|
Install the seat cushion heater (A).
|
|
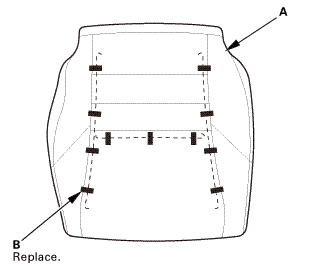
| 2. |
Front Seat Cushion Cover - Driver's Side |
|
|
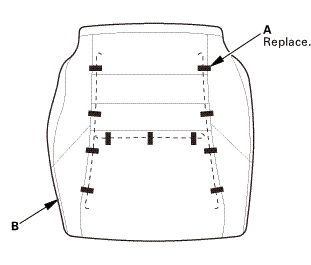
|
NOTE: Replace all of the upholstery rings (A) fastening the seat
cushion cover (B) to the pad wires (C) with new ones using commercially
available upholstery ring pliers (D).
|
|
|
Except Si (Fabric)
Except Si (Leather)
Si
|
|
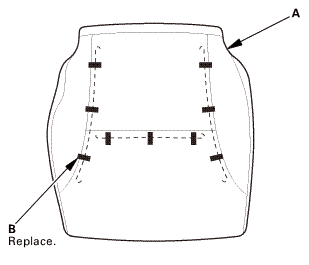
1.
|
Install the seat cushion cover (A) with the upholstery rings
(B).
|
|
|
|
|
2.
|
Install the hooks (A).
|
|
| 3. |
Front Seat Cushion - Driver's Side |
|
|
|
1.
|
Install the seat cushion cover/pad (A).
|
|
|
Power seat
Manual seat
|
|
2.
|
Install the hook strips (A).
|
|
|
Power seat
Manual seat
|
|
3.
|
Install the hook strips (A).
|
|
|
|
|
4.
|
Power seat: Install the harnesses (A) through the holes (B)
|
|
|
|
|
5.
|
Manual seat: Install the hook and loop fasteners (A).
|
|
|
Power seat
Manual seat with seat heater
|
|
6.
|
With seat heater: Connect the connectors (A).
|
|
7.
|
With seat heater: Install the clips (B).
|
|
8.
|
With seat heater: Install the holders (C).
|
|
9.
|
Power seat: Connect the connectors (D).
|
|
10.
|
Power seat: Install the clips (E) and the holders (F).
|
|
|
2-door, 4-door (power seat)
4-door (manual seat)
|
|
11.
|
Install the strap(s) (A).
|
|
| 4. |
Front Seat Center Cover - Driver's Side |
|
Power seat
Manual seat
|
|
1.
|
Install the center cover (A).
|
|
| 5. |
Front Seat Recline Cover - Driver's Side |
|
Power seat

Manual seat
|
|
1.
|
Install the recline cover (A).
|
|
2.
|
Manual seat: Install the recline knob (B).
|
|
| 6. |
Front Cover - Driver's Side |
|
|
|
1.
|
Power seat: Install the front cover (A).
|
|
| 7. |
Front Seat - Driver's Side |
|
Power seat
Manual seat
|
|
1.
|
Connect the connectors (A).
|
|
2.
|
Install the clips (B).
|
|
|
Front side
 mmu....in mmu....in
Rear side
|
|
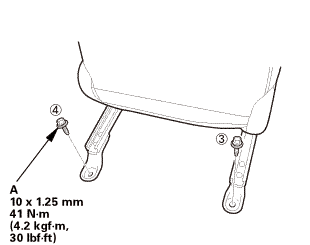
3.
|
Install the seat mounting bolts (A).
|
|
NOTE:
|
|

|
Tighten the bolts by hand first, then tighten
them to the specified torque.
|
|
|
|
Tighten the seat mounting bolts to the specified
torque in the sequence shown. Slide the seat all
the way back and tighten 1 and 2, then slide it
forward and tighten 3 and 4.
|
|
|
|
|
|
|
4.
|
Install both seat track end covers (A).
|
|
|
|
|
1.
|
Install the headrest restraint (A).
|
|
| 9. |
Front Seat Belt Lower Anchor Bolt - Driver's Side |
|
|
|
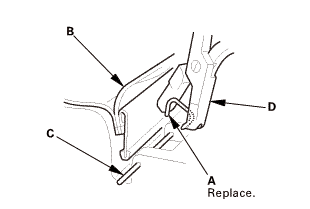
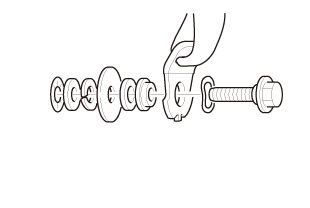
1.
|
Assemble the washer, the collar, and the bushing on the lower
anchor bolt as shown.
|
|
NOTE: Apply medium strength liquid thread lock to the lower anchor
bolt before reinstallation.
|
|
|
|
|
2.
|
Install the lower anchor bolt (A).
|
|
3.
|
Install the anchor cover (B).
|
|
|
 nmimm nmimm
|
|
1.
|
Install the lower anchor bolt (A).
|
|
|
|
|
2.
|
Install the anchor cover (A).
|
|
| 10. |
Battery Terminal (SRS) - Reconnection |
|
 (o.2ao.sam. (o.2ao.sam.
|
|
NOTE: If the battery performs abnormally, test the battery.
|
|
1.
|
Clean the battery terminals.
|
|
2.
|
Connect the positive cable (A) to the battery (B).
|
|
NOTE: Always connect the positive side first.
|
|
3.
|
Connect the negative cable and battery sensor (C) to the battery.
|
|
4.
|
Apply multipurpose grease to the terminals to prevent corrosion.
|
|
8531X9 LEFT
8531Y0 RIGHT
Removal
1.
Rear Seat-Back Release Cable - Disconnection/Reconnection
1.
Op ...
859122 LEFT FRONT
Removal
SRS components are located in this area. Review the SRS component locations
and the precautions and procedures before doing repairs or service.
...
See also:
Honda Civic Owners Manual. Phone Setup
To pair a cell phone (when there is no
phone paired to the system)
Select Phone.
Select Yes.
Make sure your phone is in search or
discoverable mode, then select Continue.
HFL automatically searches for a
Bluetooth device.
Select your phone w ...
 Rear Seat-Back Release Lever/Cable Removal and Installation
 Driver's Seat-Back Heater Removal and Installation