
Seat Ibiza (6F) 2017-2026 Owner's Manual: Changing the wiper rear wiper blades
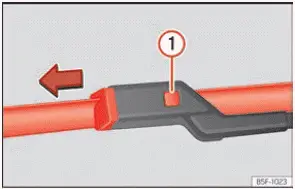
Fig. 150 Changing the windscreen wiper
blades
The windscreen wiper blades fitted to the Seat Ibiza are supplied with a graphite coating on the rubber wiping edges. This coating helps the blades move smoothly across the glass and reduces the noise produced during wiping. If the graphite layer becomes worn or damaged, the blades may no longer glide evenly over the windscreen. As a result, wiping can become noticeably louder, particularly when the blades move across a wet surface. The condition of this coating is therefore an important factor in the smooth and quiet operation of the wiper system.
Inspect the windscreen wiper blades regularly for signs of wear, deterioration, contamination or damage. Pay attention to the condition of the rubber edges and the quality of the wiping action. Blades that leave streaks, skip across the glass or fail to clear water evenly may require cleaning or replacement. Regular inspection is particularly important before periods of frequent rain or poor weather, when clear visibility depends heavily on the effectiveness of the wipers.
If the wiper blades scrape, judder or produce excessive noise while moving across the windscreen, first determine whether the problem is caused by dirt or physical damage. Blades that are contaminated with dust, road residue or other deposits should be cleaned carefully. If the rubber is worn, cracked, deformed or otherwise damaged, the affected blades should be replaced. Continuing to use defective blades may reduce visibility and can cause unnecessary wear to the glass surface.
If cleaning the blades or replacing damaged ones does not restore smooth wiping, the angle at which the wiper arms contact the windscreen may be incorrect. An unsuitable contact angle can prevent the rubber edge from moving properly across the glass and may cause noise, uneven wiping or vibration. Have the wiper arms inspected by a qualified specialist workshop and adjusted if necessary. Do not attempt to bend or reshape the arms without the appropriate knowledge and equipment, as incorrect adjustment can worsen the problem.
Damaged windscreen wiper blades should be replaced without delay. Worn or defective blades may fail to remove rainwater effectively and can significantly reduce visibility during adverse weather conditions. Replacement blades suitable for the Seat Ibiza are available from qualified specialist workshops. Select blades of the correct length and design to ensure that they fit the wiper arms properly and provide the intended wiping coverage.
Raising and lowering windscreen wiper arms
- Move the windscreen wipers into their designated service position before lifting the arms. Follow the procedure described above and confirm that the wipers have stopped in the correct position. This allows the arms to be raised without coming into contact with the bonnet.
- When lifting or lowering a wiper arm, hold it only at the blade attachment point. Avoid pulling directly on the rubber wiping edge or applying unnecessary force to the blade itself. Support the arm carefully throughout the movement to prevent it from snapping back against the windscreen.
Cleaning the windscreen wiper blades
- Raise the windscreen wiper arms carefully after placing them in the service position. Make sure the arms remain securely supported and do not allow them to fall back onto the glass while the blades are being cleaned.
- Use a soft, clean cloth to remove dust, dirt and other deposits from the wiping edges. Wipe the blades gently along their length without applying excessive pressure or using abrasive materials. Removing accumulated contamination can improve wiping performance and reduce noise.
- If the blades are heavily soiled, clean them with a soft sponge or a damp cloth. Work carefully to remove stubborn deposits without damaging the rubber or its graphite coating. Avoid aggressive cleaning products and allow the blades to rest correctly against the windscreen once cleaning is complete.
Changing the windscreen wiper blades
- Move the wipers into the service position, then lift and unfold the wiper arms away from the windscreen. Hold each arm securely while working to prevent accidental contact with the glass.
- Press and hold the release button identified as 1 in Fig. 150. While keeping the button depressed, gently pull the wiper blade in the direction indicated by the arrow until it disengages from the wiper arm. Do not twist the blade or force the attachment mechanism, as this may damage the connector.
- Fit a replacement wiper blade of the same length and design as the original. Slide the new blade onto the wiper arm attachment until it engages securely in its intended position. Check that the locking mechanism has seated correctly and that the blade cannot be pulled free unintentionally.
- Carefully lower the wiper arms back onto the windscreen. Make sure the rubber wiping edges rest properly against the glass and that the blades are correctly aligned. After both arms have been lowered, return the wipers to their normal parked position using the wiper control lever.
Changing the rear window wiper blade
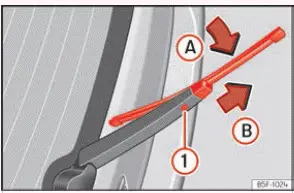
Fig. 151 Changing the rear wiper blade
- Carefully lift the rear window wiper arm away from the glass. Support the arm while working and avoid placing unnecessary force on the blade or its attachment mechanism. Ensure that the arm is held securely before attempting to remove the blade.
- Rotate the rear wiper blade slightly in the direction indicated by arrow A in Fig. 151. This movement positions the blade for removal from the attachment on the rear wiper arm. Rotate it only as far as necessary and do not force the joint.
- Press and hold release button 1 while gently pulling the blade in the direction indicated by arrow B. Continue the movement until the blade disengages from the wiper arm. Keep the arm supported throughout the procedure to prevent it from springing back against the rear window.
- Insert a new rear wiper blade of the same length and type into the wiper arm, moving it in the opposite direction to arrow B. Push the blade carefully into the attachment until button 1 clicks into place. Check that the blade is securely locked and correctly positioned before lowering the arm.
- Fold the rear wiper arm back towards the window and lower it gently until the blade rests against the glass. Make sure the rubber wiping edge is properly seated and that the blade can move freely across the rear window without obstruction.
WARNING Worn, damaged or dirty windscreen wiper blades can significantly reduce the driver's visibility, particularly during rain, snowfall or when road spray covers the glass. Blades that leave streaks, fail to clear water or move unevenly across the windscreen may prevent the driver from seeing other vehicles, pedestrians or hazards in time. Poor visibility increases the likelihood of an accident and can result in serious injuries. The wiper blades must therefore be kept in good condition and replaced whenever their cleaning performance becomes inadequate.
- Always replace windscreen wiper blades that are damaged, excessively worn or no longer capable of cleaning the glass effectively. Do not continue using blades that leave persistent streaks, skip across the windscreen or have deteriorated rubber edges. Fit replacement blades of the correct type and size for the Seat Ibiza to restore reliable wiping performance and maintain clear visibility.
NOTICE
- Dirty or damaged windscreen wiper blades can scratch the glass as they move across its surface. Hard particles trapped against the wiping edge or deteriorated blade components may damage the windscreen or rear window. Clean contaminated blades promptly and replace any blade that is no longer in suitable condition.
- Do not clean the wiper blades using solvent-based products, abrasive sponges or sharp objects. These materials can damage the graphite coating on the rubber wiping edges and may also harm the rubber itself. Once the coating is damaged, the blades may become noisy and their wiping performance may deteriorate. Use only a soft cloth or sponge and suitable gentle cleaning methods.
- Never use petrol, nail varnish remover, paint thinner or similar aggressive chemical products to clean the vehicle windows. Such substances may damage surrounding materials and components, including the rubber wiper blades. Use appropriate automotive glass-cleaning products instead of household solvents or fuel-based cleaners.
- In freezing conditions, always check whether the wiper blades are frozen to the windscreen or rear window before operating them. Activating the wipers while the blades are stuck to the glass can damage the rubber edges or overload the wiper mechanism. During cold weather, leaving the front wipers in their service position while the vehicle is parked may help when protecting the windscreen against ice, provided the arms are handled correctly and returned to their normal position before driving.
NOTICE
- To avoid damaging the bonnet or the windscreen wiper arms, raise the front wiper arms only after moving them into the designated service position. Attempting to lift the arms while they are in their normal parked position may cause them to strike the bonnet or place unnecessary stress on the wiper mechanism. Always use the correct procedure before cleaning or replacing the front wiper blades.
- Before driving the Seat Ibiza, always lower the wiper arms so that the blades rest correctly against the windscreen. Never operate the vehicle with the wiper arms raised. Once they have been lowered, use the wiper control lever to return the wipers to their normal parked position and ensure that they are ready for use.
 Wiper service position
Fig. 149 Wipers in service position.
Before moving or lifting the windscreen wiper arms, check that the blades are not frozen to the glass. In cold
weather, ice can hold the rubber wiping ...
 Jump start
Introduction
For technical reasons, the Seat Ibiza must not be started by towing or pushing the vehicle. Attempting to start
the engine in this way can damage vehicle components, particularly tho ...
See also:
Honda Civic Owners Manual. Manual transmission models
Shift Lever Operation
Fully depress the clutch pedal to operate the shift lever and change gears,
then
slowly release the pedal.
Depress the clutch pedal, and pause for a few seconds before shifting into R, or
shift into one of the forward gears for a moment. This stops the gears so they
d ...
