Honda Civic Service Manual: Trunk Lid Opener Cable/Fuel Fill Door Opener Cable Removal and Installation
(4-door except Natural Gas models)
823160

|
SRS components are located in this area. Review the SRS component
locations and the precautions and procedures before doing repairs
or service.
|
| 1. |
Front Door Sill Trim - 4-Door |
|
|
|
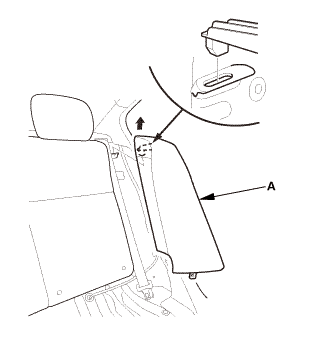
1.
|
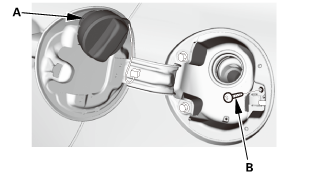
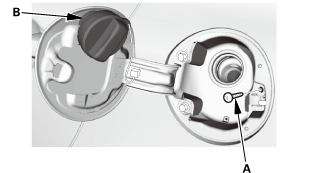
Remove the cap (A) from the front door sill trim (B).
|
|
2.
|
Remove the opener lock cylinder (C).
|
|
|
|
|
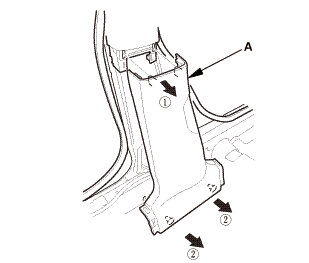
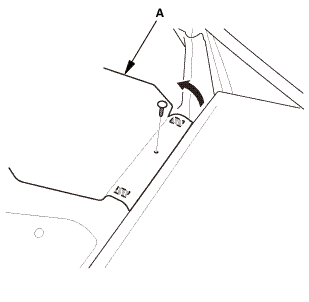
4.
|
Remove the front door sill trim (A).
|
|
| 2. |
Trunk Lid Opener/Fuel Fill Door Opener |
|
|
|
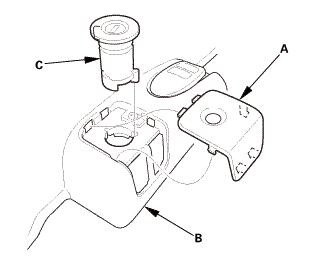
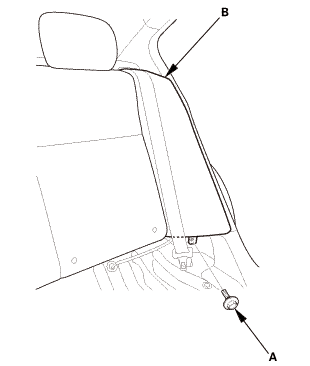
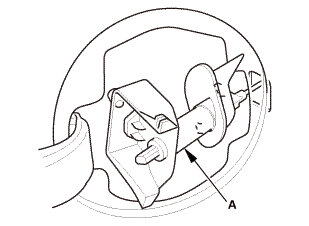
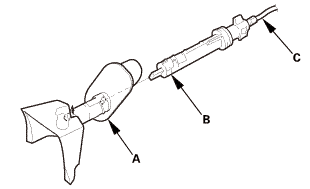
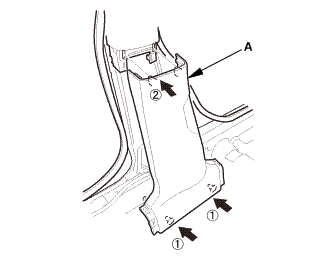
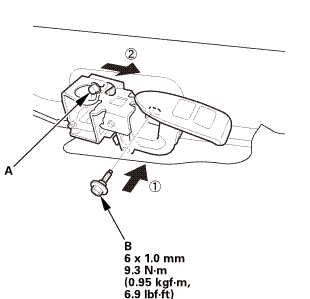
1.
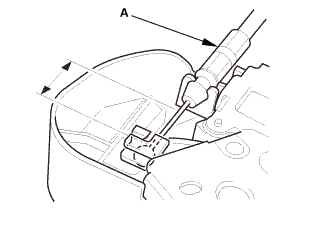
|
Loosen the opener mounting rear bolt (A).
|
|
2.
|
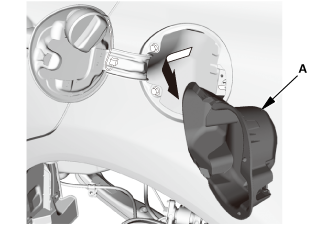
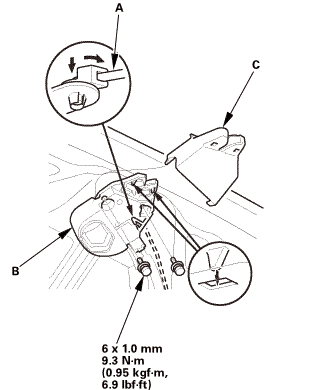
Remove the opener mounting front bolt (B), then remove
the trunk lid opener/fuel fill door opener (C).
|
|
|
|
|
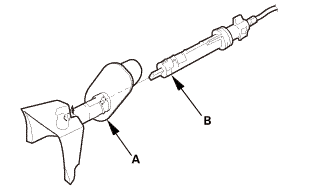
3.
|
Disconnect the trunk lid opener cable/fuel fill door
opener cable (A) from the opener.
|
|
|
|
|
1.
|
While pushing down on the rear seat cushion (A), pull
the seat hook handle (B) to release the hook (C).
|
|
2.
|
While pulling up the seat cushion, remove the rear door
sill trim (D).
|
|
| 4. |
Front and Rear Door Opening Seals as Needed |
|
Front
Rear
|
|
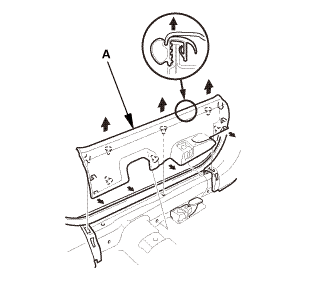
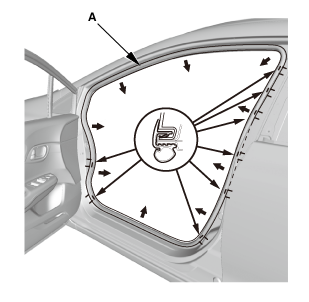
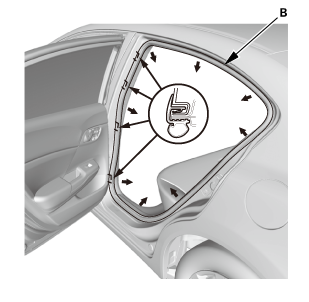
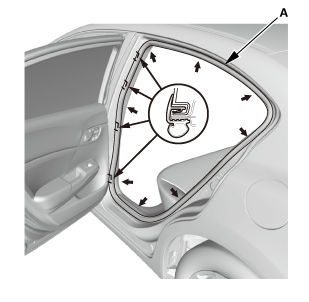
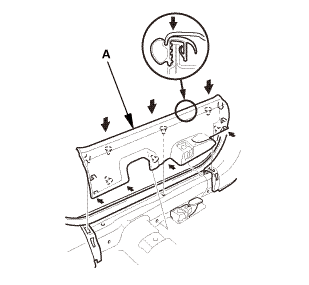
1.
|
Remove the front door opening seal (A) and the rear door
opening seal (B) as needed.
|
|
|
|
|
1.
|
Slide the front seat forward fully.
|
|
2.
|
13-14 Models (driver's side): Remove the B-pillar lower
cover (A).
|
|
|
12 Model
13-14 Models
|
|
3.
|
Remove the B-pillar lower trim (A).
|
|
|
|
|
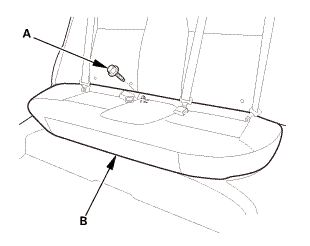
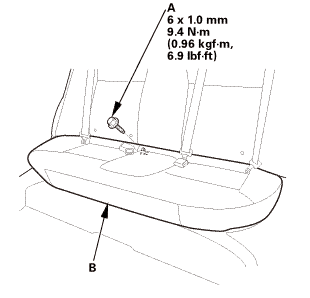
1.
|
Remove the bolt (A) securing the rear seat cushion (B).
|
|
|
|
|
2.
|
While pushing down the rear seat cushion (A), pull the
seat hook handles (B) to release the hooks (C).
|
|
3.
|
Remove the rear seat cushion.
|
|
| 7. |
Both Rear Seat Side Bolsters |
|
|
|
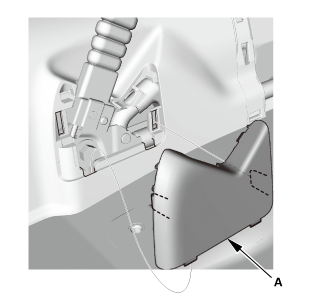
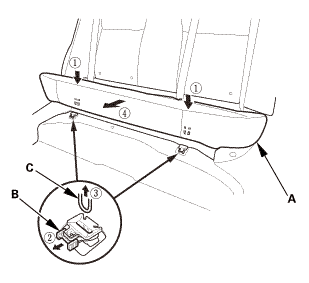
1.
|
Remove the bolt (A) securing the rear seat side bolster
(B).
|
|
2.
|
The left side is shown; repeat on the right side.
|
|
|
|
|
3.
|
Remove the rear seat side bolster (A).
|
|
4.
|
The left side is shown; repeat on the right side.
|
|
|
|
|
1.
|
Fold down the seat-back(s).
|
|
2.
|
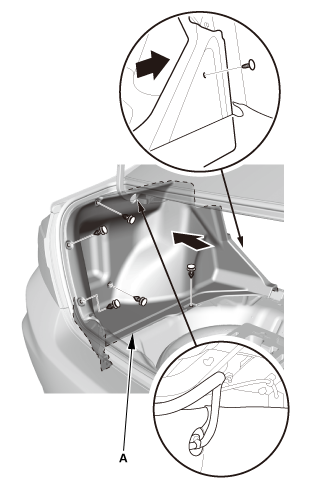
Remove the front area of the trunk floor cover (A).
|
|
|

|
|
3.
|
Remove the trunk floor cover (A).
|
|
| 9. |
Trunk Lid Weatherstrip as Needed |
|
|
|
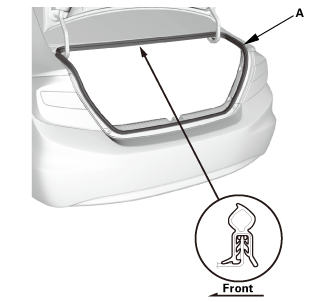
1.
|
Remove the trunk lid weatherstrip (A) as needed.
|
|
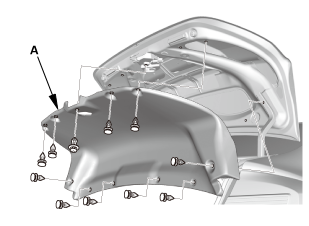
| 10. |
Trunk Rear Trim Panel |
|

|
|
1.
|
Remove the trunk rear trim panel (A).
|
|
| 11. |
Trunk Side Trim Panel |
|
|
|
1.
|
Remove the trunk side trim panel (A).
|
|
|
|
|
1.
|
For some models: Remove the trunk lid trim panel (A).
|
|
|
|
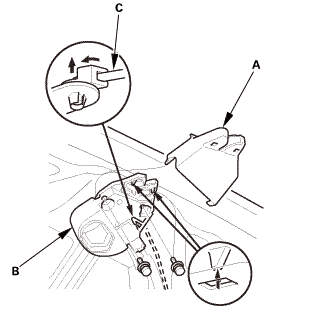
|
1.
|
Remove the latch cover (A).
|
|
2.
|
Remove the trunk lid latch (B).
|
|
3.
|
With trunk lid lock cylinder: Disconnect the cylinder
rod (C).
|
|
|

|
|
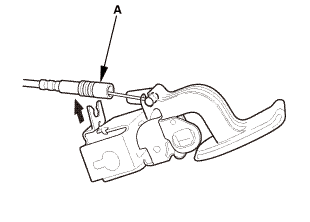
4.
|
Disconnect the trunk lid opener cable (A).
|
|
|
|
1.
|
Raise the vehicle on a lift, and make sure it is securely
supported.
|
|
|
|
|
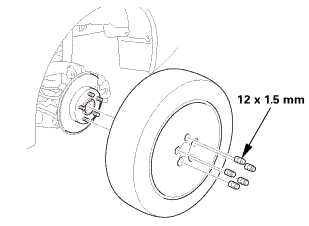
1.
|
Remove the rear wheel.
|
|
|

|
|
1.
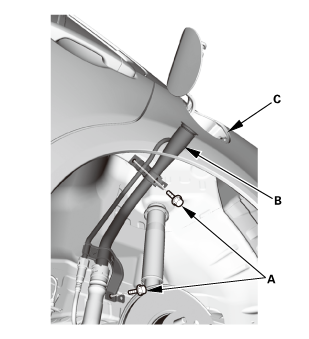
|
Remove the fuel pipe protector (A).
|
|
|
|
|
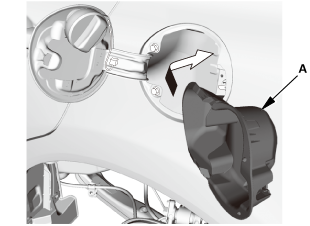
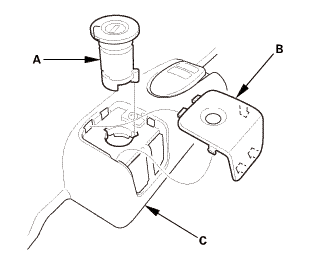
1.
|
Remove the fuel cap (A).
|
|
|
|
|
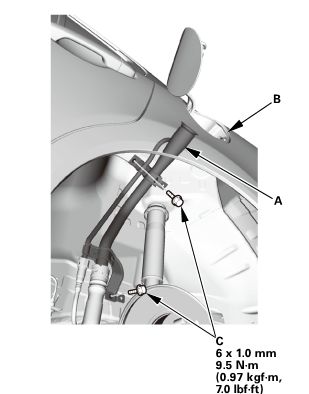
4.
|
Lower the fuel filler pipe (B), then remove it from the
fuel cap adapter (C).
|
|
|
|
|
5.
|
Turn the fuel cap adapter (A), then remove it.
|
|
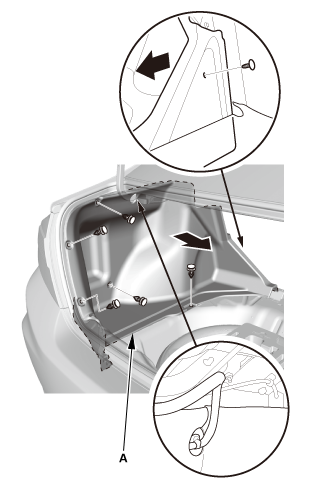
| 18. |
Trunk Lid/Fuel Fill Door Opener Cable |
|
|
|
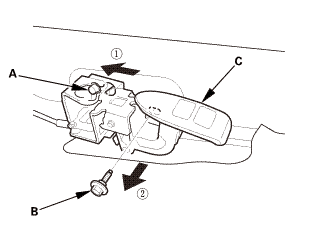
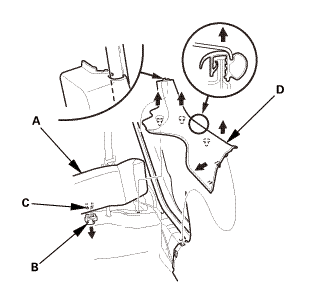
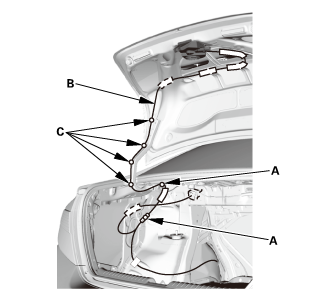
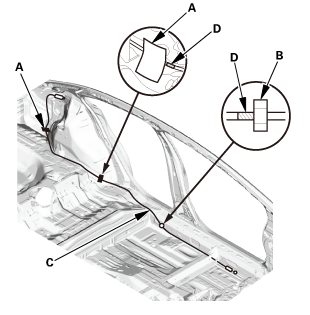
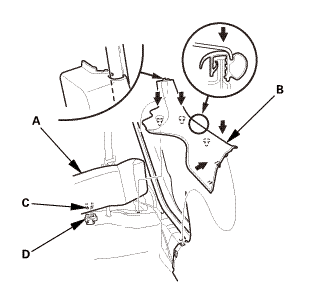
1.
|
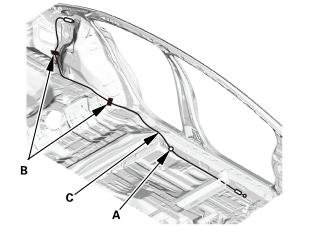
Remove the clip (A) and the cushion tapes (B) securing
the trunk lid opener cable/fuel fill door opener cable (C).
|
|
|
|
|
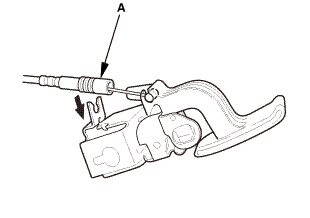
2.
|
Remove the grommet (A) from the body.
|
|
|
|
|
3.
|
Remove the grommet (A) from the fuel fill door latch
(B).
|
|
4.
|
Remove the fuel fill door opener cable (C) from inside
the body.
|
|
|
|
|
5.
|
Detach the clips (A), and release the trunk lid opener
cable/fuel fill door opener cable (B) from the clips (C),
then remove the cable from the vehicle.
|
|

|
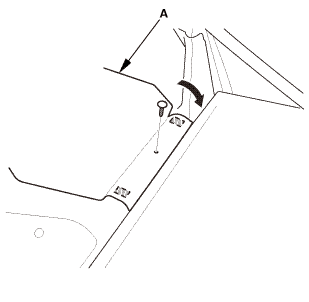
SRS components are located in this area. Review the SRS component
locations and the precautions and procedures before doing repairs
or service.
|
| 1. |
Trunk Lid/Fuel Fill Door Opener Cable |
|
|
|
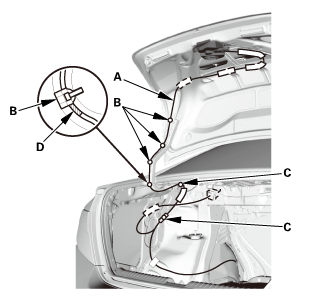
1.
|
Install the trunk lid opener cable/fuel fill door opener
cable (A) to the clips (B), and install the clips (C) securing
the cable.
|
|
NOTE: Align the marks (D) with the clips as shown.
|
|
|
|
|
2.
|
Install the grommet (A) to the fuel fill door latch (B).
|
|
|
|
|
3.
|
Install the grommet (A) to the body.
|
|
|
|
|
4.
|
Install the cushion tapes (A) and the clip (B) securing
the trunk lid opener cable/fuel fill door opener cable (C).
|
|
NOTE: Align the marks (D) with the cushion tapes and
the clip as shown.
|
|
|
|
|
1.
|
Install the fuel cap adapter (A) into place.
|
|
|
|
|
2.
|
Raise the fuel filler pipe (A), and install it to the
fuel cap adapter (B).
|
|
3.
|
Install the bolts (C).
|
|
|
|
|
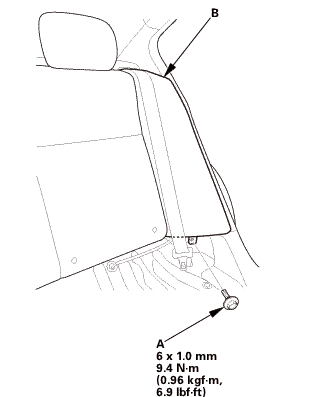
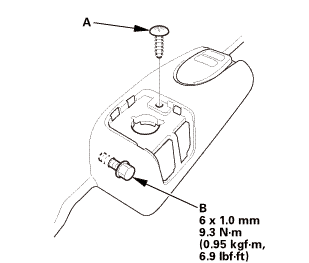
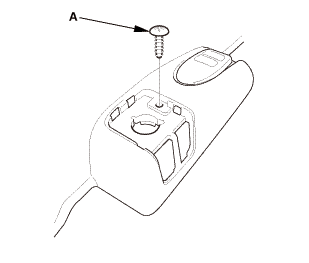
4.
|
Install the screw (A).
|
|
5.
|
Install the fuel cap (B).
|
|
|
|
|
1.
|
Install the fuel pipe protector (A).
|
|
|
 15mmumum 15mmumum
|
|
1.
|
Install the rear wheel.
|
|
NOTE: Before installing the wheel, clean the mating surfaces
between the brake disc or the brake drum and the inside
of the wheel.
|
|
|
|
|
NOTE: Fix the original position of the outer end of the
cable (A) on the trunk lid latch securely. And check the
trunk lid latch operation: Make sure the trunk lid latch
unlocks when pulling the trunk lid opener/fuel fill door
opener. If necessary, adjust the position of the cable end.
|
|
|
|
|
1.
|
Connect the trunk lid opener cable (A).
|
|
|
|
|
2.
|
With trunk lid lock cylinder: Connect the cylinder rod
(A).
|
|
3.
|
Install the trunk lid latch (B).
|
|
4.
|
Install the latch cover (C).
|
|
|

|
|
1.
|
For some models: Install the trunk lid trim panel (A).
|
|
|
|
|
1.
|
Install the trunk side trim panel (A).
|
|
|

|
|
1.
|
Install the trunk rear trim panel (A).
|
|
| 9. |
Trunk Lid Weatherstrip as Needed |
|
|
|
1.
|
Install the trunk lid weatherstrip (A).
|
|
|

|
|
1.
|
Install the trunk floor cover (A).
|
|
|
|
|
2.
|
Install the front area of the trunk floor cover (A).
|
|
3.
|
Raise the seat-back(s).
|
|
| 11. |
Both Rear Seat Side Bolsters |
|

|
|
1.
|
Install the rear seat side bolster (A).
|
|
2.
|
The left side is shown; repeat on the right side.
|
|
|
 mmmmlnss mmmmlnss
|
|
3.
|
Install the bolt (A) securing the rear seat side bolster
(B).
|
|
4.
|
The left side is shown; repeat on the right side.
|
|
|
|
|
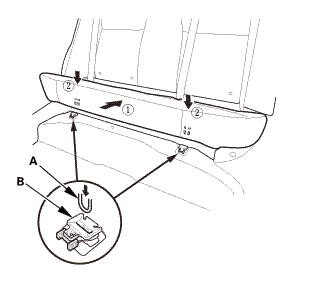
1.
|
Install the hooks (A) to the rear seat cushion clips
(B).
|
|
|
|
|
2.
|
Install the bolt (A) securing the rear seat cushion (B).
|
|
|
12 Model
13-14 Models
|
|
1.
|
Install the B-pillar lower trim (A).
|
|
|
|
|
2.
|
13-14 Models (driver's side): Install the B-pillar lower
cover (A).
|
|
| 14. |
Front and Rear Door Opening Seals as Needed |
|
Front

Rear
|
|
1.
|
Install the front door opening seal (A) and the rear
door opening seal (B).
|
|
|
|
|
1.
|
While pulling up the rear seat cushion (A), install the
rear door sill trim (B).
|
|
2.
|
Push down the seat cushion, then install the hook (C)
to the rear seat cushion clip (D).
|
|
| 16. |
Trunk Lid Opener/Fuel Fill Door Opener |
|
|
|
1.
|
Connect the trunk lid opener cable/fuel fill door opener
cable (A) to the opener.
|
|
|
|
|
2.
|
Install the opener mounting rear bolt (A) temporarily.
|
|
3.
|
Install the opener mounting front bolt (B).
|
|
|
|
|
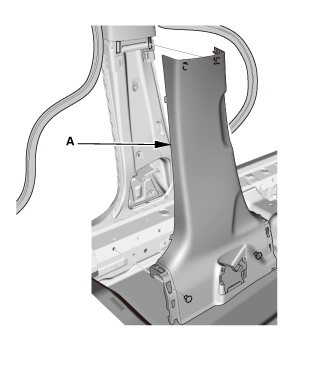
4.
|
Install the front door sill trim (A).
|
|
|
|
|
5.
|
Install the screw (A).
|
|
6.
|
Tighten the opener mounting rear bolt (B).
|
|
|
|
|
7.
|
Install the opener lock cylinder (A).
|
|
8.
|
Install the cap (B) to the front door sill trim (C).
|
|
1.
Vehicle Lift
1.
Raise the vehicle on a lift, and make sure it is securely
...
849110
Removal
1.
Front Door Sill Trim - 4-Door
1.
Remo ...
See also:
Honda Civic Owners Manual. Rear Seats
Folding Down the Rear Seats
1. Pull the release lever in the trunk to release
the lock.
2. Fold the seat-back down.
The rear seat-back(s*) can be folded down to
accommodate bulkier items in the trunk.
Never drive with the seat-back folded down and the
trunk lid open.
Exhaust Gas Ha ...
 Fuel Fill Door Switch Removal and Installation (Natural Gas models)
 Trunk Lid Opener/Fuel Fill Door Opener Removal and Installation