Honda Civic Service Manual: Rocker Arm Oil Pressure Switch Removal and Installation (K24Z7)
1101L0

Removal
|
|
|
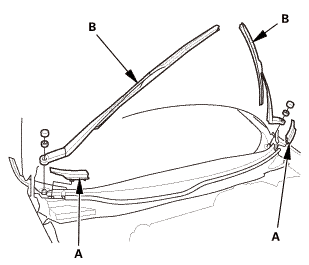
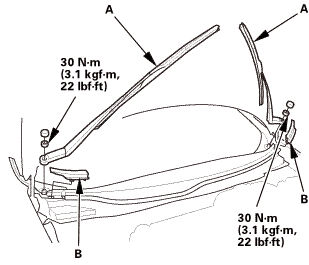
NOTE: Set the wiper arms to the auto-stop position before removal.
|
|
1.
|
Remove the cowl top wiper covers (A).
|
|
2.
|
Remove the wiper arms (B).
|
|
|
|
|
1.
|
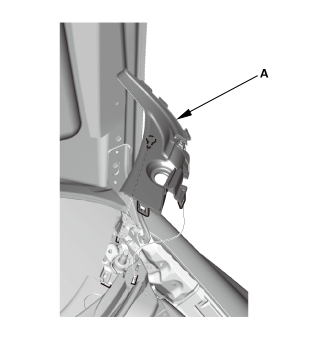
Remove the side cowl cover (A).
|
|
2.
|
The left side is shown; repeat on the right side.
|
|
|

|
|
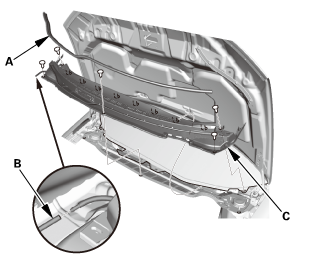
1.
|
Remove the center cowl cover (A).
|
|
2.
|
Disconnect the windshield washer tube (B).
|
|
3.
|
If necessary, remove the hood rear seal (C).
|
|
|

|
|
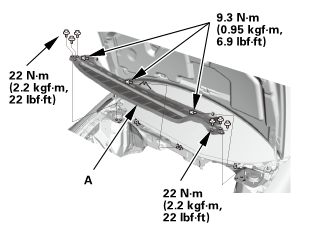
1.
|
Remove the under cowl panel (A).
|
|
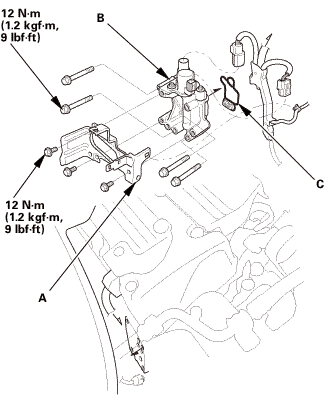
| 5. |
Rocker Arm Oil Control Valve |
|

|
|
1.
|
Remove the rocker arm oil control valve assembly (A) and the
rocker arm oil control valve filter (B).
|
|
2.
|
Remove the engine wire harness bracket (C).
|
|
| 6. |
Rocker Arm Oil Pressure Switch |
|
|
|
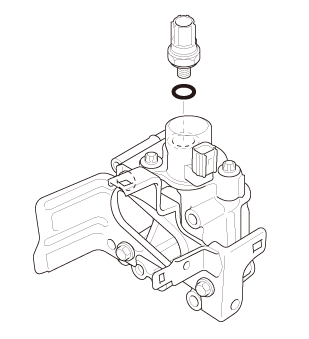
1.
|
Remove the rocker arm oil pressure switch.
|
|

Installation
| 1. |
Rocker Arm Oil Pressure Switch |
|
|
|
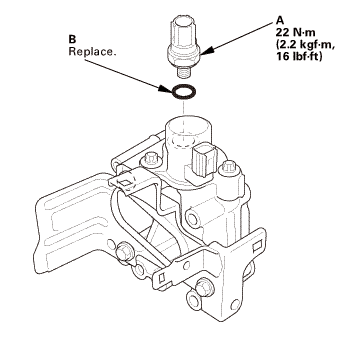
1.
|
Install the rocker arm oil pressure switch (A) with a new O-ring
(B).
|
|
| 2. |
Rocker Arm Oil Control Valve |
|
|
|
1.
|
Install the engine wire harness bracket (A).
|
|
2.
|
Install the rocker arm oil control valve assembly (B) and the
rocker arm oil control valve filter (C).
|
|
|
 22mm)2222 22mm)2222
|
|
1.
|
Install the under cowl panel (A).
|
|
|
|
|
1.
|
If necessary, install the hood rear seal (A).
|
|
2.
|
Connect the windshield washer tube (B).
|
|
3.
|
Install the center cowl cover (C).
|
|
|
|
|
1.
|
Install the side cowl cover (A).
|
|
2.
|
The left side is shown; repeat on the right side.
|
|
|
 1.122 1.122
|
|
NOTE: Set the wiper arms to the auto-stop position before installation.
|
|
1.
|
Install the wiper arms (A).
|
|
2.
|
Install the cowl top wiper covers (B).
|
|
1211K2
1.
EOP Sensor
1.
Remove the bracket (A) and the EOP sensor (B).
1 ...
1.
Air Cleaner Assembly
1.
Disconnect the intake air duct (A) and the intake air pipe (B).
...
See also:
Honda Civic Owners Manual. Brake/Clutch* Fluid
Specified fluid: Honda Heavy Duty Brake Fluid DOT 3
Use the same fluid for both the brakes and clutch.
Checking the Brake Fluid
The fluid level should be between the MIN
and MAX marks on the side of the reserve
tank.
Manual transmission models
The brake fluid reserve tank is also used for ...
 Rocker Arm Oil Pressure Sensor (EOP Sensor) Removal and Installation (Except
K24Z7 and R18Z1 (CVT))
Rocker Arm Oil Pressure Sensor (EOP Sensor) Removal and Installation (Except
K24Z7 and R18Z1 (CVT)) VTC Actuator Inspection (K24Z7)