Honda Civic Service Manual: Shift Solenoid Valve Removal and Installation (A/T)

|
NOTE: Do not hold the shift solenoid valve connector to remove the shift
solenoid valves. Be sure to hold the shift solenoid valve body.
|
|
|
1.
|
Raise the vehicle on a lift, and make sure it is securely supported.
|
|
|
|
|
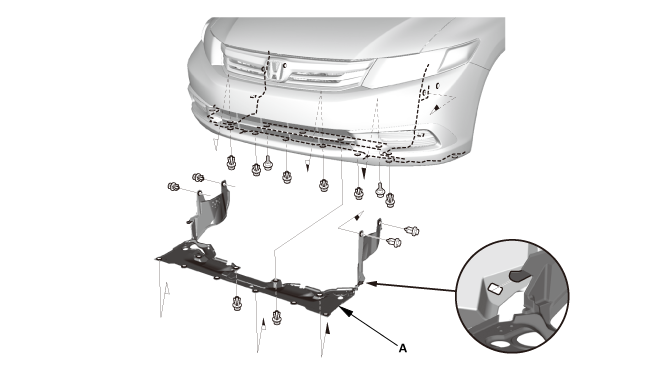
1.
|
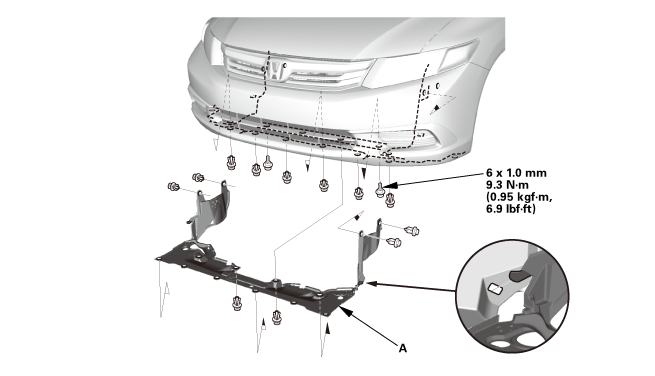
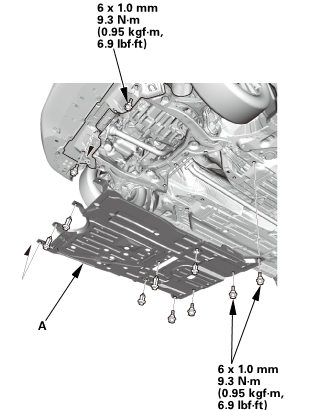
Remove the engine undercover (A).
|
|
|
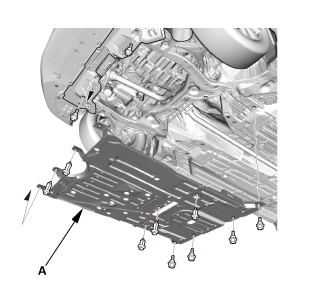
1.
|
Remove the splash shield (A).
|
|
 (somn) (somn)
|
|
1.
|
Remove the drain plug (A), and drain the ATF.
|
|
2.
|
Reinstall the drain plug using a new sealing washer (B).
|
|
|
|
|
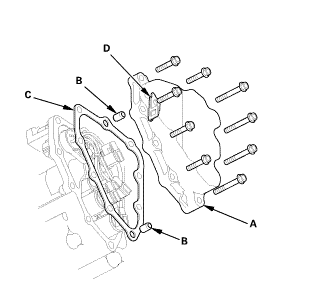
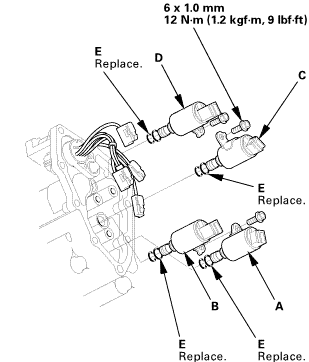
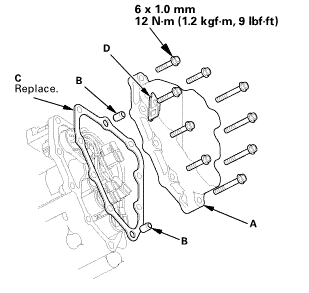
1.
|
Remove the shift solenoid valve cover (A) with the dowel pins
(B), the gasket (C), and the clamp bracket (D).
|
|
|
|
|
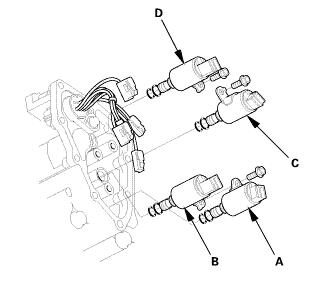
1.
|
Disconnect the shift solenoid valve connectors:
|
|

|
BLU wire from shift solenoid valve A.
|
|
|
|
ORN, WHT, and WHT wires from shift solenoid valve
B.
|
|
|
|
GRN wire from shift solenoid valve C.
|
|
|
|
YEL wire from shift solenoid valve D.
|
|
|
|
2.
|
Remove shift solenoid valves A, B, C, and D by holding the shift
solenoid valve body.
|
|
NOTE: Do not hold the connector to remove the shift solenoid
valves.
|
|

|
NOTE: Do not hold the shift solenoid valve connector to install the shift
solenoid valves. Be sure to hold the shift solenoid valve body.
|
|
|
|
1.
|
Install new O-rings (two O-rings per solenoid valve) (E) on the
shift solenoid valve.
|
|
NOTE: A new solenoid valve comes with new O-rings. If you install
a new solenoid valve, use the O-rings provided on it.
|
|
2.
|
Install shift solenoid valve D (black connector) by holding the
shift solenoid valve body; be sure to install the mounting bracket
contacts to the servo body.
|
|
3.
|
Install shift solenoid valve C (brown connector) by holding the
shift solenoid valve body; be sure that the mounting bracket contacts
the servo body.
|
|
4.
|
Install shift solenoid valve B (black connector) by holding the
shift solenoid valve body; be sure that the mounting bracket contacts
to the servo body.
|
|
5.
|
Install shift solenoid valve A (brown connector) by holding the
shift solenoid valve body; be sure that the mounting bracket contacts
to the bracket of shift solenoid valve B.
|
|
NOTE: Do not install shift solenoid valve A before installing
shift solenoid valve B. If shift solenoid valve A is installed before
installing shift solenoid valve B, it may damage to hydraulic control
system.
|
|
6.
|
Connect the shift solenoid valve connectors:
|
|
|
BLU wire to shift solenoid valve A.
|
|
|
|
ORN, WHT, and WHT wires to shift solenoid valve
B.
|
|
|
|
GRN wire to shift solenoid valve C.
|
|
|
|
YEL wire to shift solenoid valve D.
|
|
|
|
|
 inmm inmm
|
|
1.
|
Install the shift solenoid valve cover (A) with the dowel pins
(B), a new gasket (C), and the clamp bracket (D).
|
|
|
|
|
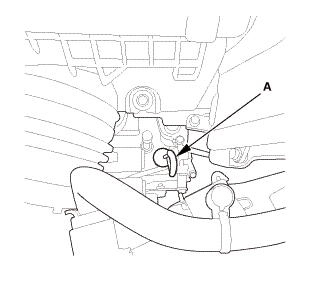
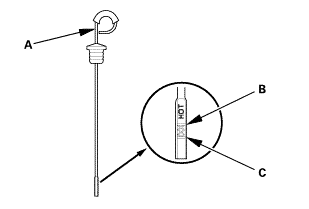
1.
|
Remove the ATF dipstick (yellow loop) (A), and wipe it with a
clean cloth.
|
|
|
2.
|
Refill the transmission with the recommended fluid into the dipstick
hole (A) to bring the fluid level between the upper mark and the lower mark
of the dipstick. Always use Honda automatic transmission fluid (ATF) ATF
DW-1. Using a non-Honda ATF can affect shift quality.
|
|
|
Automatic Transmission Fluid Capacity:
|
|
2.4 L (2.5 US qt) at change
|
|
5.75 L (6.08 US qt) at overhaul
|
|
|
|
|
|
|
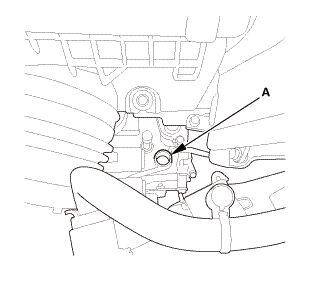
3.
|
Insert the ATF dipstick (A) back into the dipstick hole.
|
|
5.
|
Make sure the fluid level is between the upper mark (B) and the
lower mark (C) on the dipstick.
|
|
6.
|
Insert the dipstick back into the dipstick hole.
|
|
|
1.
|
Install the splash shield (A).
|
|
|
|
1.
|
Install the engine undercover (A).
|
|
| 6. |
Maintenance Minder Reset |
|
|
1.
|
After doing all procedures, select the individual maintenance
item you wish to reset with the HDS..
|
|
2321H3
1.
Vehicle Lift
1.
Raise the vehicle on a lift, and make sure it is securely supported.
...
7371J4
1.
Vehicle Lift
1.
Raise the vehicle on a lift, and make sure it is securely supported.
...
See also:
Honda Civic Owners Manual. HFL Menus
The ignition switch must be in ACCESSORY (q or ON (w*1 to use HFL.
Phone settings screen
*1: Models with the smart entry system have an ENGINE START/STOP button
instead of an
ignition switch.
HFL Menus
To use HFL, you must first pair your Bluetoothcompatible
cell phon ...
 Transmission End Cover Selector Control Shaft Oil Seal Replacement (A/T)
 Shift Solenoid Wire Harness Removal and Installation (A/T)