Honda Civic manuals

Honda Civic Service Manual: SD Module Removal and Installation ('13)

Honda Civic Service Manual / Accessories / Personal Communications / SD Module Removal and Installation ('13)

1. Dashboard Center Pocket

1.

Remove the screws (A).


2.

Remove the dashboard center pocket (A).


2. Audio-Navigation Unit Assembly

NOTE:

Lay a workshop towel under the parts when working on them to protect the face panel from scratches or other damage.

Do not work in a dusty or dirty place.

Discharge static electricity from your body before and during the work.

Do not touch the circuit board(s) with your bare hands.

Do not work with dirty hands.

Do not touch the terminal connector of the flat plate cable with your bare hands (If you have touched it, wipe it off thoroughly.).

Eject the disc before removing the audio-navigation unit to prevent damaging the CD player's load mechanism.

If you are replacing the audio-navigation unit, write down the audio presets (if possible), then enter them into the new audio-navigation unit.

When the audio-navigation unit is replaced or disconnected, do the Map Matching. This part of the initialization matches the GPS coordinates with a road on the map screen. To do this part of the procedure, make sure that the navigation system displays a map, and drive the vehicle on a mapped road shown on the map screen. Do not enter a destination at this time. When the name of the current road you are driving on appears at the bottom of the screen, the entire procedure is complete.


1.

Remove the bolts (A).


2.

Disconnect the connectors, then pull out the audio-navigation unit assembly (A).


3. SD Module

NOTE:

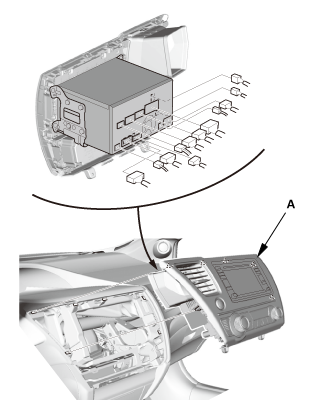
The audio-navigation unit and SD module are mated and cannot be substituted separately. If you need to substitute a known-good unit for testing, substitute a complete known-good audio-navigation unit and SD module.

Check any official Honda service website for more service information about the navigation system.

Static electricity can damage the SD module. Always follow proper handling procedures.

Always use the anti-static mat (ESD) and wrist strap when removing the SD module. Before you open the audio-navigation unit or handle the replacement SD module, attach the wrist strap around one of your wrists, and attach the alligator clip to the ESD mat.

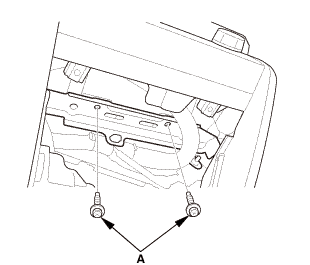
Make sure you use the screws in the same holes. The SD module can be damaged if the wrong screws are used.

You do not have to peel off the plastic cover to remove the screws or the SD module.

Do not force the SD module. If it does not slide in smoothly, check the alignment of the SD module and the pins. If the pins are bent, replace the SD module.

Make sure the SD module screws are not loose. If they are, the SD module can be damaged.

Handle the SD module by its edges. Do not touch the pins.


1.

Remove the passenger's side bracket (A).


2.

Remove the SD module (A).


1. SD Module

1.

Install the SD module (A).


NOTE: Make sure the SD module is properly aligned when installing the SD module.


2.

Install the passenger's side bracket (A).


2. Audio-Navigation Unit Assembly

1.

Connect the connectors, then install the audio-navigation unit (A).


NOTE: Make sure all the connectors and the antenna lead are secure.


mm3.72.7

2.

Install the bolts (A).


3. Dashboard Center Pocket

1.

Install the dashboard center pocket (A).


2.

Install the screws (A).


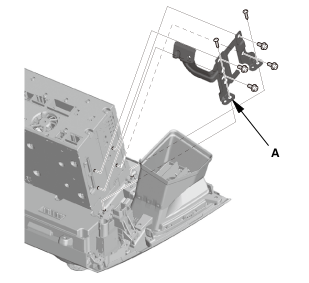
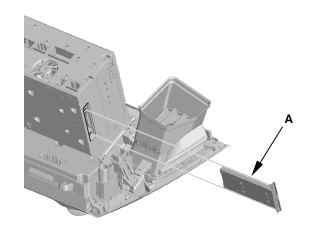
HandsFreeLink Control Unit Removal and Installation
0521B3 Removal NOTE: SRS components are located in this area. Review the SRS component locations and the pre ...

Security & Keyless Entry
...

See also:

Honda Civic Owners Manual. Refueling
Refueling From a Portable Fuel Container If you have run out of fuel and need to refuel your vehicle from a portable fuel container, use the funnel provided with your vehicle.  Turn off the engine.  Press on the edge of the fuel fill door to make it pop up slightly. υ ...

© 2016-2024 Copyright www.hocivic.com

0.0251