Honda Civic manuals

Honda Civic Service Manual: Piston, Ring, Pin, and Connecting Rod Removal and Installation (R18Z1)

Honda Civic Service Manual / Powertrain / Engine / Engine Block / Cylinder Block / Piston, Ring, Pin, and Connecting Rod Removal and Installation (R18Z1)

Removal

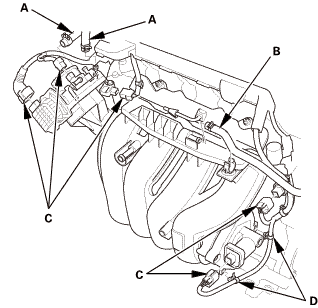
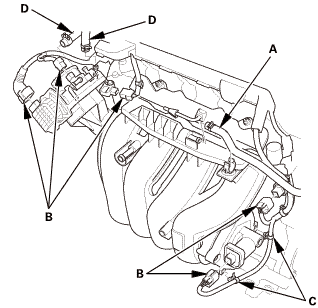
1. Intake Manifold and Throttle Body Assembly

1.

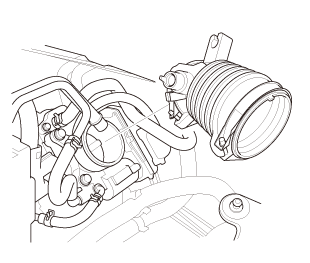
Remove the intake air duct.


2.

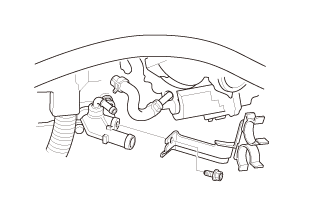
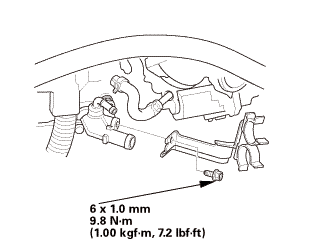
Remove the heater hose clamp bracket.


3.

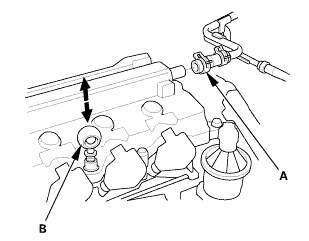
Disconnect the water bypass hoses (A).


4.

Disconnect the PCV hose (B).


5.

Disconnect the connectors (C).


6.

Remove the harness clamps (D).


7.

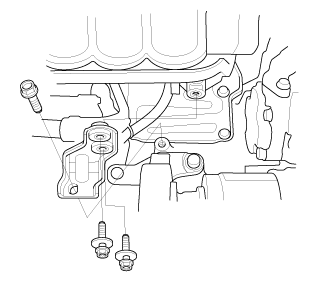
Remove the intake manifold bracket.


8.

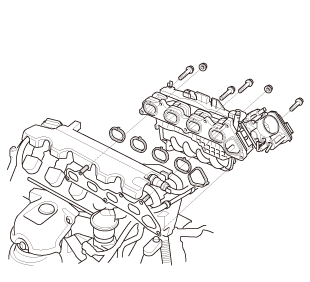
Remove the intake manifold and throttle body assembly from the cylinder head.


2. Engine Wire Harness

1.

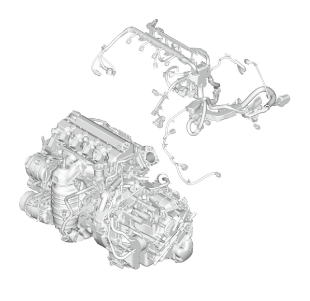
Remove the engine wire harness.


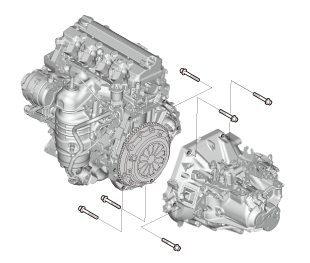
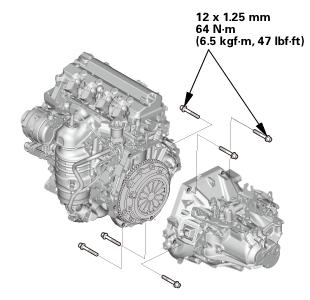
3. Manual Transmission Assembly (M/T)

1.

Remove the manual transmission.


4. Pressure Plate


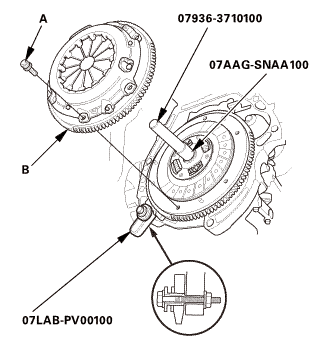
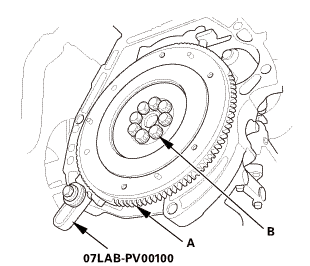
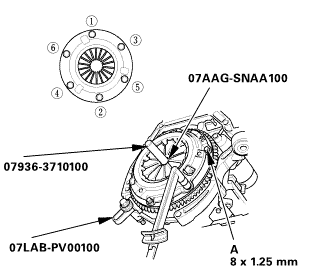
1.

Install the ring gear holder.


2.

Install the clutch alignment shaft and the remover handle.


3.

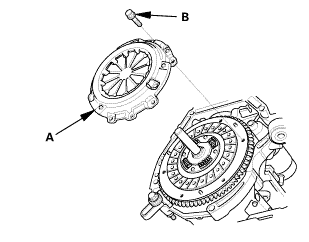
To prevent warping, loosen the pressure plate mounting bolts (A) in a crisscross pattern in several steps.


4.

Remove the pressure plate (B).


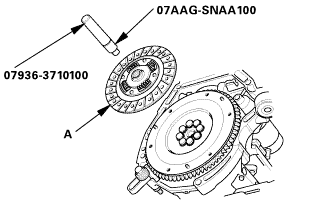
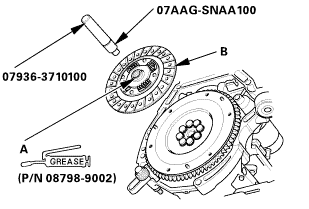
5. Clutch Disc

1.

Remove the clutch disc (A), the clutch alignment shaft, and the remover handle.


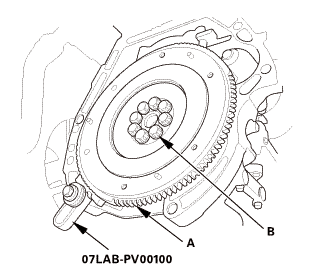
6. Flywheel

n7lab-wnolun


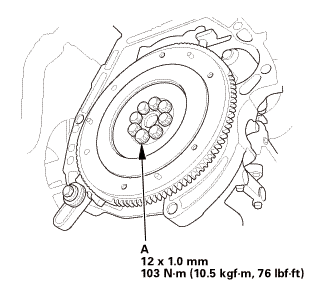
1.

Remove the flywheel (A).


NOTE: Loosen the flywheel mounting bolts (B) in a crisscross pattern in several steps.


2.

Remove the ring gear holder.


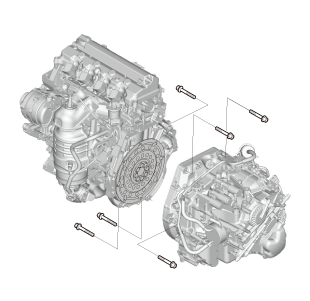
7. Automatic Transmission Assembly (A/T)

1.

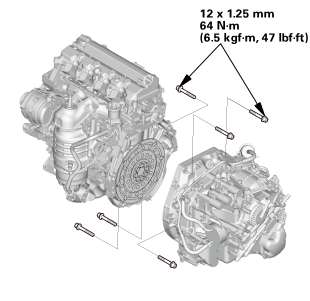
Remove the automatic transmission.


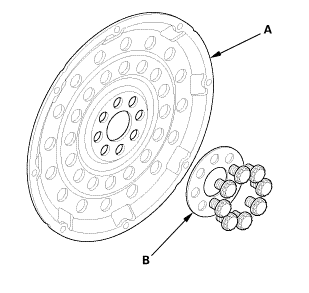
8. Drive Plate Assembly

1.

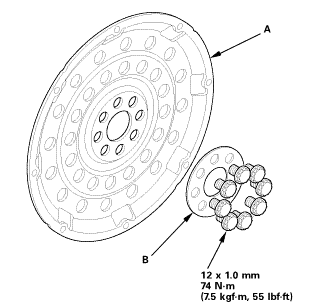
Remove the drive plate (A) and the washer (B).


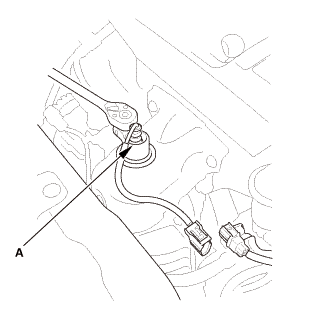
9. A/F Sensor (Sensor 1)


1.

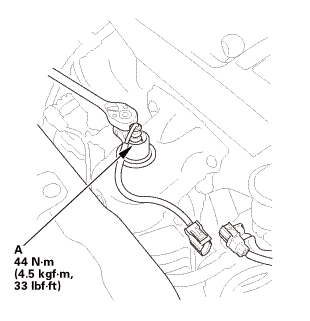
Disconnect the connector.


2.

Remove the A/F sensor (A).


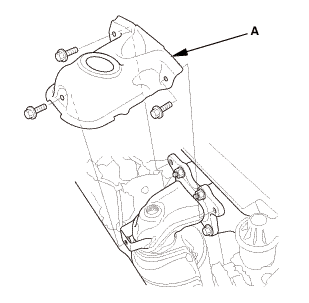
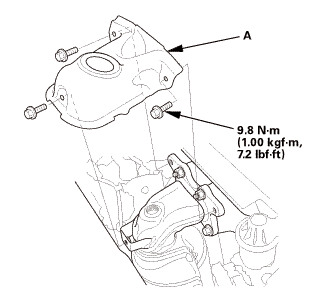
10. Exhaust Chamber Cover

1.

Remove the exhaust chamber cover (A).


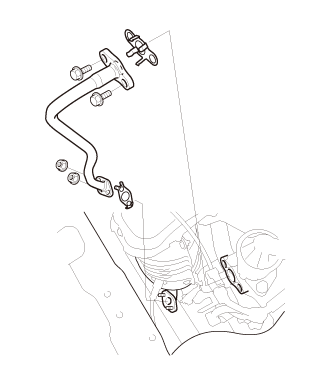
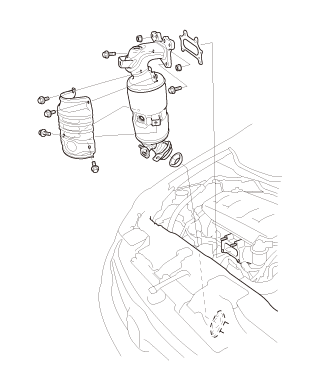
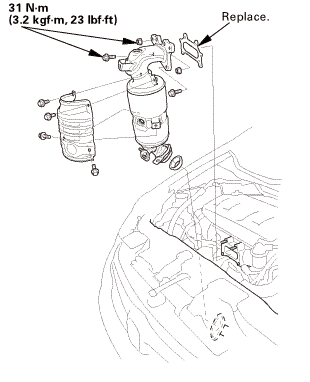
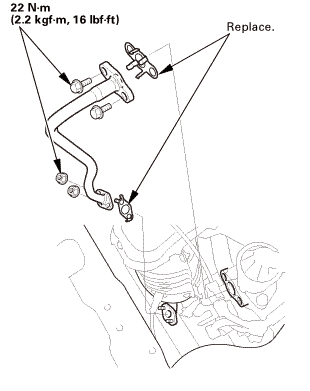
11. Catalytic Converter and EGR Pipe Assembly

1.

Remove the EGR pipe.


2.

Remove the catalytic converter.


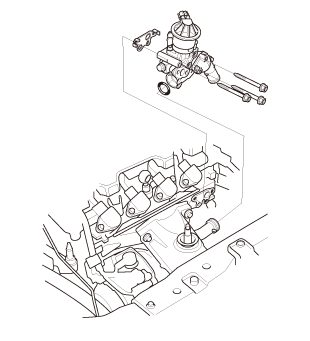
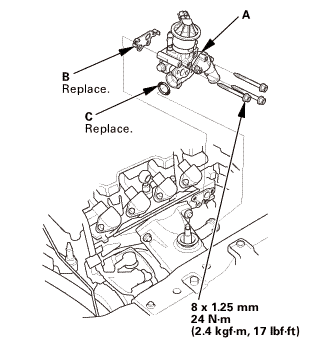
12. Thermostat Housing

1.

Remove the thermostat housing.


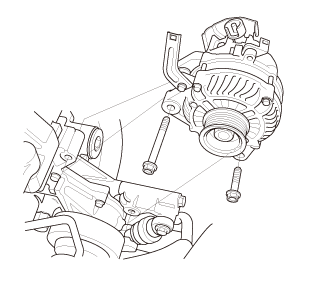
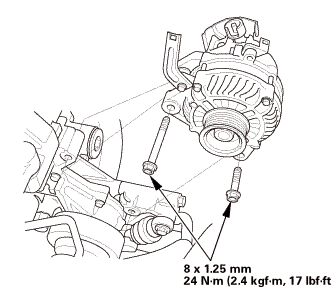
13. Alternator

1.

Remove the alternator.


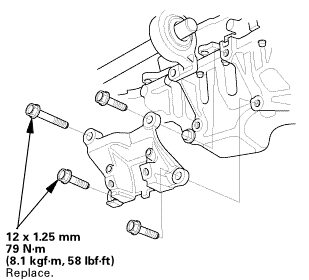
14. Lower Torque Rod Bracket (M/T)

1.

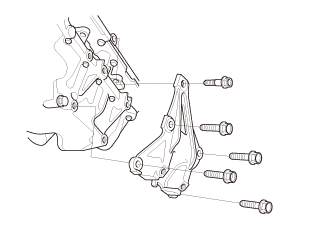
Remove the lower torque rod bracket.


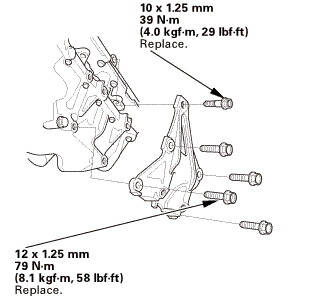
15. Lower Torque Rod Bracket (A/T)

1.

Remove the lower torque rod bracket.


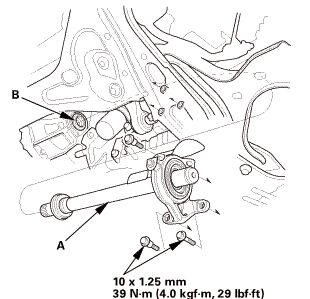
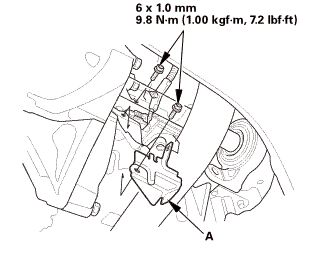
16. Intermediate Shaft Assembly

1.

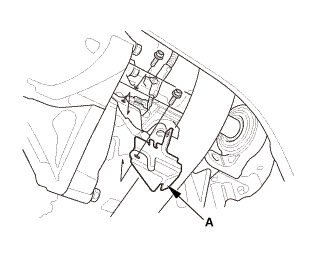
Remove the crankshaft position (CKP) sensor cover (A).


2.

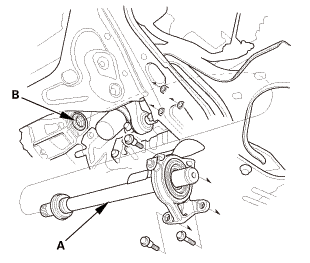
Remove the intermediate shaft (A) from the differential.


NOTE: Hold the intermediate shaft horizontal until it is clear of the differential to prevent damaging the oil seal (B).


17. A/C Compressor Bracket

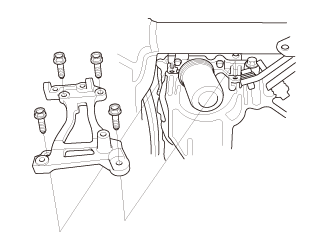
1.

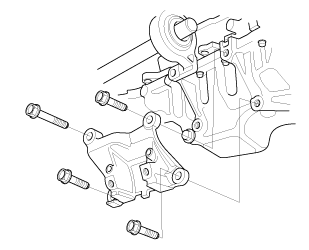
Remove the A/C compressor bracket.


18. Water Pump Pulley

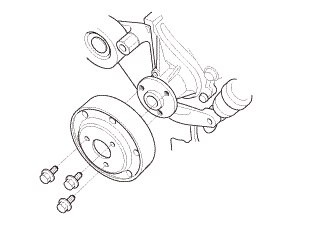
1.

Remove the water pump pulley.


19. Auto Tensioner Assembly


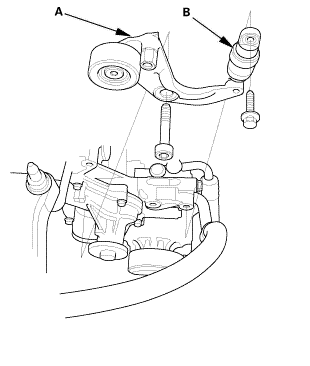
1.

Remove the drive belt auto-tensioner (A).


2.

Check for oil leaks from the drive belt auto-tensioner damper (B) and check for damage to the damper rubber.


20. Cylinder Head Cover and/or Packing


1.

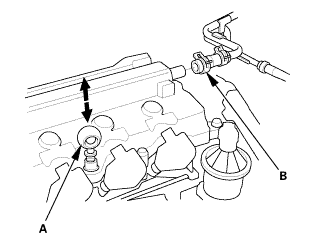
Remove the dipstick (A).


2.

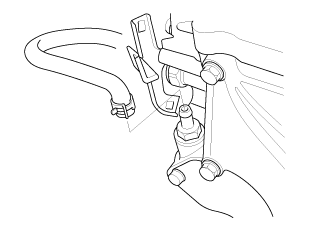
Disconnect the breather hose (B).


3.

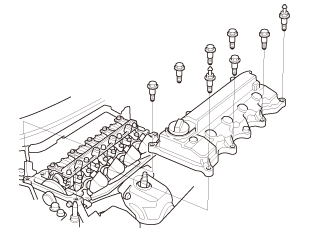
Remove the cylinder head cover.


21. Check The No.1 Piston at Top Dead Center (With Cam Chain Case/Oil Pump)

1.

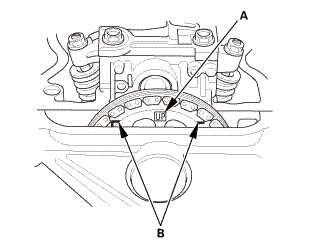
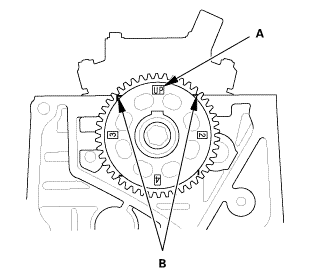
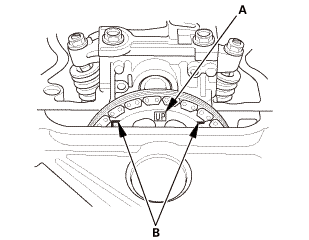
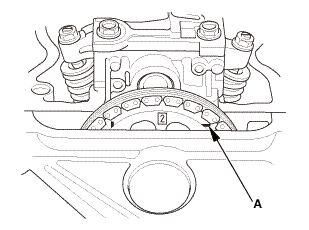
Set the No. 1 piston at top dead center (TDC). The ‘‘UP’’ mark (A) on the camshaft sprocket should be at the top, and the TDC grooves (B) on the camshaft sprocket should line up with the top edge of the head.


22. Crankshaft Pulley

[av


1.

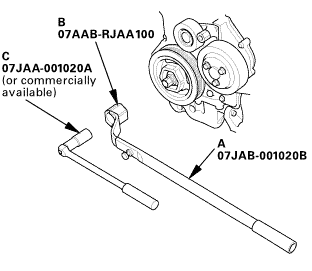
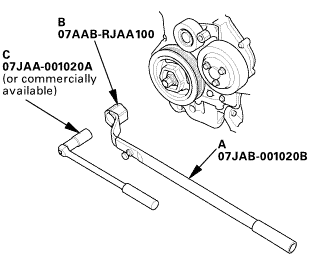
Hold the pulley with the holder handle (A) and the crankshaft pulley holder (B).


2.

Remove the bolt with a socket, 19 mm (C) and a breaker bar.


3.

Remove the crankshaft pulley.


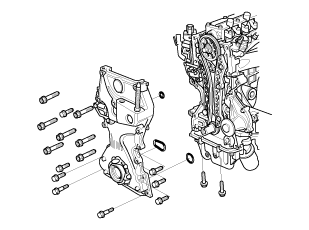
23. Engine Oil Pump Assembly

1.

Disconnect the PCV hose.


2.

Remove the oil pump.


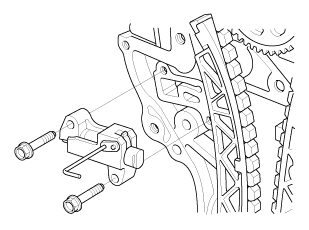
24. Cam Chain Auto-Tensioner

1.

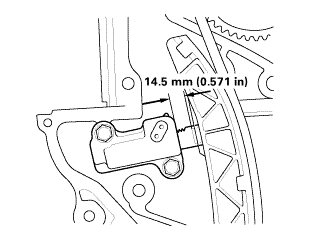
Measure the tensioner rod length between the tensioner body and bottom of the flat surface section on the tensioner rod. If the length is more than the service limit, replace the cam chain.


Tensioner Rod Length

Service Limit:

14.5 mm (0.571 in)


2.

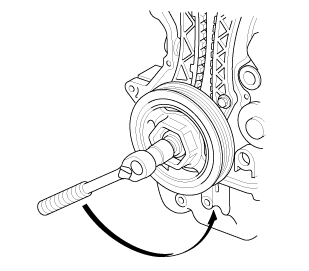
Loosely install the crankshaft pulley.


3.

Turn the crankshaft counterclockwise to compress the auto-tensioner.


4.

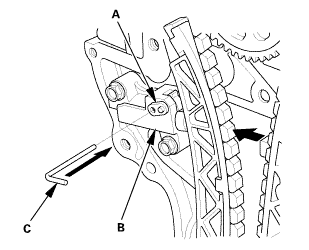
Rotate the crankshaft counterclockwise to align the holes on the lock (A) and the auto-tensioner (B).


5.

Insert a 1.0 mm (1/32 in) diameter pin (C) into the holes.


6.

Turn the crankshaft clockwise to secure the pin.


NOTE: If the holes in the lock and the auto-tensioner do not align, continue to rotating the crankshaft counterclockwise until the holes align, then install the pin.


7.

Remove the cam chain auto-tensioner.


8.

Remove the crankshaft pulley.


25. Cam Chain


1.

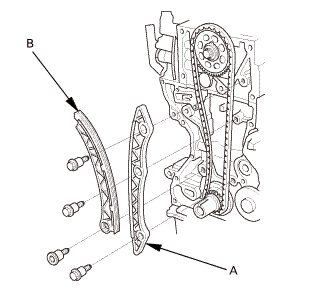
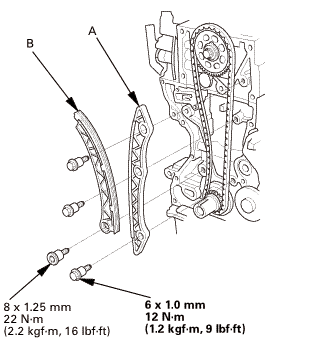
Remove the cam chain guide (A) and the cam chain tensioner arm (B).


2.

Remove the cam chain.


26. Cylinder Head Assembly


1.

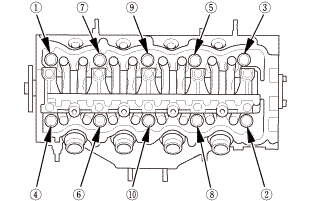
Remove the cylinder head bolts. To prevent warpage, loosen the bolts in sequence, 1/3 turn at a time, repeat the sequence until all bolts are loosened.


2.

Remove the cylinder head.


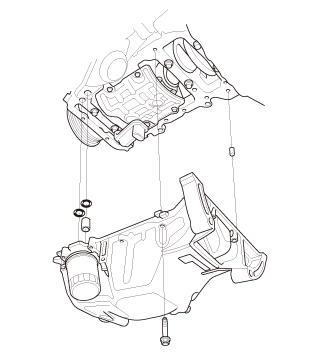
27. Oil Pan Assembly

1.

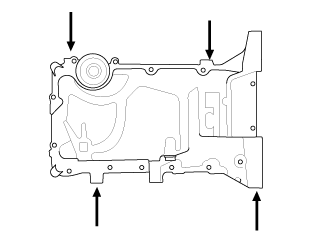
Using a flat blade screwdriver, separate the oil pan from the lower block in the places shown.


2.

Remove the oil pan.


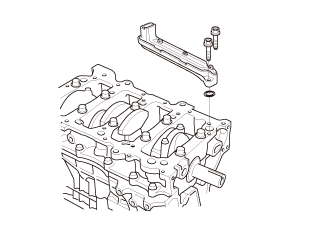
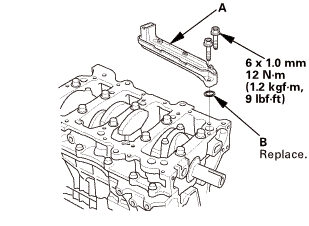
28. Engine Oil Strainer

1.

Remove the oil strainer.


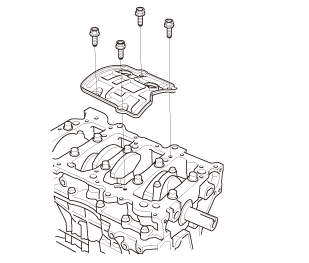
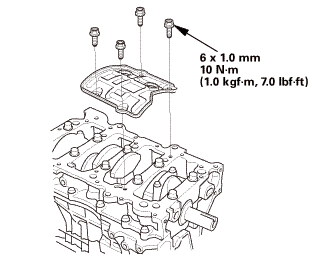
29. Engine Baffle Plate

1.

Remove the baffle plate.


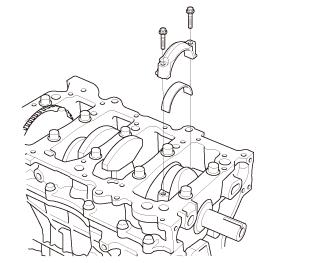
30. Connecting Rod Cap and The Bearing Half

1.

Remove the connecting rod caps/bearing. Keep all connecting rod caps/bearing halves in order.


31. Cylinder Lower Block Assembly

1.

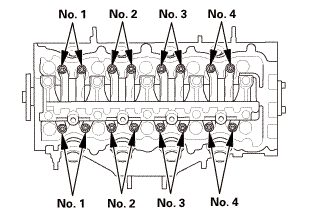
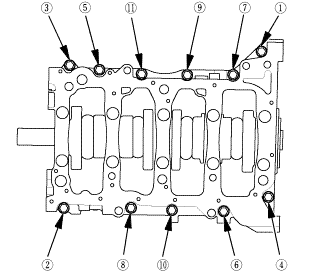
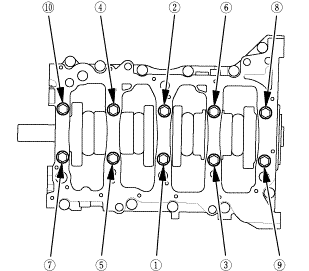
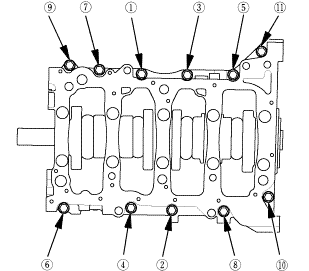
Remove the 8 mm bolts in the sequence shown.


2.

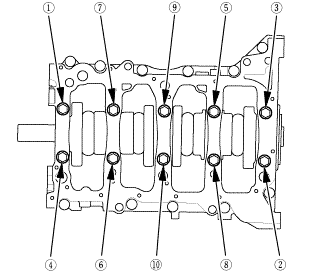
Remove the bearing cap bolts. To prevent warpage, loosen the bolts in sequence 1/3 turn at a time; repeat the sequence until all bolts are loosened.


3.

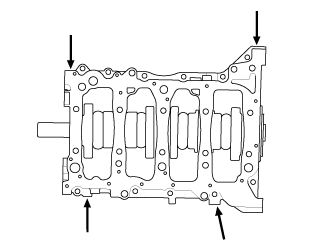
Using a flat blade screwdriver, separate the lower block from the engine block in the places shown.


4.

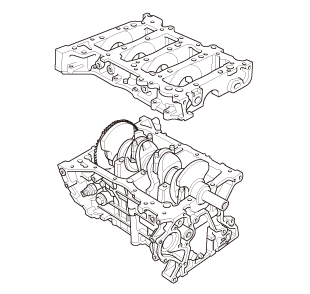
Remove the lower block and the bearings. Keep all the bearings in order.


32. Crankshaft


1.

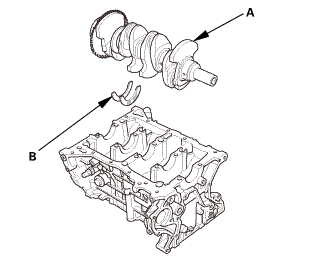
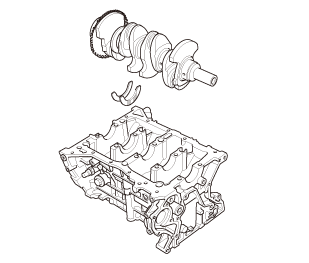
Lift the crankshaft (A) out of the engine block.


2.

Remove the thrust washers (B).


33. Crankshaft Oil Seal, Transmission Side

1.

Remove the transmission end crankshaft oil seal.


34. Piston/Connecting Rod Assembly

1.

If you can feel a ridge of metal or hard carbon around the top of each cylinder, remove it with a ridge reamer (A). Follow the reamer manufacturer's instructions. If the ridge is not removed, it may damage the piston as it is pushed out.


2.

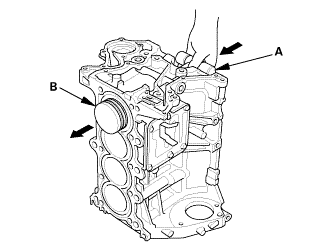
Use the wooden handle of a hammer (A) to drive out the piston/connecting rod assembly (B). Take care not to damage the oil jets or cylinder with the connecting rod.


3.

Reinstall the connecting rod bearings and caps after removing each piston/connecting rod assembly.


4.

Mark each piston/connecting rod assembly with its cylinder number to make sure they are reinstalled in the original order.


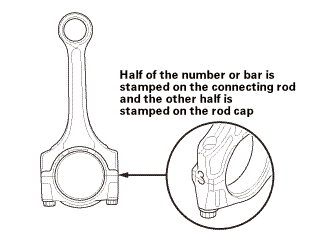
NOTE: The existing number on the connecting rod does not indicate its position in the engine, it indicates the rod bore size.


35. Piston Ring


1.

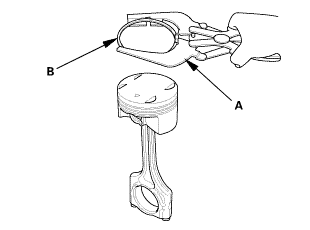
Using a ring expander (A), remove the old piston rings (B).


2.

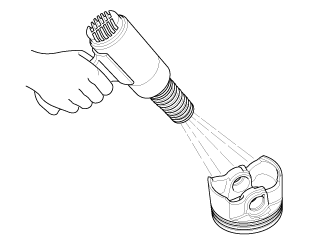
Clean all ring grooves thoroughly with a squared-off broken ring or a ring groove cleaner with a blade to fit the piston grooves. The top and second ring grooves are 1.2 mm (0.047 in) wide. The oil ring groove is 2.0 mm(0.079 in) wide. File down a blade if necessary. Do not use a wire brush to clean the ring grooves, or cut the ring grooves deeper with the cleaning tools.


NOTE: If the piston is to be separated from the connecting rod, do not install new rings yet.


3.

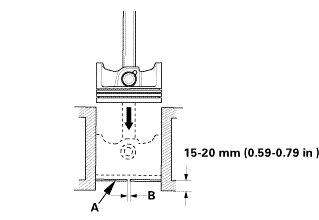
Using a piston that has its rings removed, push a new ring (A) into the cylinder bore 15-20 mm (0.59-0.79 in) from the bottom.


4.

Measure the piston ring end-gap (B) with a feeler gauge:


If the gap is too small, check to see if you have the proper rings for your engine.

If the gap is too large, recheck the cylinder bore diameter against the wear limits. If the bore is beyond the service limit, the engine block must be rebored.


Piston Ring End-Gap

Top Ring

Standard (New):

0.20-0.35 mm (0.008-0.013 in)

Service Limit:

0.60 mm (0.023 in)

Second Ring

Standard (New):

0.40-0.55 mm (0.016-0.021 in)

Service Limit:

0.70 mm (0.027 in)

Oil Ring (RIKEN)

Standard (New):

0.20-0.50 mm (0.008-0.019 in)

Service Limit:

0.55 mm (0.021 in)

Oil Ring (Except RIKEN)

Standard (New):

0.20-0.70 mm (0.008-0.027 in)

Service Limit:

0.80 mm (0.031 in)


36. Piston Pin

1.

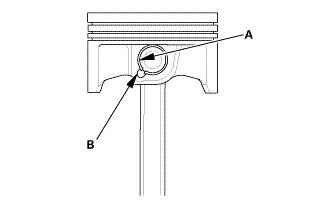
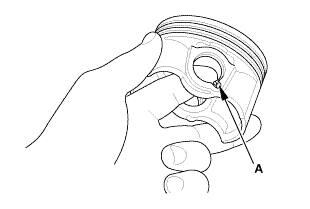
Apply new engine oil to the piston pin snap rings (A), and turn them in the ring grooves until the end gaps are lined up with the cutouts in the piston pin bores (B).


NOTE: Take care not to damage the ring grooves.


2.

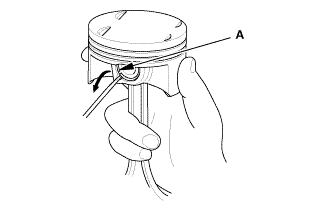
Remove snap rings (A) from both sides of each piston. Start at the cutout in the piston pin bore. Remove the snap rings carefully so they do not go flying or get lost. Wear eye protection.


3.

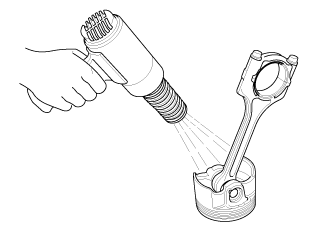
Heat the piston and connecting rod assembly to about 158 °F (70 °C).


4.

Remove the piston pin.


Inspection

1. Piston, Pin, and Connecting Rod and Piston Pin Hole Inspection

1.

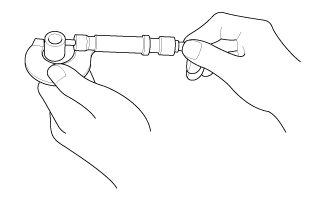
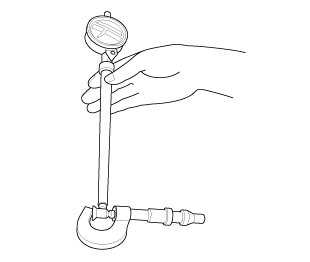
Measure the diameter of the piston pin.


Piston Pin Diameter

Standard (New):

19.960-19.964 mm (0.78583-0.78598 in)

Service Limit:

19.960 mm (0.78583 in)


2.

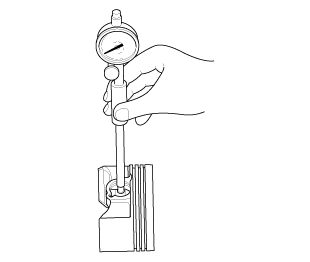
Zero the dial indicator to the piston pin diameter.


3.

Check the difference between the piston pin diameter and the piston pin hole diameter in the piston.


Piston Pin-to-Piston Clearance

Standard (New):

-0.004-0.003 mm (-0.00016-0.00012 in)

Service Limit:

0.006 mm (0.00024 in)


4.

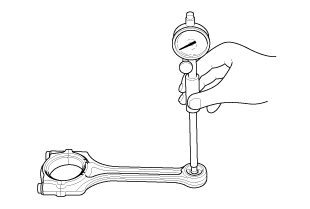
Measure the piston pin-to-connecting rod clearance.


Piston Pin-to-Connecting Rod Clearance

Standard (New):

0.005-0.015 mm (0.00020-0.00059 in)

Service Limit:

0.02 mm (0.0008 in)


Installation

1. Piston Pin


1.

Install a piston pin snap ring (A) only on one side.


2.

Coat the piston pin bore in the piston, the bore in the connecting rod, and the piston pin with new engine oil.


3.

Heat the piston to about 158 °F (70 °C).


4.

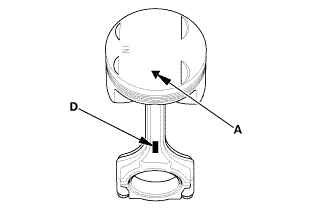
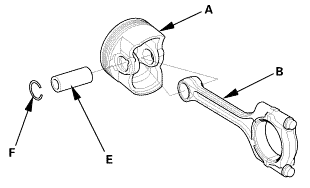
Assemble the piston (A) and the connecting rod (B) with the mark (C) and the embossed mark (D) on the same side. Install the piston pin (E).


5.

Install the remaining snap ring (F).


6.

Turn the snap rings in the ring grooves until the end gaps are positioned at the bottom of the piston.


2. Piston Ring

a.z.a.mmim

1.

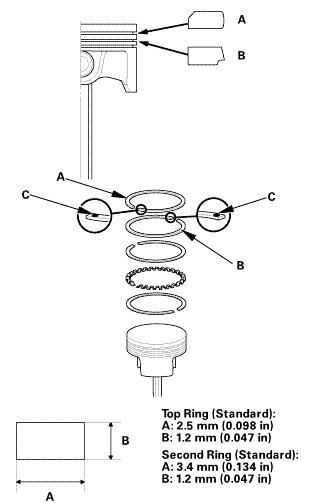
Install the top ring and the second ring as shown. The top ring (A) has a 1T or 1R mark, and the second ring (B) has a 2T or 2R mark. The manufacturing marks (C) must be facing upward.


oilringgaprowgapoilamupgapnsrou


2.

Rotate the rings in their grooves to make sure they do not bind.


3.

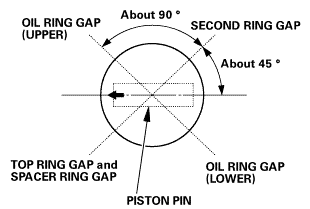
Position the ring end gaps as shown.


3. Piston/Connecting Rod Assembly


1.

Remove the connecting rod caps, then install the ring compressor. Check that the bearing is securely in place.


2.

Apply new engine oil to the piston, the inside of the ring compressor, and the cylinder bore, then attach the ring compressor to the piston/connecting rod assembly.


3.

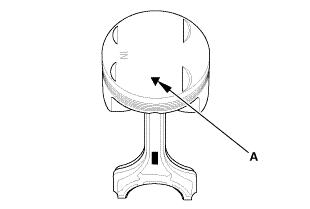
Position the mark (A) to face the cam chain side of the engine.


4.

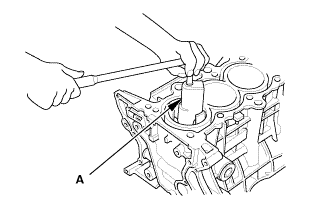
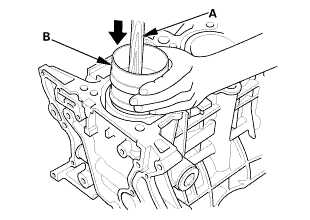
Position the piston/connecting rod assembly in the cylinder, and tap it in using the wooden handle of a hammer (A). Push down on the ring compressor (B) to prevent the rings from expanding before entering the cylinder bore.


5.

Stop after the ring compressor pops free, and check the connecting rod-to-rod journal alignment before pushing the piston into place.


4. Crankshaft

1.

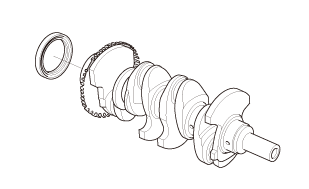
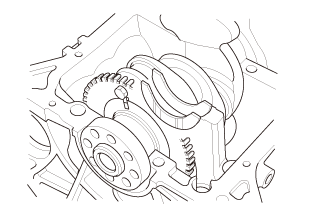
Hold the crankshaft so rod journal No. 2 and rod journal No. 3 are straight up, then lower the crankshaft into the engine block.


NOTE: Be careful not to damage the journals and the CKP pulse plate.


2.

Apply new engine oil to the thrust washer surfaces. Install the thrust washers in the No. 4 journal of the engine block.


5. Main Bearing Clearance Inspection


1.

Clean each main journal and the bearing half with a clean shop towel.


2.

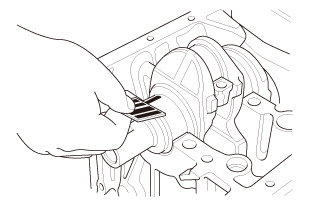
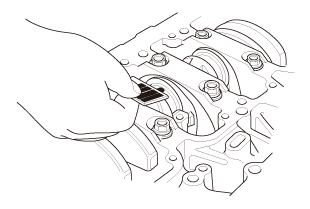
Place one strip of plastigage across each main journal.


3.

Reinstall the main bearings and the lower block, then torque the bolts to 25 N·m (2.5 kgf·m, 18 lbf·ft).


NOTE:

Apply new engine oil to the bolt threads and flanges.

Do not rotate the crankshaft during inspection.


4.

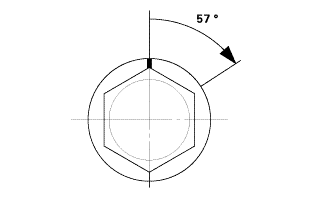
Tighten the bearing cap bolts an additional 57 °.


5.

Remove the lower block and the bearings again, and measure the widest part of the plastigage.


Main Bearing-to-Journal Oil Clearance

Standard (New):

0.018 - 0.034 mm (0.00071 -0.00134 in)

Service Limit:

0.045 mm (0.00177 in)


6.

If the plastigage measures too wide or too narrow, remove the crankshaft, and remove the upper half of the bearing. Install a new, complete bearing with the appropriate color code(s), and recheck the clearance. Do not file, shim, or scrape the bearings or the caps to adjust clearance.


7.

If the plastigage shows the clearance is still incorrect, try the next larger or smaller bearing (the color listed above or below the current one), and check again. If the proper clearance cannot be obtained by using the appropriate larger or smaller bearings, replace the crankshaft and start over.


6. Crankshaft Main Bearing - Selection

na.nono

1.

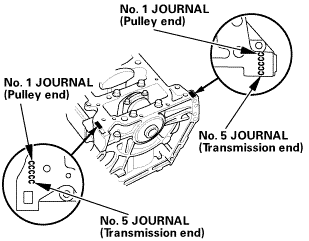
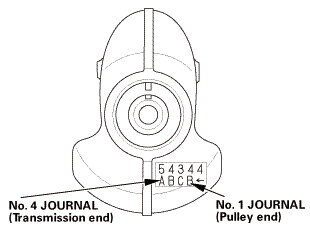
Numbers, letters, or bars have been stamped on either side of the lower block end as a code for the size of each of the five main journal bores. Write down the block bore codes. If you cannot read the codes because of accumulated dirt and dust, do not scrub them with a wire brush or scraper. Clean them only with solvent or detergent.


nojournal

2.

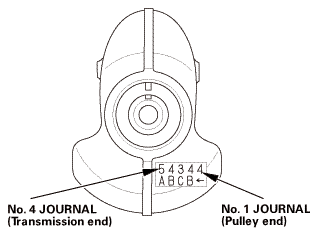
The main journal codes are stamped on the crankshaft.


bunamvllluwgemam,inwmam;

3.

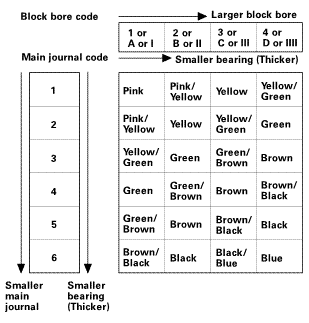
Use the block bore codes and the main journal codes to select the appropriate replacement bearings from the following table.


NOTE:

Color code is on the edge of the bearing.

When using bearing halves of different colors, it does not matter which color is used in the top or bottom.


7. Cylinder Lower Block Assembly


1.

Remove all of the old liquid gasket from the lower block mating surfaces, the bolts, and the bolt holes.


2.

Clean and dry the lower block mating surfaces.


3.

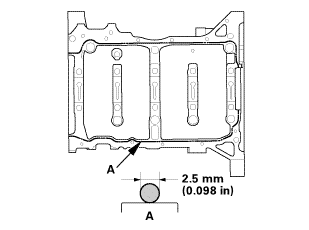
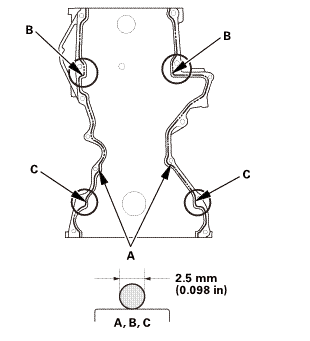
Apply liquid gasket, (P/N 08718-0004 or 08718-0009) to the engine block mating surface of the lower block, and to the inside edge of the threaded bolt holes. Install the component within 5 minutes of applying the liquid gasket.


NOTE:

Apply a 2.5 mm (0.098 in) diameter bead of liquid gasket along the broken line (A).

If too much time has passed after applying the liquid gasket, remove the old liquid gasket and residue, then reapply new liquid gasket.


4.

Put the lower block on the engine block.


5.

Apply new engine oil to the threads and flange of the bearing cap bolts.


6.

Torque the bearing cap bolts, in sequence, to 25 N·m (2.5 kgf·m, 18 lbf·ft).


7.

Tighten the bearing cap bolts an additional 57 °.


8.

Torque the 8 mm bolts, in sequence, to 24 N·m (2.4 kgf·m, 17 lbf·ft).


NOTE:

Wait at least 30 minutes before filling the engine with oil.

Do not run the engine for at least 3 hours after installing the lower block.


8. Connecting Rod Bearing Clearance Inspection


1.

Clean the connecting rod journal and the bearing half with a clean shop towel.


2.

Place plastigage across the rod journal.


3.

Reinstall the bearing half and the cap, then torque the bolts to 20 N·m (2.0 kgf·m, 15 lbf·ft) +90 °.


NOTE:

Apply new engine oil to the bolt threads and flanges.

Do not rotate the crankshaft during inspection.


4.

Remove the connecting rod cap and the bearing half, and measure the widest part of the plastigage.


Connecting Rod Bearing-to-Journal Oil Clearance

Standard (New):

0.024 - 0.042 mm (0.00094 -0.00165 in)

Service Limit:

0.055 mm (0.00217 in)


5.

If the plastigage measures too wide or too narrow, remove the cap, and the upper half of the bearing. Install a new, complete bearing with the appropriate color code(s), and recheck the clearance. Do not file, shim, or scrape the bearings or the caps to adjust clearance.


6.

If the plastigage shows the clearance is still incorrect, try the next larger or smaller bearing (the color listed above or below the current one), and check the clearance again. If the proper clearance cannot be obtained by using the appropriate larger or smaller bearings, replace the crankshaft and start over.


9. Connecting Rod Bearing Selection

1.

Inspect each connecting rod for cracks and heat damage.


redandrunisind


2.

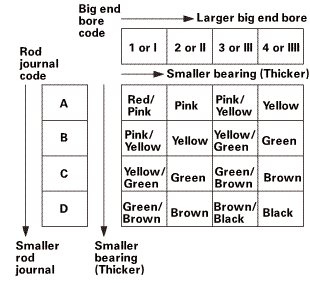
Each connecting rod has a tolerance range from 0 to 0.024 mm (0.00094 in), in 0.006 mm (0.00024 in) increments, depending on the size of its big end bore. It's then stamped with a number or bar (1, 2, 3, or 4/l, ll, lll, or llll) indicating the range. You may find any combination of numbers and bars in any engine. (Half the number or bar is stamped on the rod cap, the other half is on the connecting rod.) If you cannot read the code because of an accumulation of oil and varnish, do not scrub it with a wire brush or scraper. Clean it only with solvent or detergent.


Big End Bore Size:

48.0 mm (1.890 in)


(pulley

3.

The connecting rod journal codes are stamped on the crankshaft in either location.


a.ndendam,amznvllred/pink/pinkvellawpink/emwnbrawnsmnllevmd

4.

Use the big end bore codes and the rod journal codes to select appropriate replacement bearings from the following table.


NOTE:

Color code is on the edge of the bearing.

When using bearing halves of different colors, it does not matter which color is used in the top or bottom.


10. Connecting Rod Cap and The Bearing Half


1.

Apply new engine oil to the threads of the connecting rod bolts.


2.

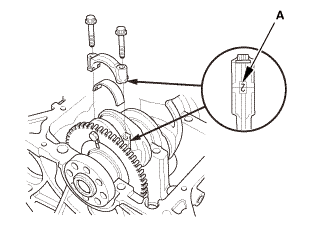
Seat the rod journals into connecting rod No. 1 and connecting rod No. 4. Line up the mark (A) on the connecting rod and the bearing cap.


3.

Install the bearing caps and the bolts finger-tight.


4.

Rotate the crankshaft clockwise, and seat the journals into connecting rod No. 2 and connecting rod No. 3. Line up the mark on the connecting rod and the bearing cap.


5.

Install the bearing caps and the bolts finger-tight.


6.

Torque the connecting rod bolts to 20 N·m (2.0 kgf·m, 14 lbf·ft).


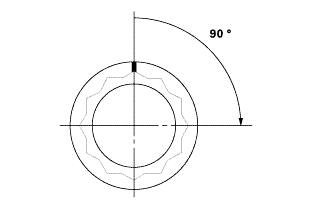
7.

Tighten the connecting rod bolts an additional 90 °.


NOTE: Remove the connecting rod bolt if you tightened it beyond the specified angle, inspect the connecting rod bolts. Do not loosen it back to the specified angle.


11. Engine Baffle Plate

1.

Install the baffle plate.


12. Engine Oil Strainer

1.

Install the oil strainer (A) with new O-ring (B).


13. Oil Pan Assembly

mm


1.

Remove all of the old liquid gasket from the oil pan mating surfaces, the bolts, and the bolt holes.


2.

Clean and dry the oil pan mating surfaces.


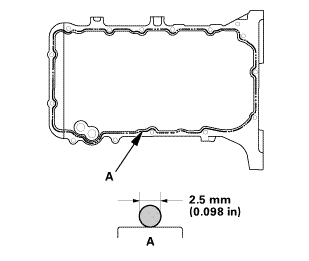
3.

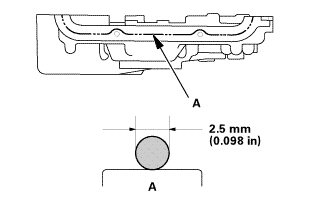
Apply liquid gasket, (P/N 08718-0004 or 08718-0009) to the engine block mating surface of the oil pan, and to the inside edge of the threaded bolt holes. Install the component within 5 minutes of applying the liquid gasket.


NOTE:

Apply a 2.5 mm (0.098 in) diameter bead of liquid gasket along the broken line (A).

If too much time has passed after applying the liquid gasket, remove the old liquid gasket and residue, then reapply new liquid gasket.


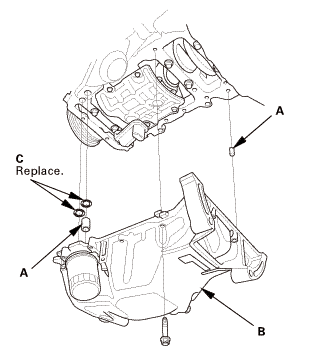
4.

Install the dowel pins (A).


5.

Install the oil pan (B) with new O-rings (C).


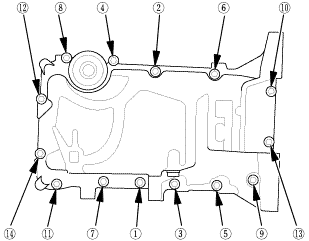
6.

Tighten the bolts in three steps. In the final step, torque all bolts, in sequence, to 18 N·m (1.8 kgf·m, 13 lbf·ft). Wipe off the excess liquid gasket on the each side of crankshaft pulley and flywheel/drive plate.


NOTE:

Wait at least 30 minutes before filling the engine with oil.

Do not run the engine within 3 hours after installing the oil pan.


14. Cylinder Head Assembly


1.

Clean the cylinder head and the engine block surface.


2.

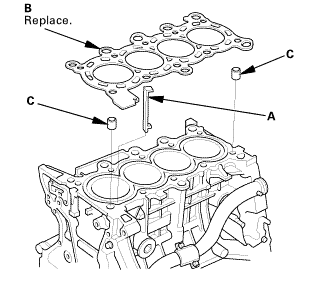
Install a new coolant separator (A) in the engine block whenever the engine block is replaced.


3.

Install the new cylinder head gasket (B) and the dowel pins (C) on the engine block. Always use a new cylinder head gasket.


4.

Install the cylinder head on the engine block.


inmmam


5.

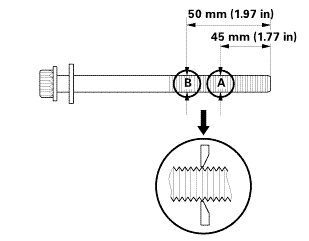
Measure the diameter of each cylinder head bolt at point A and point B.


6.

If either diameter is less than 10.6 mm (0.417 in), replace the cylinder head bolt.


7.

Apply new engine oil to the threads and under the bolt heads of all cylinder head bolts.


8.

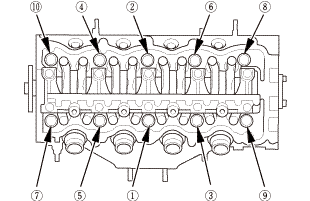
Torque the cylinder head bolts in sequence to 40 N·m (4.1 kgf·m, 30 lbf·ft). Use a beam-type torque wrench. When using a preset click-type torque wrench, be sure to tighten slowly and do not overtighten. If a bolt makes any noise while you are torquing it, loosen the bolt and retighten it from the first step.


secounstep

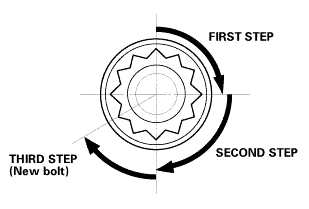
9.

After torquing, tighten all cylinder head bolts in two steps (90 ° per step using the sequence shown in step 8). If you are using a new cylinder head bolt, tighten the bolt an extra 60 °.


NOTE: Remove the cylinder head bolt if you tightened it beyond the specified angle, and go back to step 5 of the procedure. Do not loosen it back to the specified angle.


15. Set The No.1 Piston at Top Dead Center (Without Cam Chain Case/Oil Pump)

1.

Set the camshaft to TDC. The ‘‘UP’’ mark (A) on the camshaft sprocket should be at the top, and the TDC grooves (B) on the camshaft sprocket should line up with the top edge of the head.


16. Cam Chain

1.

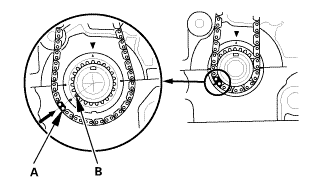
Install the cam chain on the crankshaft sprocket with the colored piece (A) aligned with the mark (B) on the crankshaft sprocket.


2.

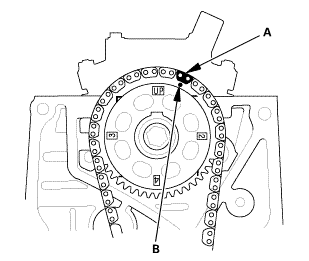
Install the cam chain on the camshaft sprocket with the colored link plate (A) aligned with the mark (B) on the camshaft sprocket.


...,is(1.2

3.

Install the cam chain guide (A) and the cam chain tensioner arm (B).


17. Cam Chain Auto-Tensioner

1.

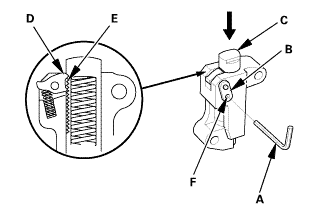
Compress the cam chain auto-tensioner when replacing the cam chain. Remove the pin (A) from the auto-tensioner that was installed during removal. Turn the plate (B) counterclockwise, to release the lock, then press the rod (C), and set the first cam (D) to the first edge of the rack (E). Insert the 1.0 mm (1/32 in) diameter pin back into the holes (F).


NOTE: If the chain tensioner is not set up as described, the tensioner will be damaged.


nokvf-in.

2.

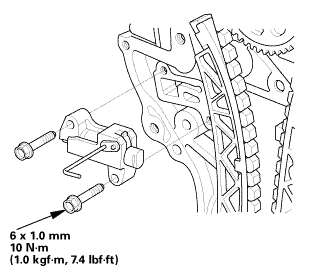
Install the cam chain auto-tensioner.


3.

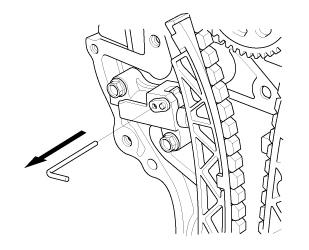
Remove the pin from the cam chain auto-tensioner.


18. Engine Oil Pump Assembly


1.

Check the oil pump oil seal for damage. If the oil seal is damaged, replace the oil seal.


2.

Remove all of the old liquid gasket from the oil pump mating surfaces, the bolts, and the bolt holes.


3.

Clean and dry the oil pump mating surfaces.


4.

Apply liquid gasket (P/N 08718-0004 or 08718-0009) to the engine block mating surface of the oil pump, and to the inside edge of the threaded bolt holes. Install the component within 5 minutes of applying the liquid gasket.


NOTE:

Apply a 2.5 mm (0.098 in) diameter bead of liquid gasket along the broken line (A), (B), and (C).

If too much time has passed after applying the liquid gasket, remove the old liquid gasket and residue, then reapply new liquid gasket.


5.

Apply liquid gasket (P/N 08718-0004 or 08718-0009) to the oil pan mating surface of the oil pump, and to the inside edge of the threaded bolt holes. Install the component within 5 minutes of applying the liquid gasket.


Apply a 2.5 mm (0.098 in) diameter bead of liquid gasket along the broken line (A).

If too much time has passed after applying the liquid gasket, remove the old liquid gasket and residue, then reapply new liquid gasket.


25mm(7(32k1n1omm12


6.

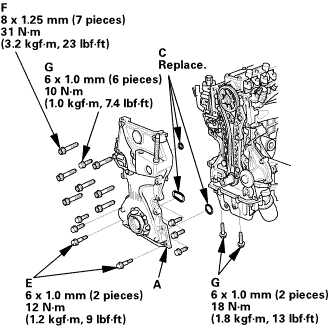
Set the edge of the oil pump (A) on the edge of the oil pan (B) with new O-rings (C).


7.

Install the oil pump on the engine block (D).


8.

Loosely install the dowel bolts (E), then tighten the 8mmbolts (F), the 6 mm bolts (G) and the dowel bolts.


9.

Wipe off the excess liquid gasket on the oil pan and oil pump mating surface.


NOTE:

When installing the oil pump, do not slide the bottom surface onto the oil pan mounting surface.

Wait at least 30 minutes before filling the engine with oil.

Do not run the engine within 3 hours after installing the oil pump.


19. Crankshaft Oil Seal, Transmission side


1.

Apply a light coat of new engine oil to the crankshaft and the lip of the crankshaft oil seal.


2.

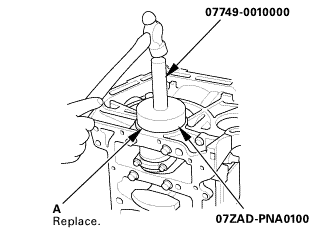
Use the driver handle and the oil seal driver attachment, 96 mm to drive a new crankshaft oil seal (A) squarely into the engine block to the specified installed height.


3.

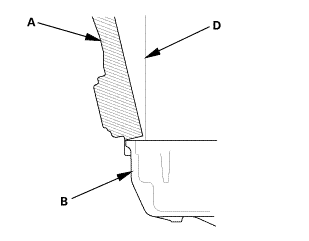
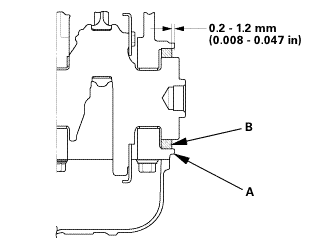
Measure the distance between the engine block (A) and the crankshaft oil seal (B).


Oil Seal Installed Height:

0.2-1.2 mm (0.008-0.047 in)


20. Crankshaft Pulley


1.

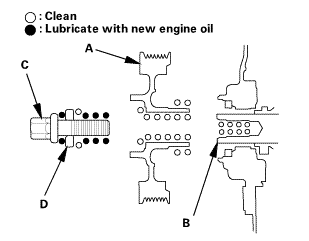
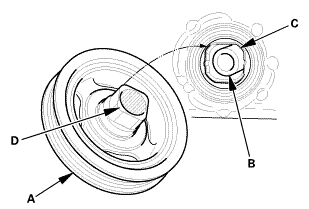
Clean the crankshaft pulley (A), the crankshaft (B), the bolt (C), and the washer (D).


2.

Lubricate with new engine oil as shown.


3.

Install the crankshaft pulley (A) onto the crankshaft (B) by aligning the flat sides (C) of the pulley with the flat sides (D) of the inner oil pump gear.


o7jaanmo2oa


When a new crankshaft or a new pulley bolt is installed


4.

Hold the pulley with the holder handle (A) and crankshaft pulley holder (B), torque the bolt to 180 N·m (18.4 kgf·m, 133 lbf·ft) with a torque wrench and a socket (C), then remove the bolt.


5.

Torque the bolt to 50 N·m (5.1 kgf·m, 37 lbf·ft) with a torque wrench and a socket.


NOTE: Tighten the crankshaft pulley bolt. Do not use an impact wrench.


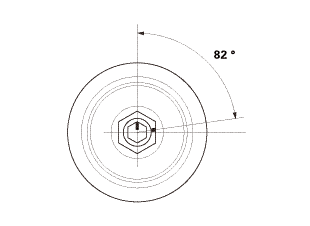
6.

Tighten the bolt an additional 82 °.


o7jaanmo2oa


When the crankshaft or the pulley bolt is reused


7.

Hold the pulley with the holder handle (A) and crankshaft pulley holder (B), then torque the bolt to 70 N·m (7.1 kgf·m, 52 lbf·ft) with a torque wrench and a socket (C).


NOTE: Tighten the crankshaft pulley bolt. Do not use an impact wrench.


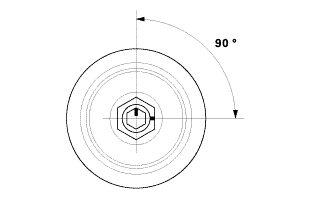
8.

Tighten the bolt an additional 90 °.


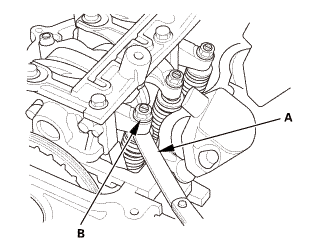
21. Valve Clearance Adjustment

1.

Set the No. 1 piston at top dead center (TDC). The ‘‘UP’’ mark (A) on the camshaft sprocket should be at the top, and the TDC grooves (B) on the camshaft sprocket should line up with the top edge of the head.


2.

Select the correct feeler gauge for the valve clearance you are going to check.


Valve Clearance

Intake:

0.18-0.22 mm (0.008-0.008 in)

Exhaust:

0.23-0.27 mm (0.010-0.010 in)

no!


3.

Insert the feeler gauge (A) between the adjusting screw (B) and the end of the valve stem on the No. 1 cylinder, and slide it back and forth; you should feel a slight amount of drag.


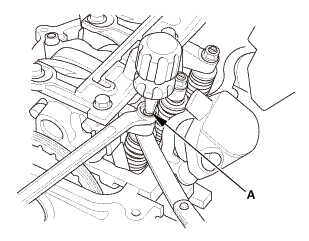
4.

If you feel too much or too little drag, loosen the locknut, and turn the adjusting screw (A) until the drag on the feeler gauge is correct.


5.

Tighten the locknut to the specified torque, and recheck the clearance. Repeat the adjustment if necessary.


Specified Torque

7 x 0.75 mm

14 N·m (1.4 kgf·m, 10 lbf·ft)

Apply new engine oil to the nut threads.


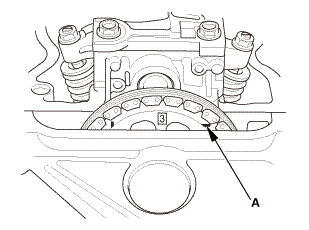
6.

Rotate the crankshaft clockwise. Align the No. 3 piston TDC groove (A) on the camshaft sprocket with the top edge of the head.


7.

Check and, if necessary, adjust the valve clearance on the No. 3 cylinder.


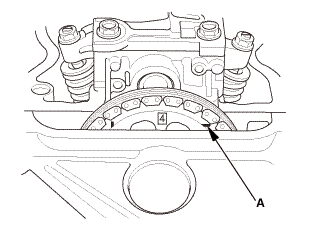
8.

Rotate the crankshaft clockwise. Align the No. 4 piston TDC groove (A) on the camshaft sprocket with the top edge of the head.


9.

Check and, if necessary, adjust the valve clearance on the No. 4 cylinder.


10.

Rotate the crankshaft clockwise. Align the No. 2 piston TDC groove (A) on the camshaft sprocket with the top edge of the head.


11.

Check and, if necessary, adjust the valve clearance on the No. 2 cylinder.


22. Cylinder Head Cover and/or Packing


1.

Thoroughly clean the head cover gasket and the groove.


NOTE: Check and, if necessary, replace the head cover gasket.


2.

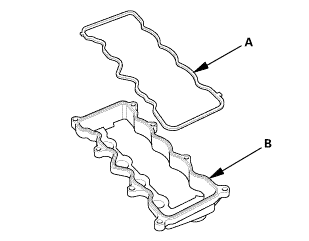
Install the head cover gasket (A) in the groove of the cylinder head cover (B).


3.

Make sure the head cover gasket is seated securely.


4.

Clean the head cover contacting surfaces with a shop towel.


5.

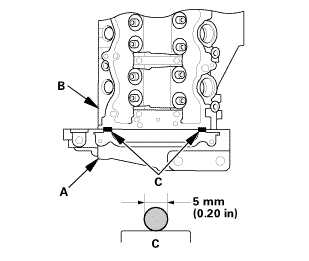
Remove the old liquid gasket from the top edge matting surfaces of the oil pump (A) and cylinder head (B).


6.

Apply liquid gasket (P/N 08718-0004 or 08718-0009) to the chain case contact areas. Install the component within 5 minutes of applying the liquid gasket.


NOTE:

Apply a 5 mm (0.20 in) diameter bead of liquid gasket to the mating surfaces (C).

If too much time has passed after applying the liquid gasket, remove the old liquid gasket and residue, then reapply new liquid gasket.


7.

Install the cylinder head cover.


8.

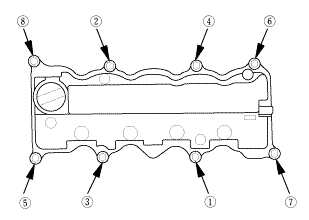
Tighten the bolts in two steps. In the final step, torque all bolts in sequence to 10 N·m (1.0 kgf·m, 7 lbf·ft).


NOTE:

Wait at least 30 minutes before filling the engine with oil.

Do not run the engine for at least 3 hours after installing the head cover.


9.

Connect the breather hose (A).


10.

Install the dipstick (B).


23. Auto Tensioner Assembly

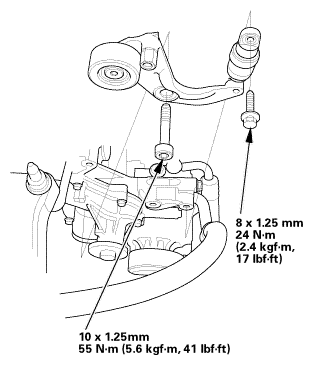
inl.25mmssn-m

1.

Install the drive belt auto-tensioner.


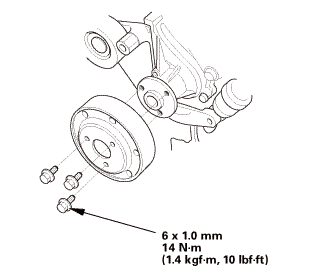
24. Water Pump Pulley

1.

Install the water pump pulley.


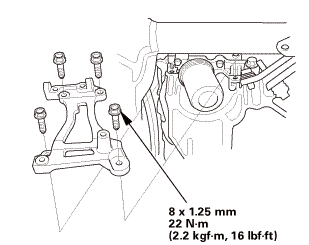
25. A/C Compressor Bracket

1.

Install the A/C compressor bracket.


26. Intermediate Shaft Assembly

inmmn-mu.o

1.

Insert the intermediate shaft (A) into the differential correctly.


NOTE: Insert the intermediate shaft carefully to prevent damaging the oil seal (B).


mms.

2.

Install the crankshaft position (CKP) sensor cover (A).


27. Lower Torque Rod Bracket (M/T)

mm

1.

Install the lower torque rod bracket.


28. Lower Torque Rod Bracket (A/T)

u.z5mm75n-mmm

1.

Install the lower torque rod bracket.


29. Alternator

1.

Install the alternator.


30. Thermostat Housing

11

1.

Install the thermostat housing (A), using a new gasket (B) and new O-ring (C).


31. Catalytic Converter and EGR Pipe Assembly

num(2.2m.2:m41!

1.

Install the catalytic converter.


22n-m

2.

Install the EGR pipe.


32. Exhaust Chamber Cover

1.

Install the exhaust chamber cover (A).


33. A/F Sensor (Sensor 1)


1.

Install the A/F sensor (A).


2.

Connect the connector.


34. Drive Plate Assembly

55

1.

Install the drive plate (A) and the washer (B), and tighten the eight bolts in a crisscross pattern in at least two steps.


35. Automatic Transmission Assembly (A/T)

usmmn-mlbml)

1.

Install the automatic transmission.


36. Flywheel


1.

Install the flywheel (A) on the crankshaft, and install the mounting bolts (B) finger-tight.


2.

Install the ring gear holder.


:2minn-inno

3.

Tighten the flywheel mounting bolts (A) in a crisscross pattern in several steps.


37. Clutch Disc

(pm


1.

Temporarily install the clutch disc onto the splines of the transmission mainshaft. Make sure the clutch disc slides freely on the mainshaft.


2.

Apply super high temp urea grease (P/N 08798-9002) to the splines (A) of the clutch disc (B).


NOTE: Wipe off any excess grease.


3.

Install the clutch disc using the clutch alignment shaft and the remover handle.


38. Pressure Plate

1.

Install the pressure plate (A) and the mounting bolts (B) finger-tight.


a7aag-suaa1aa


2.

Torque the pressure plate mounting bolts (A) in a crisscross pattern.


NOTE:

Tighten the bolts in several steps to prevent warping the diaphragm spring.

Make sure that there is no clearance between the pressure plate and the flywheel.


Specified Torque:

25 N·m (2.5 kgf·m, 18 lbf·ft)


3.

Remove the ring gear holder.


4.

Remove the clutch alignment shaft and the remover handle.


5.

Make sure the diaphragm spring fingers are all the same height.


39. Manual Transmission Assembly (M/T)

1.

Install the manual transmission.


40. Engine Wire Harness

1.

Install the engine wire harness.


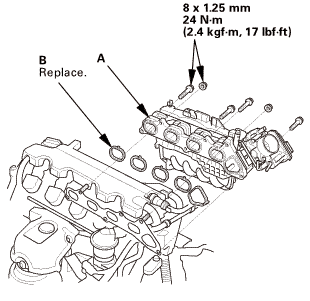
41. Intake Manifold and Throttle Body Assembly


1.

Install the intake manifold and throttle body assembly (A) with new gaskets (B).


2.

Tighten the bolts and nuts in a crisscross pattern in three steps, beginning with the inner bolt.


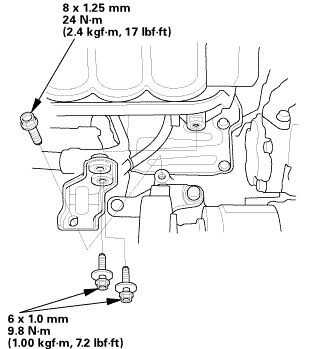
3.

Install the intake manifold bracket.


4.

Connect the PCV hose (A).


5.

Connect the connectors (B).


6.

Install the harness clamps (C).


7.

Connect the water bypass hoses (D).


8.

Install the heater hose clamp bracket.


9.

Install the intake air duct.


Connecting Rod Bolt Inspection (K24Z7)
Inspection 1. Connecting Rod Bolt - Inspection 1. Measure the diameter of each connecting rod bolt at point A and point B. 35mmzomm ...

Cylinder Head
...

See also:

Honda Civic Owners Manual. Unlocking Using the Front Door Inner Handle
Pull the front door inner handle. The door unlocks and opens in one motion. Unlocking and opening the driver’s door from the inner handle unlocks all the other doors. To avoid all the doors to be unlocked, use the lock tab on the driver’s door to unlock, then lock again bef ...

© 2016-2024 Copyright www.hocivic.com

0.029