Honda Civic Service Manual: Left M/T Differential Oil Seal Replacement (R18Z1 M/T)
2191F4 LEFT
|
|
1.
|
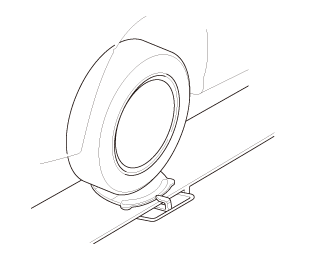
Raise the vehicle on a lift, and make sure it is securely supported.
|
|
|
|
1.
|
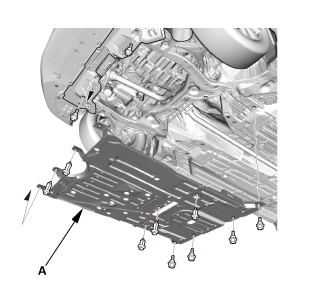
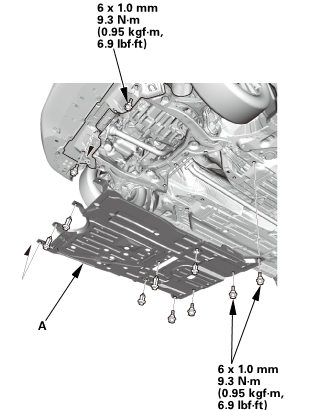
Remove the engine undercover (A).
|
|
|
|
1.
|
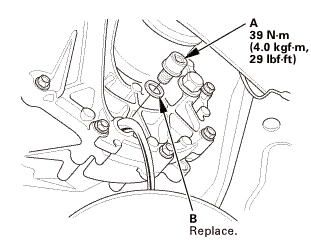
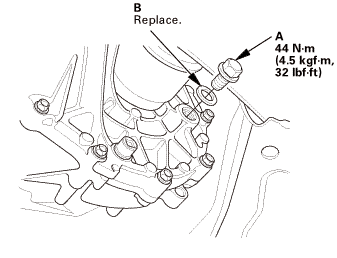
Remove the drain plug (A) and the sealing washer (B), and drain
the MTF.
|
|
2.
|
Reinstall the drain plug with a new sealing washer.
|
|
|
|
1.
|
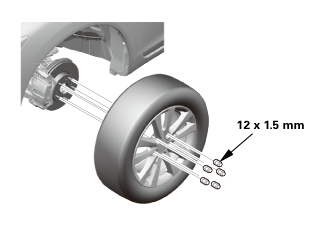
Remove the left front wheel.
|
|
5. |
Lower Ball Joint Lower Arm Side - Disconnection |
i225
|
|
1.
|
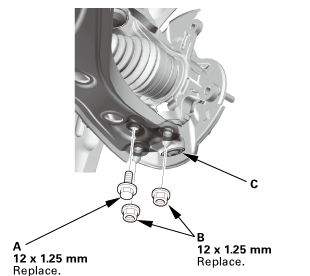
Remove the flange bolt (A).
|
|
2.
|
Remove the flange nuts (B).
|
|
3.
|
Disconnect the lower ball joint (C) from the lower arm.
|
|
6. |
Driveshaft Front Left - Disconnection Inboard Side |
|
|
1.
|
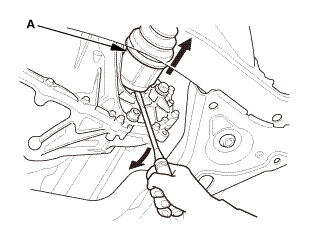
Pry the inboard joint (A) from the differential using a pry bar.
|
|
NOTE:
|
|
|
Do not pull on the driveshaft, or the inboard
joint may come apart.
|
|
|
|
Be careful not to damage the end of the inboard
joint using the pry bar.
|
|
|
|
|
|
2.
|
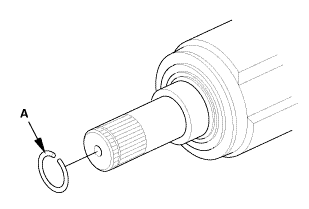
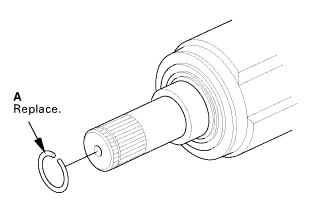
Remove the set ring (A).
|
|
7. |
M/T Differential Oil Seal, Left |
|
|
1.
|
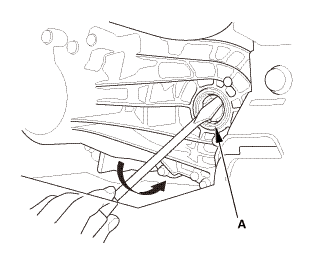
Remove the oil seal (A) using a pry bar.
|
|
NOTE: Be careful not to damage the transmission housing while
removing the oil seal.
|
|
1. |
M/T Differential Oil Seal, Left |
|
|
1.
|
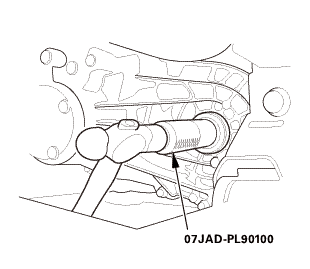
Install the oil seal flush with the transmission housing using
the 65 mm oil seal driver.
|
|
2. |
Driveshaft Front Left - Reconnection, Inboard Side |
|
|
1.
|
Install a new set ring (A).
|
|
|
|
2.
|
Clean the areas where the driveshaft contacts the differential
thoroughly with solvent.
|
|
NOTE: Do not wash the rubber parts with solvent.
|
|
3.
|
Dry the areas where the driveshaft contacts the differential
thoroughly with compressed air.
|
|
4.
|
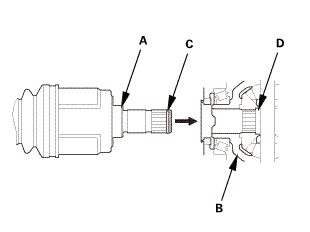
Insert the inboard end (A) of the driveshaft into the differential
(B) until the set ring (C) locks in the groove (D).
|
|
NOTE: Insert the driveshaft horizontally to prevent damaging
the oil seal.
|
|
3. |
Lower Ball Joint Lower Arm Side - Reconnection |
55(ini15mm(skg!m,12x125mm
|
|
1.
|
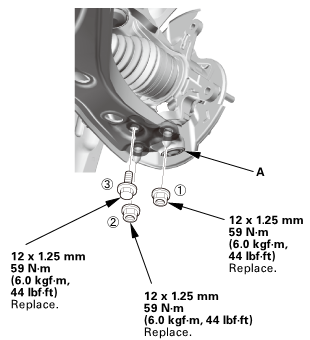
Connect the lower ball joint (A) to the lower arm.
|
|
2.
|
Install the new flange nuts and the new flange bolt in the sequence
shown.
|
|
mmmln-mnomm
|
|
1.
|
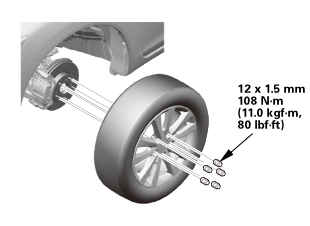
Install the left front wheel.
|
|
NOTE: Before installing the wheel, clean the mating surfaces
between the brake disc and the inside of the wheel.
|
|
5. |
Driveshaft After Install Check |
|
|
1.
|
Turn the wheel by hand, and make sure there is no interference
between the driveshaft and surrounding parts.
|
|
|
|
1.
|
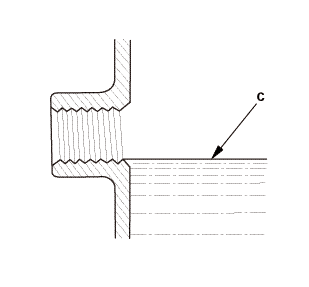
Remove the filler plug (A) and the sealing washer (B).
|
|
2.
|
Refill the transmission with MTF to the proper level (C). Always
use Honda Manual Transmission Fluid (MTF).
|
|
Manual Transmission Fluid Capacity
Except K24Z7 engine:
|
|
1.4 L (1.5 US qt) at fluid change
|
|
1.6 L (1.7 US qt) at overhaul
|
K24Z7 engine:
|
|
1.9 L (2.0 US qt) at fluid change
|
|
2.0 L (2.1 US qt) at overhaul
|
|
|
|
|
3.
|
Reinstall the filler plug with a new sealing washer.
|
|
|
|
1.
|
Install the engine undercover (A).
|
|
|
For proper inspection and adjustment of the wheel alignment,
do these checks:
|
|
1.
|
Release the parking brake to avoid an incorrect measurement.
|
|
2.
|
Make sure the suspension is not modified.
|
|
3.
|
Make sure the fuel tank is full, and that the tire repair kit,
the spare tire, the jack, and the tools are in place on the vehicle.
|
|
4.
|
Check the tire size and tire pressure according to tire information.
|
|
|
Use commercially available computerized four wheel alignment
equipment to measure wheel alignment (caster, camber, toe, and turning
angle). Follow the equipment manufacturer's instructions.
|
|
1.
|
Check the caster angle.
|
|
USA and Canada models
Caster angle:
|
|
Except Si:
|
5 ° 19 ’±30 ’
|
|
Si (Without 18 inch wheel):
|
5 ° 22 ’±30 ’
|
|
Si (With 18 inch wheel):
|
5 ° 15 ’±30 ’
|
|
|
|
|
Mexico models
Caster angle:
|
|
Without 18 inch wheel:
|
5 ° 10 ’±30 ’
|
|
With 18 inch wheel:
|
5 ° 6 ’±30 ’
|
|
|
|
|
|
If the measurement is within specifications,
measure the front camber angle.
|
|
|
|
If the measurement is not within specifications,
check for bent or damaged suspension components.
|
|
|
|
|
Use commercially available computerized four wheel alignment
equipment to measure wheel alignment (caster, camber, toe, and turning
angle). Follow the equipment manufacturer's instructions.
|
|
1.
|
Check the camber angle.
|
|
USA and Canada models
Camber angle:
|
|
Except Si:
|
|
|
Front:
|
0 ° 00 ’±30 ’
|
|
|
Rear:
|
-0 ° 45 ’±45 ’
|
|
Si (Without 18 inch wheel):
|
|
|
Front:
|
-0 ° 04 ’±30 ’
|
|
|
Rear:
|
-0 ° 52 ’±45 ’
|
|
Si (With 18 inch wheel):
|
|
|
Front:
|
-0 ° 18 ’±30 ’
|
|
|
Rear:
|
-0 ° 45 ’±45 ’
|
(Maximum difference between the front right and
left side: 0 ° 45 ’)
|
|
|
|
|
Mexico models
Camber angle:
|
|
Front:
|
0 ° 20 ’±30 ’
|
|
Rear:
|
-0 ° 22 ’±45 ’
|
(Maximum difference between the front right and
left side: 0 ° 45 ’)
|
|
|
|
|
|
If the measurement is within specification, measure
the toe-in.
|
|
|
|
If the measurement for the front camber is not
within the specification, go to front camber adjustment.
|
|
|
|
If the measurement for the rear camber is not
within the specification, check for bent or damaged
suspension components.
|
|
|
|
11. |
Front Toe - Inspection |
|
Use commercially available computerized four wheel alignment
equipment to measure wheel alignment (caster, camber, toe, and turning
angle). Follow the equipment manufacturer's instructions.
|
|
1.
|
Set the steering column to the middle tilt position and telescopic
positions.
|
|
2.
|
Center the steering wheel spokes, and install a steering wheel
holder tool.
|
|
3.
|
Check the toe with the wheels pointed straight ahead.
|
|
Front toe-in: 0±2 mm (0±0.08 in)
|
|
|
If adjustment is required, go to the front toe
adjustment.
|
|
|
|
If no adjustment is required, remove the alignment
equipment.
|
|
|
|
12. |
Turning Angle - Inspection |
|
Use commercially available computerized four wheel alignment
equipment to measure wheel alignment (caster, camber, toe, and turning
angle). Follow the equipment manufacturer's instructions.
|
|
1.
|
Turn the wheel right and left while applying the brake, and measure
the turning angle of both wheels.
|
|
USA and Canada models
Turning angle:
|
|
Except Si:
|
|
|
Inward:
|
38 ° 30 ’±2 °
|
|
|
Outward (reference):
|
30 ° 47 ’±1 °
|
|
Si (Without 18 inch wheel):
|
|
|
Inward:
|
38 ° 22 ’±2 °
|
|
|
Outward (reference):
|
30 ° 41 ’±1 °
|
|
Si (With 18 inch wheel):
|
|
|
Inward:
|
36 ° 33 ’±2 °
|
|
|
Outward (reference):
|
29 ° 53 ’±1 °
|
|
|
|
|
Mexico models
Turning angle:
|
|
Without 18 inch wheel:
|
|
|
Inward:
|
39 ° 12 ’±2 °
|
|
|
Outward (reference):
|
31 ° 14 ’±1 °
|
|
With 18 inch wheel:
|
|
|
Inward:
|
36 ° 58 ’±2 °
|
|
|
Outward (reference):
|
30 ° 16 ’±1 °
|
|
|
|
|
2.
|
If the measurement is not within the specifications, even up
both sides of the tie-rod threaded section length while adjusting
the front toe.
|
|
3.
|
If it is correct, but the turning angle is not within the specifications,
check for bent or damaged suspension components.
|
|
|
|
1.
|
Turn the wheel right and left while applying the brake, and measure
the turning angle of both wheels.
|
|
USA and Canada models
Turning angle:
|
|
Except Si:
|
|
|
Inward:
|
38 ° 43 ’±2 °
|
|
|
Outward (reference):
|
30 ° 55 ’±1 °
|
|
Si:
|
|
|
Inward:
|
38 ° 36 ’±2 °
|
|
|
Outward (reference):
|
30 ° 49 ’±1 °
|
|
|
|
|
Mexico models
Turning angle:
|
|
Inward:
|
39 ° 15 ’±2 °
|
|
Outward (reference):
|
31 ° 21 ’±1 °
|
|
|
|
|
2.
|
If the measurement is not within the specifications, even up
both sides of the tie-rod threaded section length while adjusting
the front toe.
|
|
3.
|
If it is correct, but the turning angle is not within the specifications,
check for bent or damaged suspension components.
|
|
|
|
1.
|
Test-drive the vehicle.
|
|
14. |
Maintenance Minder Reset |
|
|
1.
|
After doing all procedures, select the individual maintenance
item you wish to reset with the HDS..
|
|
2131M6 LEFT
1.
Vehicle Lift
1.
Raise the vehicle on a lift, and make sure it is securely supported.
...
2191M0 RIGHT
1.
Vehicle Lift
1.
Raise the vehicle on a lift, and make sure it is securely supported.
...