Honda Civic Service Manual: TPMS Control Unit Removal and Installation ('12-'13)
4211B5

| 1. |
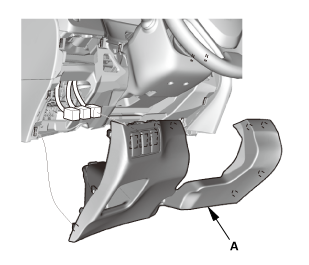
Driver's Dashboard Lower Cover |
|
|
|
1.
|
Remove the driver's dashboard lower cover (A).
|
|
|
|
|
NOTE: Make sure the TPMS control unit mounting bracket is not
bent or twisted as this may affect its communication with the tire
pressure sensors.
|
|
1.
|
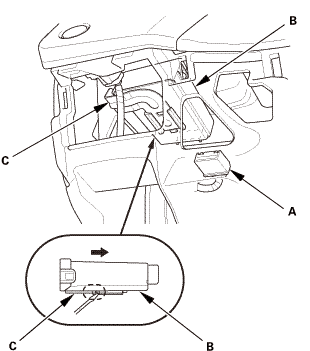
Turn the ignition switch to LOCK (0).
|
|
2.
|
Disconnect the connector (A).
|
|
3.
|
Remove the TPMS control unit (B) from the bracket (C).
|
|

|
|
|
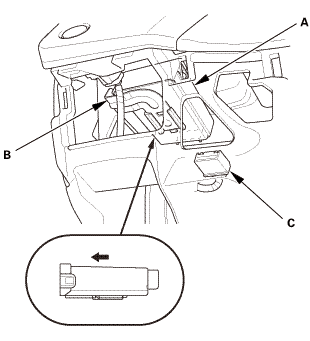
NOTE: Make sure the TPMS control unit is properly installed.
You will hear a click when the TPMS control unit is securely mounted
on the bracket.
|
|
1.
|
Install the TPMS control unit (A) to the bracket (B).
|
|
2.
|
Connect the connector (C).
|
|
| 2. |
Driver's Dashboard Lower Cover |
|
|
|
1.
|
Install the driver's dashboard lower cover (A).
|
|
|
|
|
1.
|
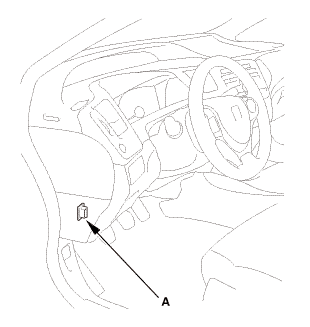
Connect the HDS to the data link connector (DLC) (A) located
under the driver's side of the dashboard.
|
|
2.
|
Turn the ignition switch to ON (II).
|
|
3.
|
Make sure the HDS communicates with the vehicle. If it does not
communicate, go to the DLC circuit troubleshooting.
|
|
| 4. |
Memorizing the Tire Pressure Sensor ID |
|
 nmvvss nmvvss
|
|

|
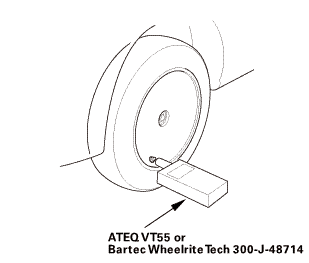
The TPMS tool is needed to do this procedure.
|
|
|
|
Let the vehicle sit for at least 5 minutes to allow the
tire pressure sensors to switch to sleep mode.
|
|
|
|
To ensure the TPMS control unit memorizes the correct
sensor ID, the vehicle with the new tire pressure sensor
must be at least 10 ft (3 m) away from other vehicles that
have sensors.
|
|
|
|
When doing a tire rotation, memorizing the sensors in
not needed.
|
|
|
1.
|
Select Sensor ID Learning from the Mode Menu on the HDS.
|
|
2.
|
Follow the HDS screen prompts to turn on the TPMS tool.
|
|
3.
|
Hold the TPMS tool near the valve stem of one wheel, and memorize
the tire pressure sensor ID by following the screen prompts on the
HDS.
|
|
NOTE:
|
|
|
If you turn the ignition switch to LOCK (0) before
memorizing all four sensor IDs, the memorizing sensor
ID is canceled.
|
|
|
|
If more than one sensor ID is displayed on the
HDS, verify that the vehicle has not been driven
for 5 minutes, and there are no other vehicles or
tire pressure sensors within 10 ft (3 m).
|
|
|
|
See the HDS Help menu for specific instructions.
|
|
|
|
4.
|
Repeat step 3 for each wheel until all four sensor IDs are memorized.
When all four IDs are memorized, the low tire pressure indicator
blinks.
|
|
5.
|
Turn the ignition switch to LOCK (0).
|
|
6.
|
Disconnect the HDS from the DLC.
|
|
7.
|
Test-drive the vehicle at 28 mph (45 km/h) or more for at least
1 minute.
|
|
8.
|
Make sure the low tire pressure indicator does not blink.
|
|
9.
|
Make sure the tires are inflated to the specified tire pressure
listed on the doorjamb label.
|
|
10.
|
Turn the ignition switch to LOCK (0).
|
|
1.
Vehicle Lift
1.
Raise the vehicle on a lift, and make sure it is securely supported.
2. ...
4151B0 LEFT FRONT
4151B1 RIGHT FRONT
1.
Vehicle Lift
1.
Raise the vehicle on a lift, and make sure it is securely suppor ...
See also:
Honda Civic Owners Manual. Caller's ID Information
You can select a caller's information to be displayed when you have an
incoming
call.
Press the button or
the button.
Rotate to select Phone
Setup, then
press .
Rotate to select
Caller ID Info, then
press .
Rotate to select a
mode you want, ...
 Valve Stem-to-Guide Clearance Inspection (R18Z1)
 Front Wheel Bolt Removal and Installation (Except Si models)