Honda Civic Service Manual: Rear Damper Removal, Installation, and Inspection (Except Natural Gas models)
417105 LEFT
417110 RIGHT
417101 BOTH

| 1. |
Rear Damper Exploded View |
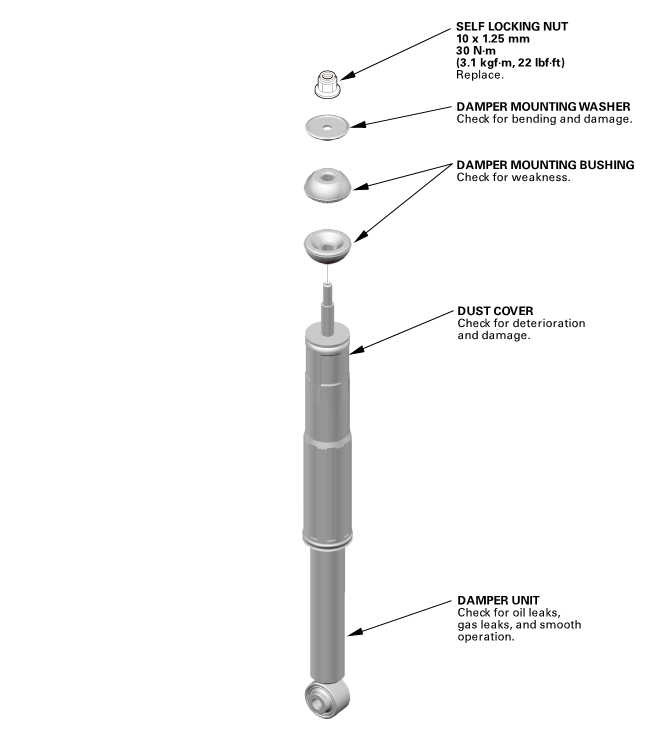 se.rlockingum10125mmmminmountingandmountingamanduurrorallandsmeelh

|
NOTE: Refer to the Exploded View as needed during the following procedures.
|
|
|
1.
|
Raise the vehicle on a lift, and make sure it is securely supported.
|
|
|
|
|
1.
|
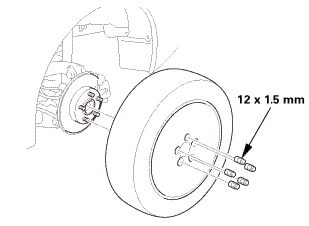
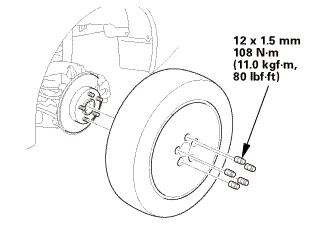
Remove the rear wheel.
|
|
| 3. |
Rear Knuckle - Jack Up |
|
|
|
1.
|
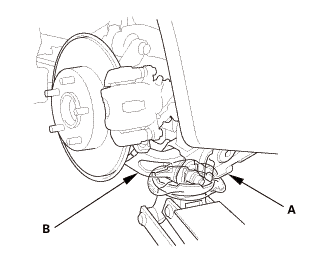
Position a floor jack at the connecting point of the trailing
arm (A) and the knuckle (B).
|
|
2.
|
Raise the floor jack until the suspension begins to compress.
|
|
| 4. |
Rear Damper Lower Side - Disconnection |
|
|
|
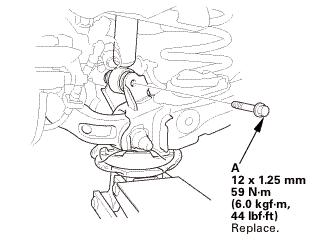
1.
|
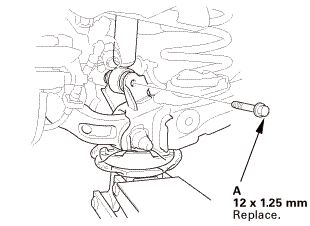
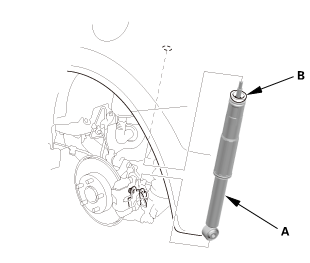
Remove the damper mounting bolt (A).
|
|
|
|
|
1.
|
Fold down the seat-back(s).
|
|
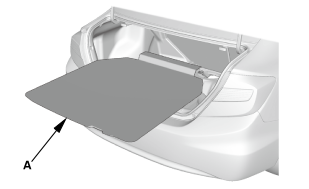
2.
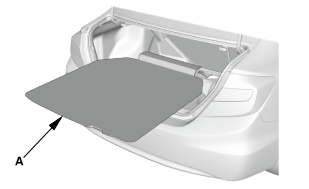
|
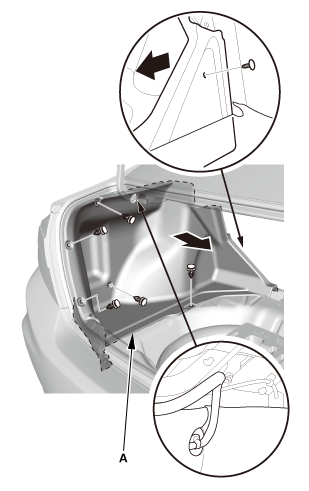
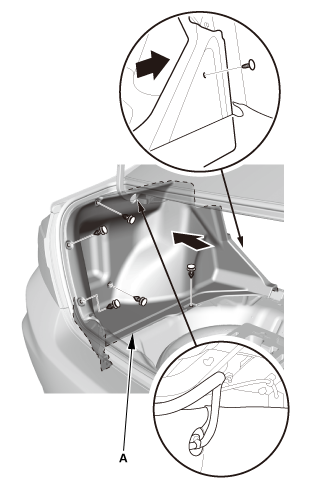
Remove the front area of the trunk floor cover (A).
|
|
|
|
|
3.
|
Remove the trunk floor cover (A).
|
|
| 6. |
Trunk Lid Weatherstrip as Needed |
|
|
|
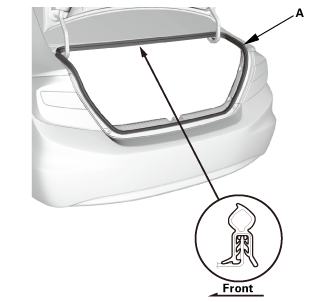
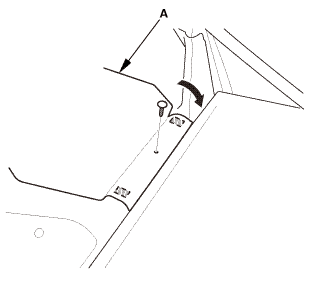
1.
|
Remove the trunk lid weatherstrip (A) as needed.
|
|
|
|
|
1.
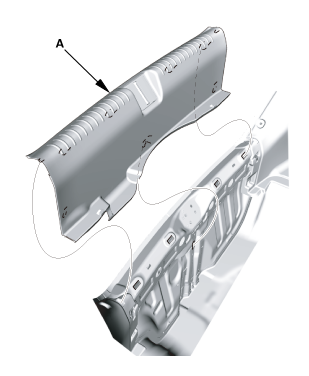
|
Remove the trunk rear trim panel (A).
|
|
|
|
|
1.
|
Remove the trunk side trim panel (A).
|
|
| 9. |
Rear Damper Upper Side |
|
|
|
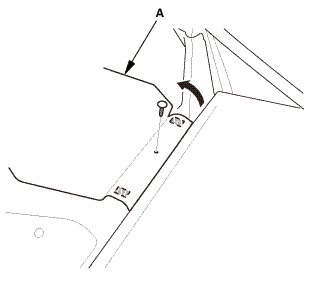
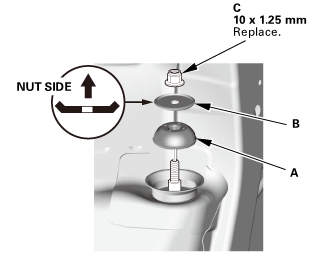
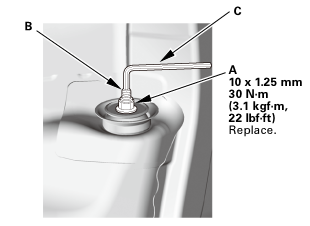
1.
|
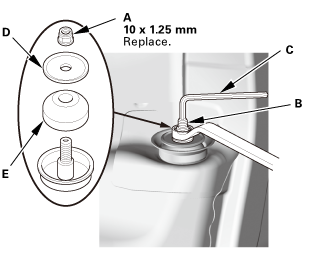
Remove the self-locking nut (A) while holding the damper shaft
(B) with a hex wrench (C).
|
|
2.
|
Remove the damper mounting washer (D).
|
|
3.
|
Remove the damper mounting bushing (E).
|
|
|
|
|
1.
|
Remove the damper assembly (A).
|
|
2.
|
Remove the damper mounting bushing (B).
|
|

| 1. |
Rear Damper - Inspection |
|
|
|
1.
|
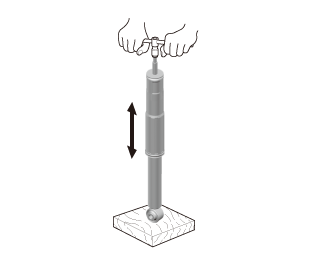
Push on the damper as shown.
|
|
2.
|
Compress the damper assembly by hand, and check for smooth operation
through a full stroke, both compression and extension. The damper
should extend smoothly and constantly when compression is released.
If it does not, the gas is leaking and the damper should be replaced.
|
|
3.
|
Check for oil leaks, abnormal noises, and binding during these
tests.
|
|

|
NOTE: Refer to the Exploded View as needed during the following procedures.
|
|

|
|
1.
|
Install the damper mounting bushing (A)
|
|
2.
|
Install the damper assembly (B).
|
|
| 2. |
Rear Knuckle - Jack Up |
|
|
|
1.
|
Position a floor jack at the connecting point of the trailing
arm (A) and the knuckle (B).
|
|
2.
|
Raise the floor jack until the suspension begins to compress.
|
|
| 3. |
Rear Damper Lower Side - Reconnection |
|
|
|
1.
|
Loosely install the new damper mounting bolt (A).
|
|
| 4. |
Rear Damper Lower Side - Tighten Under Vehicle's Weight |
|
|
1.
|
Raise the rear suspension with the jack until the vehicle just
lifts off of the safety stands, then tighten the damper mounting
bolt to the specified torque.
|
|
| 5. |
Rear Damper Upper Side |
|
 125mm 125mm
|
|
1.
|
Install the damper mounting bushing (A).
|
|
2.
|
Install the damper mounting washer (B).
|
|
3.
|
Loosely install the new self-locking nut (C).
|
|
|
 inmm22 inmm22
|
|
4.
|
Tighten the self-locking nut (A) to the specified torque while
holding the damper shaft (B) with a hex wrench (C).
|
|
|
|
|
1.
|
Install the trunk side trim panel (A).
|
|
|

|
|
1.
|
Install the trunk rear trim panel (A).
|
|
| 8. |
Trunk Lid Weatherstrip as Needed |
|
|
|
1.
|
Install the trunk lid weatherstrip (A).
|
|
|
|
|
1.
|
Install the trunk floor cover (A).
|
|
|
|
|
2.
|
Install the front area of the trunk floor cover (A).
|
|
3.
|
Raise the seat-back(s).
|
|
|
 15mmumum 15mmumum
|
|
1.
|
Install the rear wheel.
|
|
NOTE: Before installing the wheel, clean the mating surfaces
between the brake disc or the brake drum and the inside of the wheel.
|
|
|
|
For proper inspection and adjustment of the wheel alignment,
do these checks:
|
|
1.
|
Release the parking brake to avoid an incorrect measurement.
|
|
2.
|
Make sure the suspension is not modified.
|
|
3.
|
Make sure the fuel tank is full, and that the tire repair kit,
the spare tire, the jack, and the tools are in place on the vehicle.
|
|
4.
|
Check the tire size and tire pressure according to tire information.
|
|
|
|
Use commercially available computerized four wheel alignment
equipment to measure wheel alignment (caster, camber, toe, and turning
angle). Follow the equipment manufacturer's instructions.
|
|
1.
|
Check the camber angle.
|
|
USA and Canada models
|
Camber angle:
|
| |
Except Si:
|
| |
|
Front:
|
0 ° 00 ’±30 ’
|
| |
|
Rear:
|
-0 ° 45 ’±45 ’
|
| |
Si (Without 18 inch wheel):
|
| |
|
Front:
|
-0 ° 04 ’±30 ’
|
| |
|
Rear:
|
-0 ° 52 ’±45 ’
|
| |
Si (With 18 inch wheel):
|
| |
|
Front:
|
-0 ° 18 ’±30 ’
|
| |
|
Rear:
|
-0 ° 45 ’±45 ’
|
|
(Maximum difference between the front right and
left side: 0 ° 45 ’)
|
|
|
|
|
Mexico models
|
Camber angle:
|
| |
Front:
|
0 ° 20 ’±30 ’
|
| |
Rear:
|
-0 ° 22 ’±45 ’
|
|
(Maximum difference between the front right and
left side: 0 ° 45 ’)
|
|
|
|
|

|
If the measurement is within specification, measure
the toe-in.
|
|
|
|
If the measurement for the front camber is not
within the specification, go to front camber adjustment.
|
|
|
|
If the measurement for the rear camber is not
within the specification, check for bent or damaged
suspension components.
|
|
|
|
| 13. |
Rear Toe - Inspection |
|
|
Use commercially available computerized four wheel alignment
equipment to measure wheel alignment (caster, camber, toe, and turning
angle). Follow the equipment manufacturer's instructions.
|
|
1.
|
Release the parking brake to avoid an incorrect measurement.
|
|
2.
|
Check the toe.
|
|
Rear toe-in: 2+2-1 mm (0.08+0.08-0.04 in)
|
|
|
If adjustment is required, go to the rear toe
adjustment.
|
|
|
|
If no adjustment is required, go to front toe
inspection.
|
|
|
|
1.
Rear Damper Exploded View
Exploded View
se.rlockingum10125mmmminmountingandmountingamanduurrorallandsmeelh
1.
Vehicle Lift
...
See also:
Honda Civic Owners Manual. Playing SiriusXM’ Radio
To Change the Tune Mode
1. Select .
2. Select Tune Mode.
3. Select Channel Mode or Category Mode.
Playing SiriusXM’ Radio*
In the channel mode, all available channels are
selectable. In the category mode, you can select a
channel within a category (Jazz, Rock, Classical, etc.).
...
 Dampers/Shocks
 Rear Damper Removal, Installation, and Inspection (Natural Gas models)