Honda Civic manuals

Honda Civic Service Manual: Rear Brake Disc Removal and Installation

411125 LEFT


411127 RIGHT


411122 BOTH


NOTE: Keep grease away from the brake disc and the brake pads.


1. Vehicle Lift

1.

Raise the vehicle on a lift, and make sure it is securely supported.


2. Center Console Rear Trim

1.

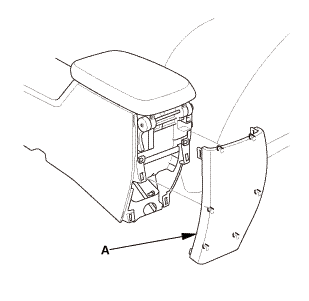
Remove the center console rear trim (A).


3. Rear Wheel

1.

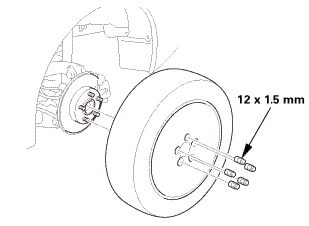
Remove both rear wheels.


4. Rear Brake Caliper - Detach


1.

Release the parking brake lever fully.


2.

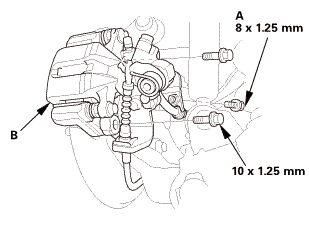
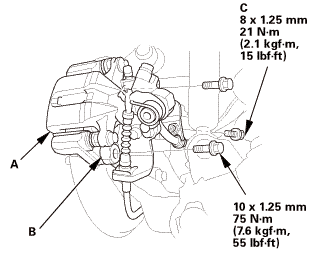
Remove the brake hose mounting bolt (A).


3.

Remove the caliper assembly (B).


NOTE:

To prevent damage to the caliper assembly or brake hose, use a short piece of wire to hang the caliper assembly from the undercarriage.

Do not twist the brake hose and the parking brake cable excessively.


5. Rear Brake Disc

1.

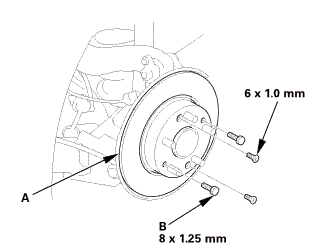
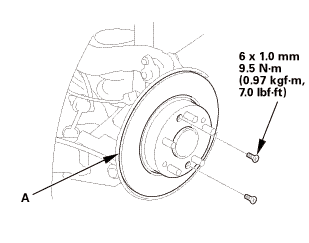
Remove the brake disc (A).


NOTE: If the brake disc is stuck to the hub bearing unit, thread two 8 x 1.25 mm bolts (B) into the brake disc to push it away from the hub bearing unit. Turn each bolt 90 degrees at a time to prevent the brake disc from binding.


NOTE: Keep grease away from the brake disc and the brake pads.


1. Rear Brake Disc

1.

Install the brake disc (A).


NOTE: Before installing the brake disc, clean the mating surfaces between the hub bearing unit and the inside of the brake disc.


2. Rear Brake Caliper - Reattach


1.

Install the caliper assembly (A).


NOTE: Make sure the washers (B) are in position.


2.

Install the brake hose mounting bolt (C).


3. Rear Brake Caliper Lever - Contact Check (Disc Brake)

1.

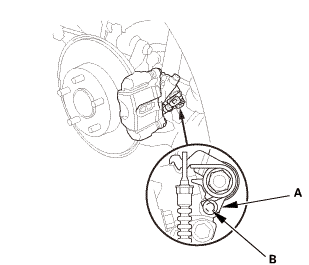
Make sure the lever (A) on the rear brake caliper contacts the stop pin (B).


NOTE: The lever will only contact the stop pin when the parking brake adjusting nut is loosened.


4. Parking Brake - Adjustment (Disc Brake)

1.

Pull the parking brake lever 1 click.


2.

Tighten the parking brake adjusting nut until the parking brakes drag slightly when the rear wheels are turned.


3.

Release the parking brake lever fully.


4.

Check that the parking brakes do not drag when the rear wheels are turned.


5.

Readjust if necessary.


6.

Make sure the parking brake lever is within the specified number of clicks (Except Si: 8 to 10 clicks, Si: 8 to 9 clicks).


5. Rear Brake Disc Runout - Inspection


1.

Inspect the brake disc to wheel surface for damage and cracks.


2.

Clean the brake disc thoroughly, and remove all rust.


3.

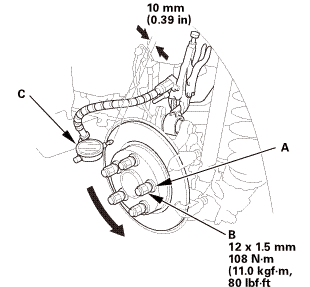
Install suitable flat washers (A) and the wheel nuts (B).


4.

Tighten the wheel nuts to the specified torque to hold the brake disc securely against the hub.


5.

Set up the dial gauge (C) against the brake disc as shown.


6.

Measure the runout at 10 mm (0.39 in) from the outer edge of the brake disc.


Brake disc runout:


Service limit:

0.04 mm (0.0016 in)


7.

If the brake disc is beyond the service limit, refinish the brake disc with a Honda-approved commercially available on-car brake lathe.


Maximum refinishing limit: 8.0 mm (0.315 in)


NOTE:

If the brake disc is beyond the service limit for refinishing, replace it.

If the brake disc is replaced with a new one, check the new disc for runout. If the new disc is out of specification, refinish the disc.


6. Rear Wheel

15mmumum

1.

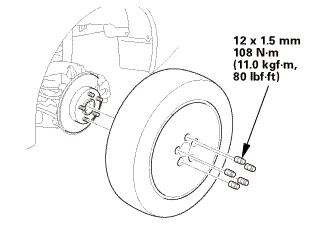
Install both rear wheels.


NOTE: Before installing the wheel, clean the mating surfaces between the brake disc or the brake drum and the inside of the wheel.


7. Center Console Rear Trim

1.

Install the center console rear trim (A).


Rear Brake Disc Removal and Installation
...

Rear Hub Bearing Unit Replacement (Disc Brake)
...

See also:

Honda Civic Service Manual. Console Box Trim Removal and Installation ('13-'14)
1. Console Box Trim 1. Remove the mat (A). 2. Remove the console box trim (A). ...

© 2016-2024 Copyright www.hocivic.com

0.0067