Honda Civic Service Manual: Rear Brake Disc Inspection


Frequent inhalation of brake pad dust, regardless of material composition, could
be hazardous to your health.
|

|
Avoid breathing dust particles.
|
|
|
|
Never use an air hose or brush to clean brake assemblies. Use
an OSHA-approved vacuum cleaner.
|
|
|
|
1.
|
Raise the vehicle on a lift, and make sure it is securely supported.
|
|
|
|
|
1.
|
Remove both rear wheels.
|
|
|
|
|
1.
|
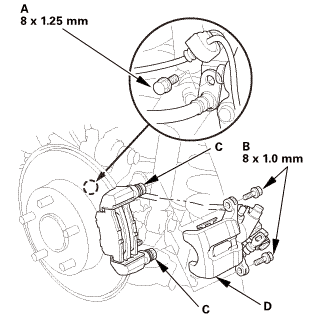
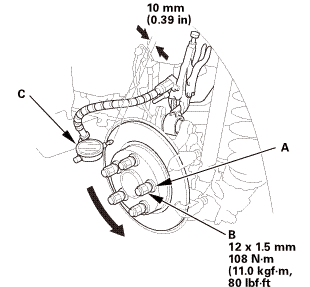
Remove the brake hose mounting bolt (A).
|
|
2.
|
Remove the flange bolts (B) while holding the respective caliper
pins (C) with a wrench.
|
|
3.
|
Remove the caliper body (D).
|
|
NOTE: Do not twist the brake hose and the parking brake cable
to prevent damage.
|
|
4.
|
Check the hose and pin boots for damage and deterioration.
|
|
|
|
|
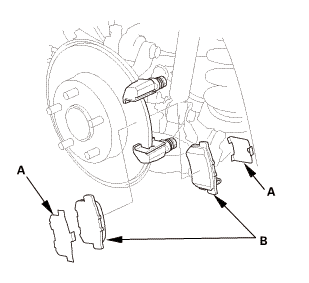
5.
|
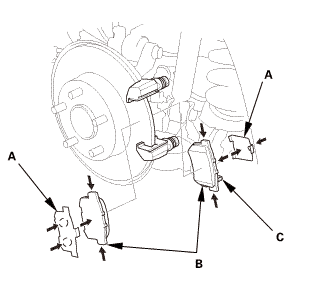
Remove the pad shims (A) and the brake pads (B).
|
|

| 1. |
Rear Brake Disc Thickness and Parallelism - Inspection |
|
|
|
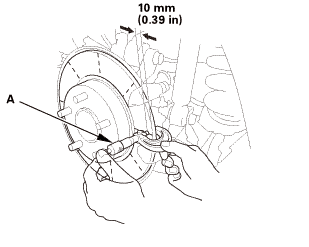
1.
|
Using a micrometer (A), measure the brake disc thickness at eight
points, about 45 ° apart and 10 mm (0.39 in) in from the outer edge
of the brake disc.
|
|
Replace the brake disc if the smallest measurement is less than
the maximum refinishing limit.
|
|
|
Brake disc thickness:
|
| |
Standard:
|
9.0 mm (0.354 in)
|
| |
Maximum refinishing limit:
|
8.0 mm (0.315 in)
|
|
Brake disc parallelism*:
|
0.015 mm (0.00059 in) max.
|
|
|
|
|
*: This is the maximum allowable difference between the thickness
measurements.
|
|
2.
|
If the brake disc is beyond the service limit for parallelism,
refinish the brake disc with a Honda-approved commercially available
on-car brake lathe.
|
|
NOTE: If the brake disc is beyond the service limit for refinishing,
replace it.
|
|
3.
|
Inspect the brake disc runout.
|
|
| 2. |
Rear Brake Disc Runout - Inspection |
|
|
|
1.
|
Inspect the brake disc to wheel surface for damage and cracks.
|
|
2.
|
Clean the brake disc thoroughly, and remove all rust.
|
|
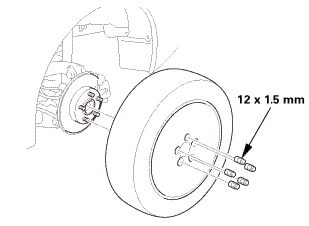
3.
|
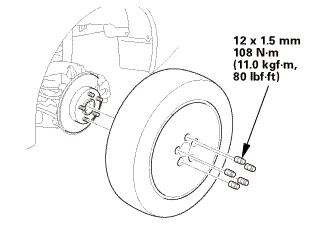
Install suitable flat washers (A) and the wheel nuts (B).
|
|
4.
|
Tighten the wheel nuts to the specified torque to hold the brake
disc securely against the hub.
|
|
5.
|
Set up the dial gauge (C) against the brake disc as shown.
|
|
6.
|
Measure the runout at 10 mm (0.39 in) from the outer edge of
the brake disc.
|
|
|
Brake disc runout:
|
| |
Service limit:
|
0.04 mm (0.0016 in)
|
|
|
|
|
7.
|
If the brake disc is beyond the service limit, refinish the brake
disc with a Honda-approved commercially available on-car brake lathe.
|
|
Maximum refinishing limit: 8.0 mm (0.315 in)
|
|
NOTE:
|
|
|
If the brake disc is beyond the service limit
for refinishing, replace it.
|
|
|
|
If the brake disc is replaced with a new one,
check the new disc for runout. If the new disc is
out of specification, refinish the disc.
|
|
|
|

Frequent inhalation of brake pad dust, regardless of material composition, could
be hazardous to your health.
|
|
Avoid breathing dust particles.
|
|
|
|
Never use an air hose or brush to clean brake assemblies. Use
an OSHA-approved vacuum cleaner.
|
|
|
|
|
1.
|
Apply a thin coat of M-77 assembly paste (P/N 08798-9010) to
the pad side of the shims (A), the back of the brake pads (B), and
the other areas indicated by the arrows.
|
|
NOTE: Wipe off the excess assembly paste from the pad shims and
brake pads friction material.
|
|
2.
|
Install the brake pads and the pad shims.
|
|
NOTE: Install the brake pad with the wear indicator (C) on the
bottom inside position.
|
|
|
|
|
3.
|
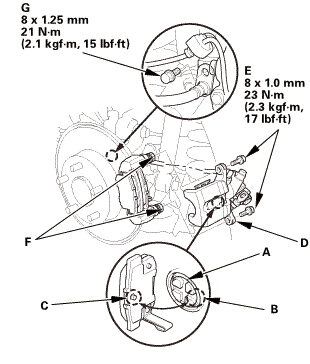
Rotate the caliper piston (A) clockwise into the cylinder.
|
|
4.
|
Align the cutout (B) in the piston with the tab (C) on the inner
pad by turning the piston back.
|
|
NOTE: Be careful when moving the piston back in the caliper;
brake fluid might overflow from the master cylinder's reservoir.
If brake fluid gets on any painted surface, wash it off immediately
with water.
|
|
5.
|
Install the caliper body (D).
|
|
6.
|
Install the flange bolts (E) while holding respective caliper
pins (F) with a wrench.
|
|
7.
|
Install the brake hose mounting bolt (G).
|
|
8.
|
Press the brake pedal several times to make sure the brakes work.
|
|
NOTE: Engagement may require a greater pedal stroke immediately
after the brake pads have been replaced as a set. Several applications
of the brake pedal will restore the normal pedal stroke.
|
|
|
 15mmumum 15mmumum
|
|
1.
|
Install both rear wheels.
|
|
NOTE: Before installing the wheel, clean the mating surfaces
between the brake disc or the brake drum and the inside of the wheel.
|
|
See also:
Honda Civic Owners Manual. Keys
Use the key to start and stop the engine, to lock and unlock the doors and to
open
the trunk. You can also use the remote transmitter or smart entry system* to
lock
and unlock the doors and to open the trunk.
Smart entry remote*
The built-in key can be used to
lock/unlock the
doors when ...


