Honda Civic Service Manual: Rear Brake Caliper Overhaul
 View
View
| 1. |
Rear Brake Caliper Exploded View |
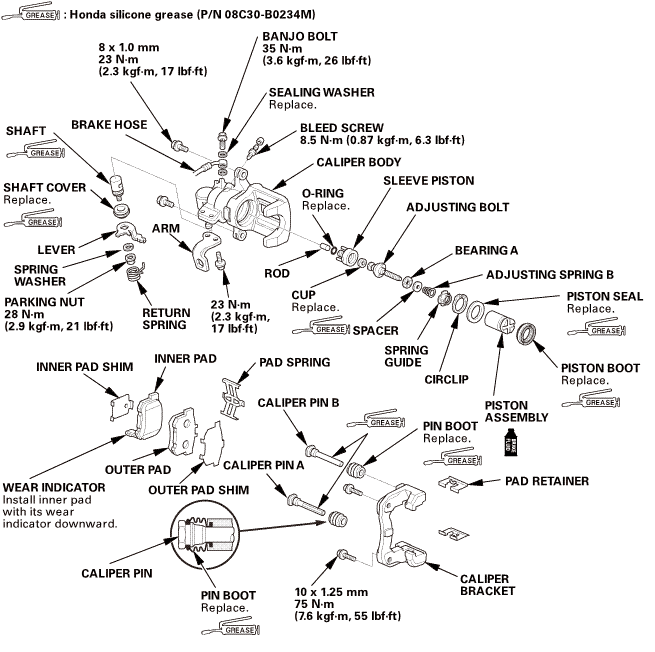
 Disassembly

Frequent inhalation of brake pad dust, regardless of material composition, could
be hazardous to your health.
|

|
Avoid breathing dust particles.
|
|
|

|
Never use an air hose or brush to clean brake assemblies. Use
an OSHA-approved vacuum cleaner.
|
|
|

|
Clean all parts in brake fluid and air dry; blow out all passages
with compressed air.
|
|
|

|
Make sure no dirt or other foreign matter gets in the brake fluid.
|
|
|

|
Make sure no grease or oil gets on the brake discs or pads.
|
|
|

|
Do not reuse drained brake fluid. Use only new Honda DOT 3 Brake
Fluid from an unopened container. Using a non-Honda brake fluid
can cause corrosion and shorten the life of the system.
|
|
|

|
Refer to the Exploded View as needed during this procedure.
|
|
| 1. |
Rear Brake Caliper - Disassembly |
|
|
|
1.
|
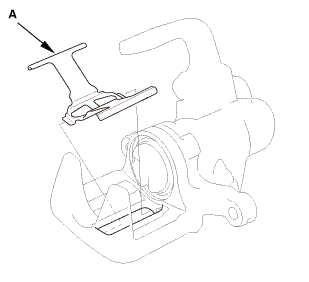
Remove the pad spring (A).
|
|
|
|
|
2.
|
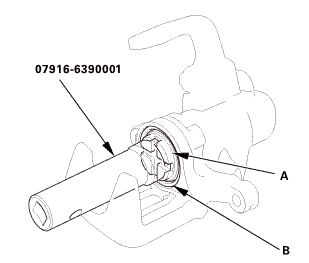
Rotate the piston (A) counterclockwise by using the locknut wrench,
and remove the piston and piston boot (B).
|
|
NOTE: Be careful not to damage the piston.
|
|
|
|
|
3.
|
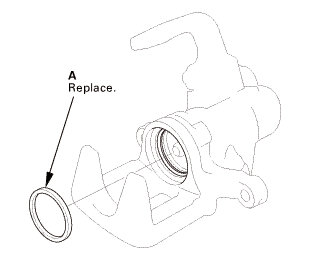
Remove the piston seal (A).
|
|
NOTE: Be careful not to damage the inner surface of the cylinder
wall with the tool.
|
|
|
|
|
4.
|
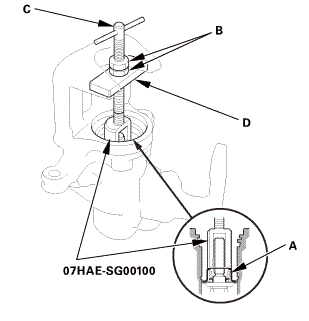
Install the rear caliper spring compressor on the spring guide
(A) inside of the caliper body.
|
|
5.
|
Loosen the locknuts (B) on the top of the shaft (C), and turn
the shaft clockwise until the plate (D) touches the caliper body.
|
|
|
|
|
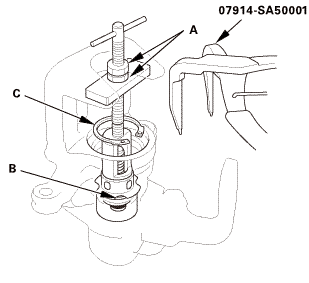
6.
|
Turn the lower locknut (A) until contacts the plate.
|
|
7.
|
Turn the shaft for 1/4 to 1/2 clockwise to compress the adjusting
spring B.
|
|
8.
|
Remove the circlip (C).
|
|
9.
|
Turn the lower locknut until it contacts the plate again, then
lock it in place with the upper locknut.
|
|
NOTE: Leave the locknuts in this position for caliper reassembly.
|
|
10.
|
Remove the rear caliper spring compressor.
|
|
|
|
|
11.
|
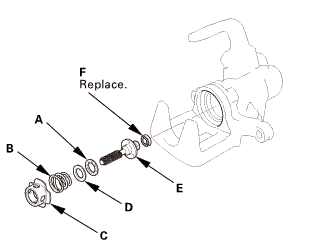
Remove the spring guide (C).
|
|
12.
|
Remove adjusting spring B.
|
|
13.
|
Remove the spacer (D).
|
|
15.
|
Remove the adjusting bolt (E).
|
|
|
|
|
17.
|
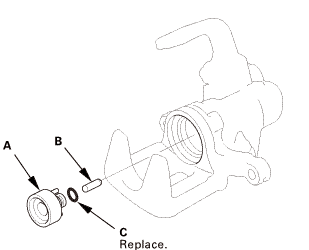
Remove the sleeve piston (A).
|
|
19.
|
Remove the O-ring (C).
|
|
|
|
|
20.
|
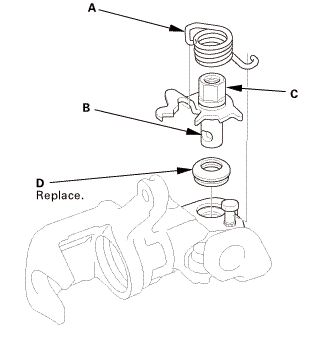
Remove the return spring (A).
|
|
21.
|
Remove the lever/shaft (B).
|
|
NOTE: Do not loosen the parking nut (C) with the shaft attached
to the caliper. When disassembling the lever and the shaft, clamp
the lever in a vice and loosen the nut.
|
|
22.
|
Remove the shaft cover (D).
|
|
|
|
|
23.
|
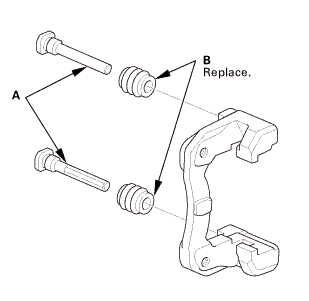
Remove the caliper pins (A).
|
|
NOTE: The upper and lower caliper pins are different. During
installation, make sure the caliper pins are in the proper positions.
|
|
24.
|
Remove the pin boots (B).
|
|
 Reassembly

Frequent inhalation of brake pad dust, regardless of material composition, could
be hazardous to your health.
|

|
Avoid breathing dust particles.
|
|
|

|
Never use an air hose or brush to clean brake assemblies. Use
an OSHA-approved vacuum cleaner.
|
|
|

|
Clean all parts in brake fluid and air dry; blow out all passages
with compressed air.
|
|
|

|
Before reassembling, check that all parts are free of dirt and
other foreign particles.
|
|
|

|
Make sure no dirt or other foreign matter gets in the brake fluid.
|
|
|

|
Make sure no grease or oil gets on the brake discs or pads.
|
|
|

|
Do not reuse drained brake fluid. Use only new Honda DOT 3 Brake
Fluid from an unopened container. Using a non-Honda brake fluid
can cause corrosion and shorten the life of the system.
|
|
|

|
Coat the piston, the piston seal groove, and the caliper bore
with clean brake fluid.
|
|
|

|
Use recommended greases in the rear caliper set.
|
|
|

|
After installing the caliper, check the brake hose and line for
leaks, interference, and twisting.
|
|
|

|
Refer to the Exploded View as needed during this procedure.
|
|
| 1. |
Rear Brake Caliper - Reassembly |
|
|
|
NOTE: When disassembling the lever and the shaft, assemble them
according to the following procedure, referring to the exploded
view beforehand, then install them to the caliper.
|
|

|
Install the lever and a spring washer to the shaft.
|
|
|

|
Apply new sealant (Loctite 569) to the threads of the
parking nut, and install it.
|
|
|

|
Clamp the lever in a vice, and tighten the nut.
|
|
|
1.
|
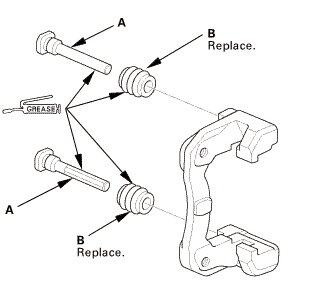
Apply a thin coat of Honda silicone grease (P/N 08C30-B0234M)
to the caliper pins (A) and the new pin boots (B).
|
|
2.
|
Install the pin boots.
|
|
3.
|
Install the caliper pins.
|
|
NOTE:
|
|

|
Make sure that the caliper pins are installed
correctly. The upper caliper pin and the lower caliper
pin are different. If these caliper pins are installed
in the wrong location, it will cause vibration,
uneven or rapid brake pad wear, and possibly uneven
tire wear.
|
|
|

|
Remove air with the inside of the boots.
|
|
|
|
|
|
|
4.
|
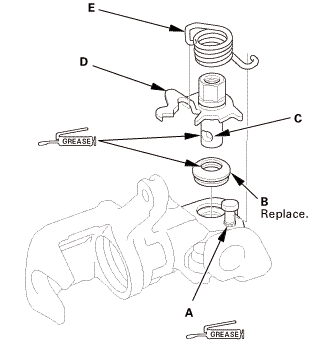
Apply a thin coat of Honda silicone grease (P/N 08C30-B0234M)
to a stop pin (A) of the caliper body.
|
|
NOTE: Check if notch of the stop pin faces to the cylinder.
|
|
5.
|
Apply a thin coat of Honda silicone grease (P/N 08C30-B0234M)
to the seal of a new shaft cover (B).
|
|
6.
|
Install the shaft cover.
|
|
7.
|
Apply a thin coat of Honda silicone grease (P/N 08C30-B0234M)
to the hole (C) in the shaft.
|
|
8.
|
Install the lever/shaft (D).
|
|
NOTE:
|
|

|
Rotate the shaft slowly when inserting so as
not to damage the seal of the shaft cover.
|
|
|

|
Fix the lip of the shaft cover to the groove
portion of the shaft completely.
|
|
|
|
9.
|
Install the return spring (E).
|
|
|
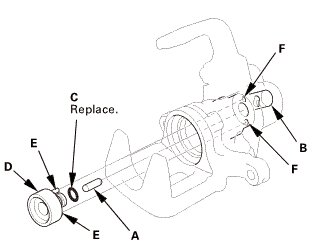
|
|
10.
|
Install the rod (A) to the shaft (B) so that it turns toward
the center.
|
|
11.
|
Install the new O-ring (C) to the sleeve piston (D).
|
|
12.
|
Install the two pins (E) of the sleeve piston into the two holes
(F) of the caliper body, so that the rod is inserted in the hole
in the bottom of the sleeve piston.
|
|
|
|
|
13.
|
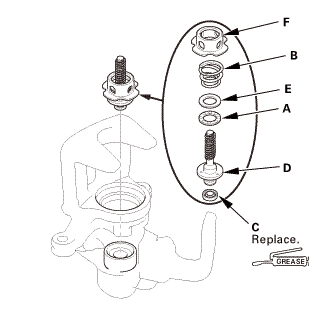
Apply a thin coat of Honda silicone grease (P/N 08C30-B0234M)
to the new cup (C), and assemble to the adjusting bolt (D).
|
|
NOTE: Install the cup with the groove facing toward bearing A.
|
|
14.
|
Assemble bearing A, the spacer (E), adjusting spring B, and the
spring guide (F),
|
|
15.
|
Install them into the caliper body.
|
|
|
|
|
16.
|
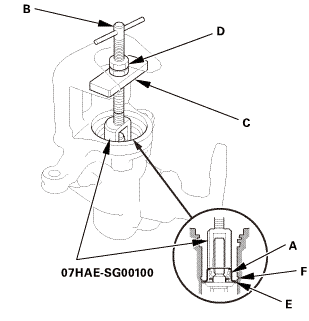
Install the rear caliper spring compressor on the spring guide
(A) in the caliper body.
|
|
17.
|
Turn the shaft (B) clockwise until the plate (C) touches the
locknut (D).
|
|
18.
|
Check that the bottom (E) of the spring guide is lower than the
circlip installation groove (F) in the caliper body.
|
|
|
|
|
19.
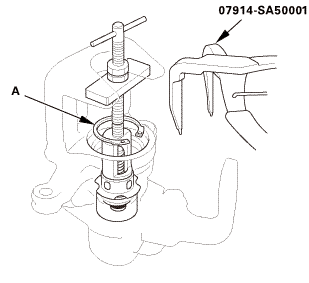
|
Install the circlip (A) with the snap ring pliers.
|
|
NOTE: Make sure the circlip securely fits in the groove of the
caliper body.
|
|
|
|
|
20.
|
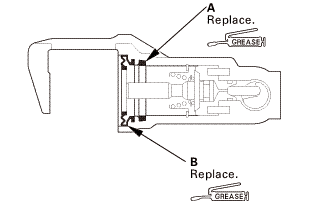
Apply a thin coat of Honda silicone grease (P/N 08C30-B0234M)
to the new piston seal (A).
|
|
21.
|
Install the piston seal.
|
|
22.
|
Apply a thin coat of Honda silicone grease (P/N 08C30-B0234M)
to the new piston boot (B).
|
|
23.
|
Install the piston boot.
|
|
|
 oms.mmm oms.mmm
|
|
24.
|
Apply brake fluid to the outer surface of the piston.
|
|
25.
|
Set the piston in place on the caliper body.
|
|
26.
|
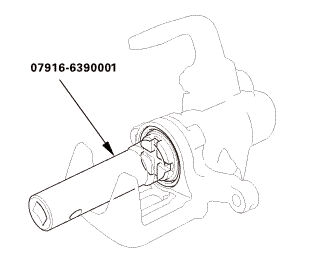
Rotate the piston clockwise with the locknut wrench to install
it.
|
|
NOTE:
|
|

|
Make sure that the piston boot is properly positioned
into the groove of the piston.
|
|
|

|
Be careful not to damage the piston boot when
rotate the piston.
|
|
|
|
|

|
|
27.
|
Install the pad spring (A).
|
|
1.
Vehicle Lift
1.
Raise the vehicle on a lift, and make sure it is securely supported.
2. ...
See also:
Honda Civic Owners Manual. How the System Activates
The system becomes ready to start searching for lane markings when all the
following conditions are met:
The vehicle is traveling between about 45 and 90 mph (72 and 145
km/h).
The vehicle is on a straight or slightly curved road.
The turn signals are off.
The b ...
 View
View
 Disassembly
 Reassembly
 Front Brake Caliper Removal and Installation (Natural Gas models)
 Brake Pads


 oms.mmm