Honda Civic Service Manual: Front Seat Belt Removal and Installation - Passenger's Seat (2-door)

Removal
| 1. |
Battery Terminal (SRS) - Disconnection |
|
|
|
1.
|
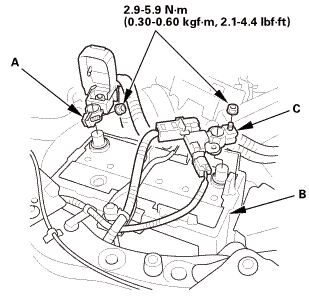
Make sure the ignition switch is in LOCK (0).
|
|
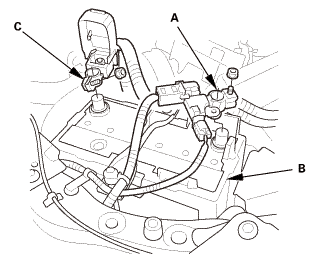
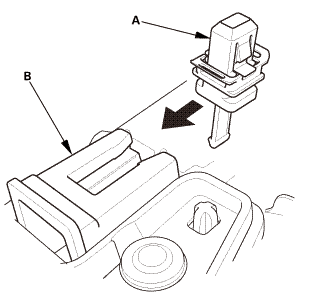
2.
|
Disconnect and isolate the negative cable and battery sensor
(A) from the battery (B).
|
|
NOTE: Always disconnect the negative side first.
|
|
3.
|
Disconnect the positive cable (C) from the battery.
|
|
4.
|
Wait at least 3 minutes before starting work.
|
|
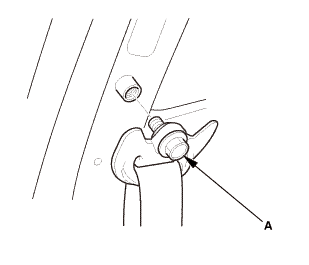
| 2. |
Front Seat Belt Lower Anchor Bolt - Passenger's Side |
|
|
|
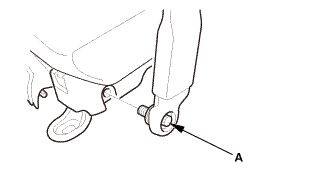
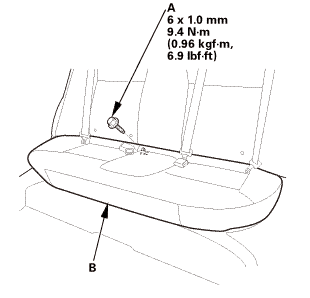
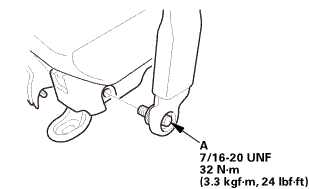
1.
|
Remove the lower anchor bolt (A).
|
|
|
|
|
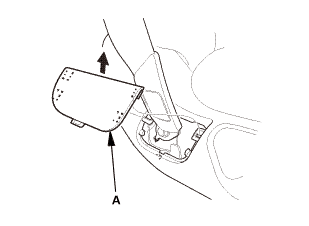
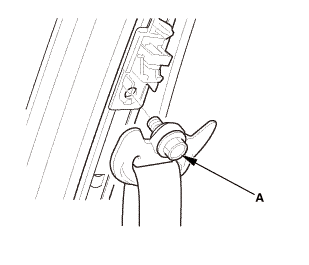
1.
|
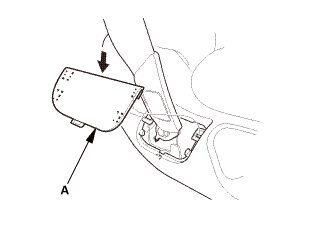
Remove the anchor cover (A).
|
|
|
|
|
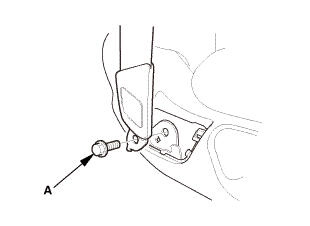
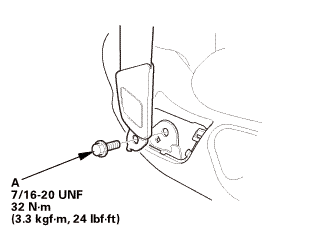
2.
|
Remove the lower anchor bolt (A).
|
|
| 3. |
Front Door Sill Trim - 2-Door |
|
|
|
1.
|
Remove the front door sill trim (A).
|
|
|
|
|
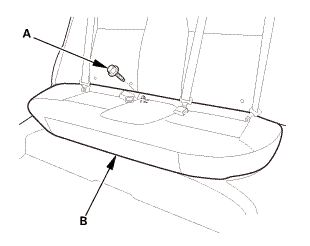
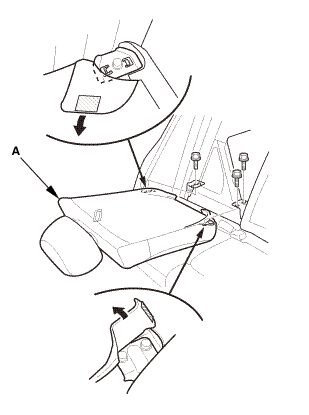
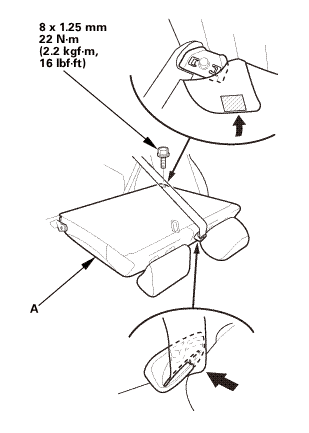
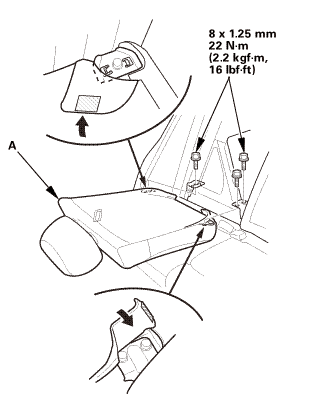
1.
|
Remove the bolt (A) securing the rear seat cushion (B).
|
|
|
|
|
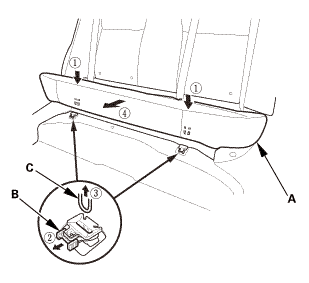
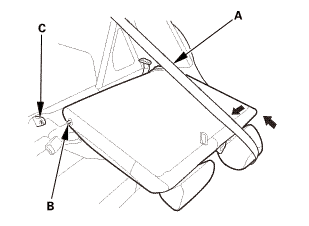
2.
|
While pushing down the rear seat cushion (A), pull the seat hook
handles (B) to release the hooks (C).
|
|
3.
|
Remove the rear seat cushion.
|
|
| 5. |
Rear Seat-Back - Fold Down |
|
|
|
1.
|
Remove the rear seat-back (A).
|
|
| 6. |
Right Rear Seat-Back - Split Fold Down |
|
|
|
1.
|
Remove the right rear seat-back (A).
|
|
| 7. |
Center Pivot Bracket - Split Fold Down |
|
|
|
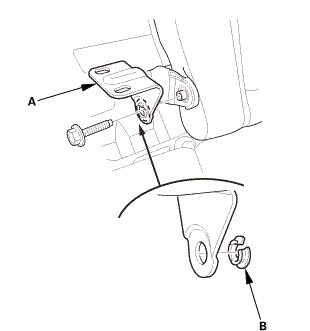
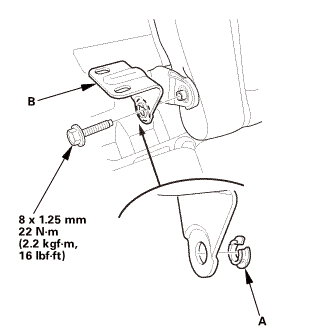
1.
|
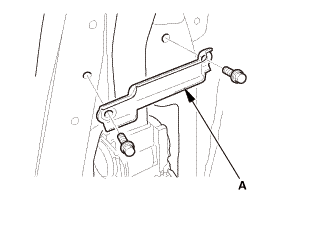
Remove the center pivot bracket (A).
|
|
2.
|
If necessary, remove the bushing (B).
|
|
| 8. |
Left Rear Seat-Back - Split Fold Down |
|
|
|
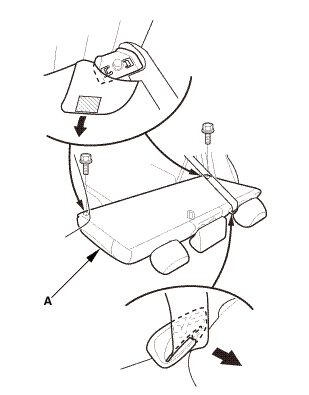
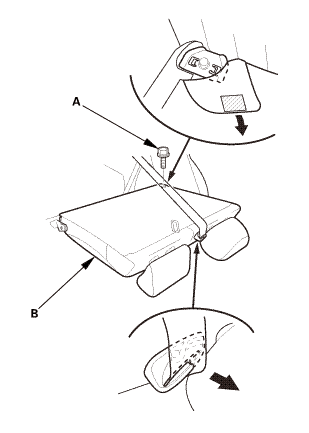
1.
|
Remove the bolt (A) securing the left rear seat-back (B).
|
|
|
|
|
2.
|
Extend the center seat belt (A), then remove the left rear seat-back
(B).
|
|
| 9. |
Both Quarter Pillar Trims |
|

|
|
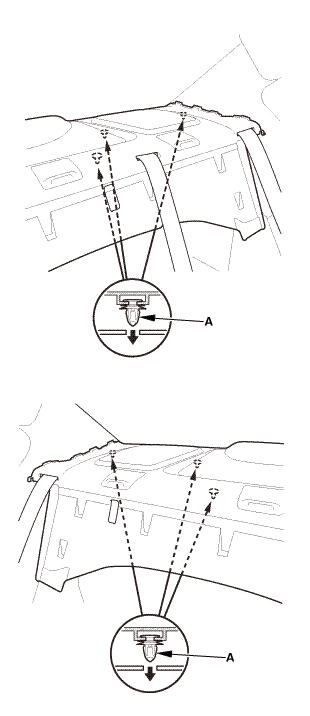
1.
|
Remove the cap (A) and the clip (B).
|
|
2.
|
The left side is shown; repeat on the right side.
|
|
|
|
|
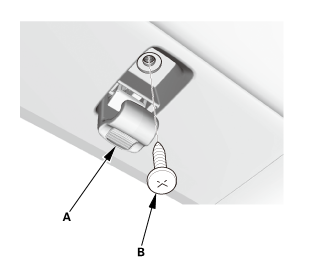
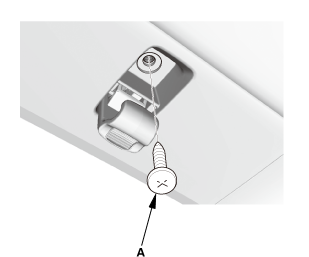
3.
|
Lower the coat hanger hook (A), then remove the screw (B).
|
|
4.
|
The left side is shown; repeat on the right side.
|
|
|
|
|
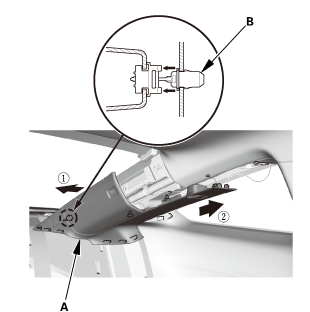
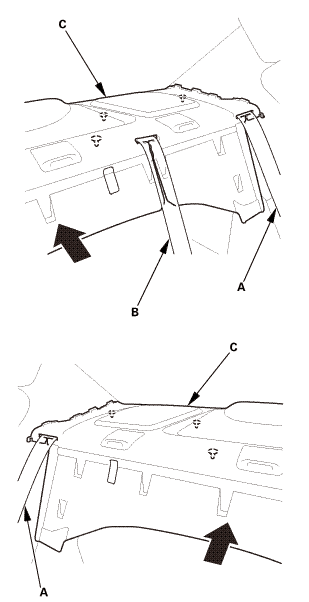
5.
|
Pull out the quarter pillar trim (A) to release the clips.
|
|
6.
|
Remove the quarter pillar trim.
|
|
NOTE: The rear clip (B) will stay in the body.
|
|
7.
|
The left side is shown; repeat on the right side.
|
|
|
|
|
8.
|
Remove the rear clip (A).
|
|
9.
|
The left side is shown; repeat on the right side.
|
|
|
|
|
1.
|
Fold down the seat-back(s).
|
|
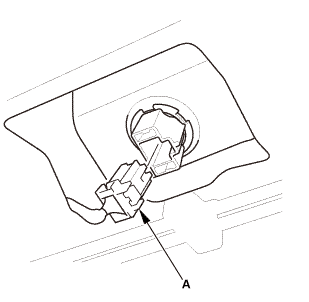
2.
|
From the trunk compartment, disconnect the connector (A).
|
|
|
|
|
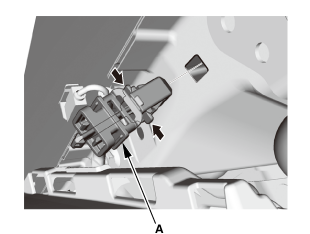
3.
|
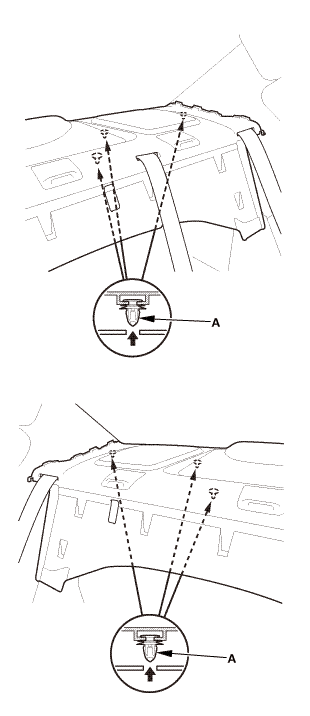
From the trunk compartment, detach the clips (A).
|
|
|
|
|
4.
|
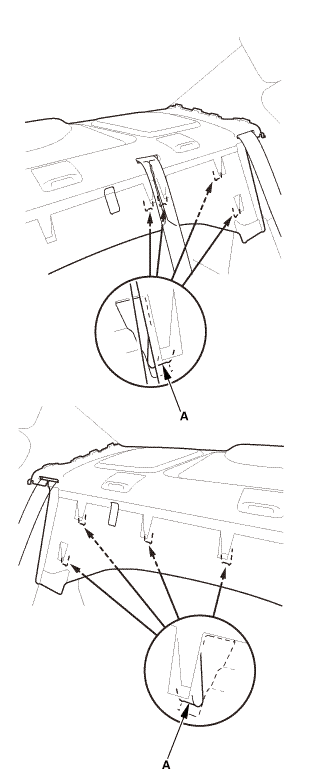
Release the hooks (A).
|
|
|
|
|
5.
|
Pull out both rear seat belts (A) and the rear center seat belt
(B) through the slits in the rear shelf trim (C), then remove the
rear shelf trim.
|
|
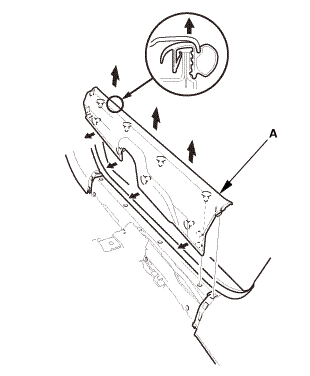
| 11. |
Rear Side Trim Panel - Passenger's Side (2-door) |
|
|
|
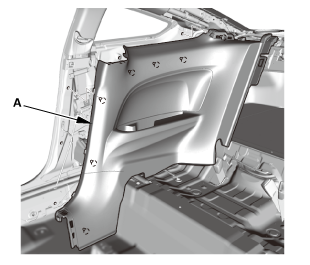
1.
|
Remove the rear side trim panel (A).
|
|
| 12. |
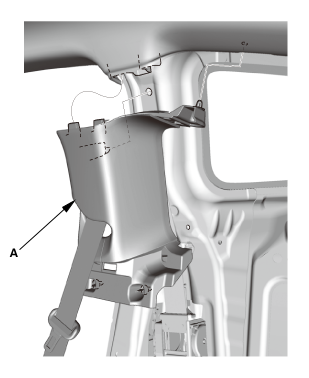
B-Pillar Upper Trim - Passenger's Side (2-Door) |
|
|
|
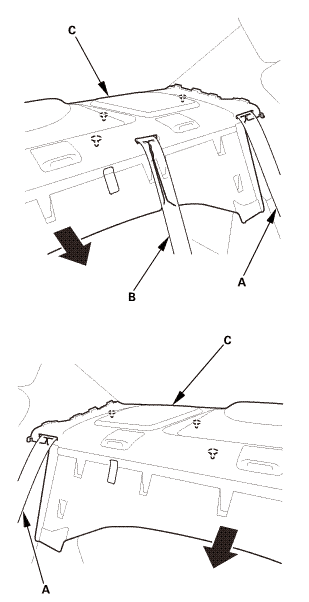
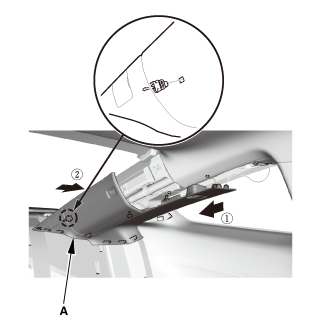
1.
|
Remove the B-pillar upper trim (A).
|
|
|
|
|
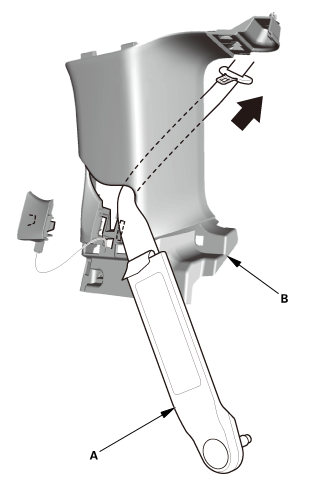
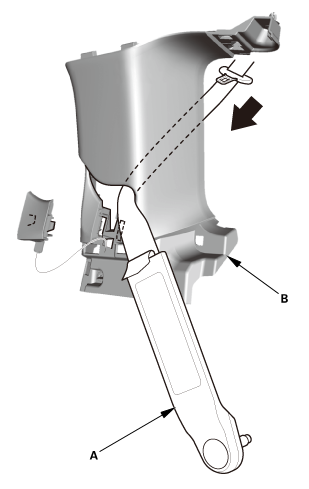
2.
|
Pass the front seat belt lower anchor (A) out through a hole
in the B-pillar upper trim (B), then remove the trim.
|
|
| 13. |
Front Seat Belt Upper Anchor Bolt - Passenger's Side |
|
2-door
4-door
|
|
1.
|
Remove the upper anchor bolt (A).
|
|
| 14. |
Front Seat Belt Retractor - Passenger's Side (2-Door) |
|
|
|
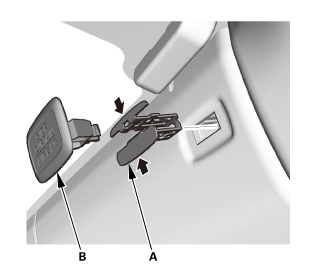
1.
|
Remove the seat belt guide (A).
|
|
|
|
|
2.
|
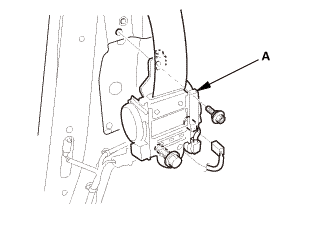
Remove the seat belt retractor (A).
|
|
3.
|
Disconnect the connector.
|
|

Installation
| 1. |
Front Seat Belt Retractor - Passenger's Side (2-Door) |
|
 uur uur
|
|
1.
|
Connect the connector.
|
|
2.
|
Install the seat belt retractor (A).
|
|
|
|
|
3.
|
Install the seat belt guide (A).
|
|
| 2. |
Front Seat Belt Upper Anchor Bolt - Passenger's Side |
|
|
|
1.
|
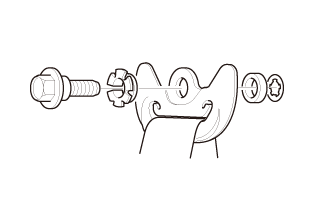
Assemble the washer, the collar, and the bushing on the upper
anchor bolt as shown.
|
|
NOTE: Apply medium strength liquid thread lock to the upper anchor
bolt before reinstallation.
|
|
|
2-door
 unr:2m.im unr:2m.im
4-door
 uur:2m.im uur:2m.im
|
|
2.
|
Install the upper anchor bolt (A).
|
|
| 3. |
B-Pillar Upper Trim - Passenger's Side (2-Door) |
|
|
|
1.
|
If the side curtain airbag has deployed, replace the B-pillar
upper trim (A) and all clips (B) on the trim with new parts.
|
|
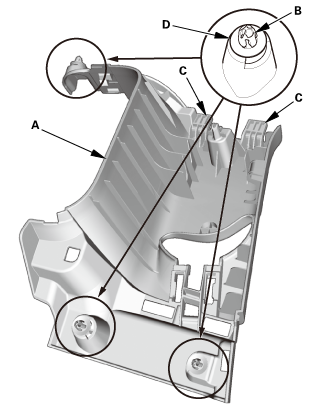
2.
|
If the side curtain airbag has not deployed, check the B-pillar
upper trim and note the following items:
|
|

|
To prevent the side curtain airbags from deploying
improperly and possibly causing injury, inspect
the trim and replace it with a new one if it has
any of the following damage:
|
|
|
-
|
Any cracks or deformations in the B-pillar
upper trim or the upper hooks (C), or any
stress-whitened areas in the upper part
of the trim
|
|
|
|
-
|
Any cracks or stress-whitening areas
in the clip seating surfaces (D)
|
|
|
|
|
If the clips are damaged or stress-whitened,
replace them with new ones.
|
|
|
|
|
|
|
3.
|
Pass the front seat belt lower anchor (A) in through a hole in
the B-pillar upper trim (B).
|
|
|
|
|
4.
|
Install the B-pillar upper trim (A).
|
|
| 4. |
Rear Side Trim Panel - Passenger's Side (2-door) |
|
|
|
1.
|
Install the rear side trim panel (A).
|
|
|
|
|
1.
|
Slip the rear seat belts (A) and the rear center seat belt (B)
through the slits in the rear shelf trim (C).
|
|
|
|
|
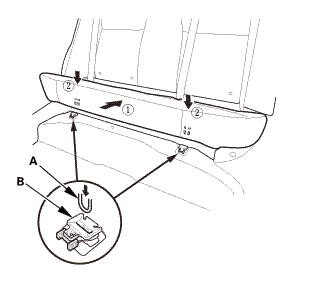
2.
|
Install the hooks (A).
|
|
|
|
|
3.
|
Install the clips (A).
|
|
|
|
|
4.
|
From the trunk compartment, connect the connector (A).
|
|
5.
|
Raise the seat-back(s).
|
|
| 6. |
Both Quarter Pillar Trims |
|
|
|
1.
|
Install the new rear clip (A) to the quarter pillar trim (B).
|
|
|
|
|
2.
|
Fit the clips into the holes in the quarter pillar.
|
|
3.
|
Lightly push the quarter pillar trim (A) into place, then install
the trim.
|
|
NOTE:
|
|
|
Make sure the side curtain airbag is not tucked
under the clips or the ribs.
|
|
|
|
Do not push too hard on the quarter pillar trim.
If you push too hard, the clip will be damaged,
and it will not hold the trim properly.
|
|
|
|
Gently tug on the quarter pillar trim to verify
that all clips are securely fastened.
|
|
|
|
|
|
|
4.
|
Install the screw (A).
|
|
|
|
|
5.
|
Install the clip (A) and the cap (B).
|
|
| 7. |
Left Rear Seat-Back - Split Fold Down |
|
|
|
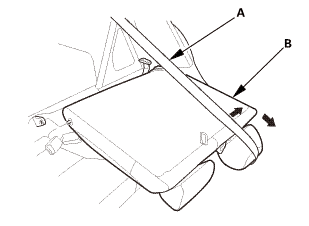
1.
|
Extend the center seat belt (A), then install the pivot shaft
(B) to the center pivot bracket (C).
|
|
|
|
|
2.
|
Install the left rear seat-back (A).
|
|
| 8. |
Center Pivot Bracket - Split Fold Down |
|
|
|
1.
|
If necessary, install the bushing (A).
|
|
2.
|
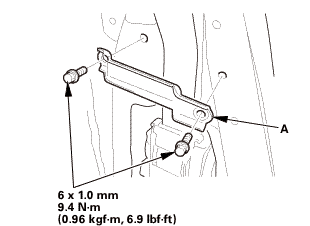
Install the center pivot bracket (B).
|
|
| 9. |
Right Rear Seat-Back - Split Fold Down |
|
|
|
1.
|
Install the right rear seat-back (A).
|
|
| 10. |
Rear Seat-Back - Fold Down |
|
|
|
1.
|
Install the rear seat-back (A).
|
|
|
|
|
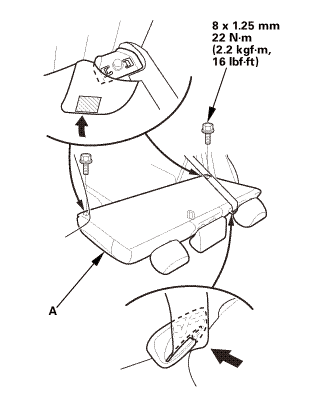
1.
|
Install the hooks (A) to the rear seat cushion clips (B).
|
|
|
|
|
2.
|
Install the bolt (A) securing the rear seat cushion (B).
|
|
| 12. |
Front Door Sill Trim - 2-Door |
|

|
|
1.
|
Install the front door sill trim (A).
|
|
| 13. |
Front Seat Belt Lower Anchor Bolt - Passenger's Side |
|
 @@ @@
|
|
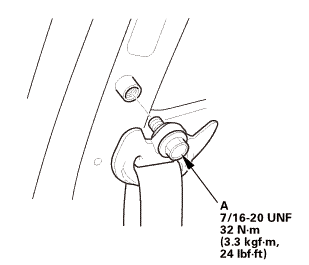
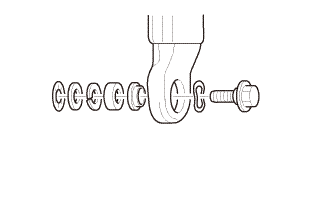
1.
|
Assemble the washer, the collar, and the bushing on the lower
anchor bolt as shown.
|
|
NOTE: Apply medium strength liquid thread lock to the lower anchor
bolt before reinstallation.
|
|
|
 7/m2onm 7/m2onm
|
|
2.
|
Install the lower anchor bolt (A).
|
|
|
 um22nmin um22nmin
|
|
1.
|
Install the lower anchor bolt (A).
|
|
|
|
|
2.
|
Install the anchor cover (A).
|
|
| 14. |
Battery Terminal (SRS) - Reconnection |
|
 (o.2ao.sam. (o.2ao.sam.
|
|
NOTE: If the battery performs abnormally, test the battery.
|
|
1.
|
Clean the battery terminals.
|
|
2.
|
Connect the positive cable (A) to the battery (B).
|
|
NOTE: Always connect the positive side first.
|
|
3.
|
Connect the negative cable and battery sensor (C) to the battery.
|
|
4.
|
Apply multipurpose grease to the terminals to prevent corrosion.
|
|
Removal
1.
Battery Terminal (SRS) - Disconnection
1.
Make sure the ignition switch is in LOCK (0).
...
Removal
SRS components are located in this area. Review the SRS component locations
and the precautions and procedures before doing repairs or service.
1.
Bat ...
 Front Seat Belt Removal and Installation - Driver's Seat (2-door)
 Power Seat Adjustment Switch Removal, Installation, and Test