Honda Civic Service Manual: Rear Hub Bearing Unit Replacement (Drum Brake)
4181A0 LEFT
4181A1 RIGHT
4181A2 BOTH

| 1. |
Rear Knuckle/Hub Bearing Unit Exploded View |
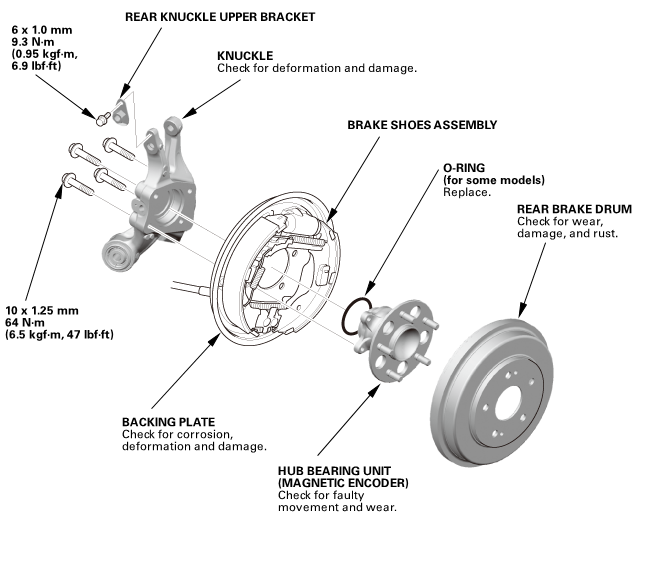 mmm.knuckles.smmnndsunssassemblvunuuni0i25mmm-mmucarroimrv.zndum(maaumcmcooei1i

|
NOTE: Refer to the Exploded View as needed during the following procedures.
|
|
|
1.
|
Raise the vehicle on a lift, and make sure it is securely supported.
|
|
|
|
|
1.
|
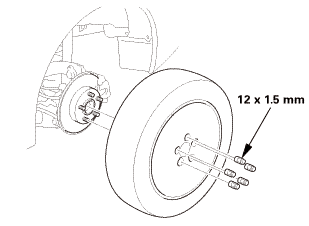
Remove the rear wheel.
|
|
|
|

Frequent inhalation of brake shoe dust, regardless of material composition,
could be hazardous to your health.
|

|
Avoid breathing dust particles.
|
|
|
|
Never use an air hose or brush to clean brake assemblies.
Use an OSHA-approved vacuum cleaner.
|
|
|
1.
|
Release the parking brake.
|
|
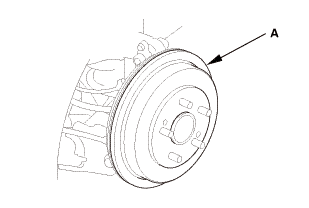
2.
|
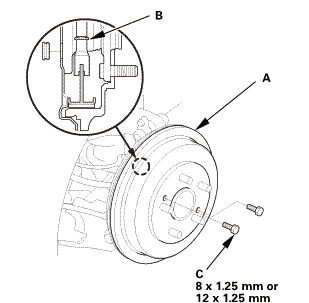
Remove the brake drum (A).
|
|
NOTE:
|
|
|
If necessary, turn the adjuster bolt (B) with
a flat-tip screwdriver until the shoes become loose.
|
|
|
|
If the brake drum is stuck to the hub bearing
unit, thread two 8 x 1.25 mm or 12 x 1.25 mm bolts
(C) into the brake drum to push it away from the
hub bearing unit. Turn each bolt 90 degrees at a
time to prevent the brake drum from binding.
|
|
|
|
|
|
|
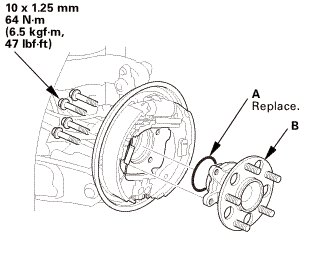
1.
|
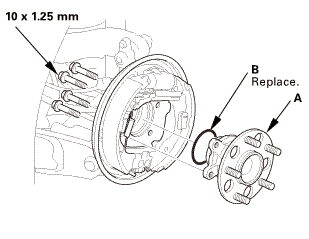
Remove the hub bearing unit (A).
|
|
2.
|
For some models: Remove the O-ring (B).
|
|

|
NOTE: Refer to the Exploded View as needed during the following procedures.
|
|
|
|
1.
|
For some models: Install the new O-ring (A).
|
|
2.
|
Install the hub bearing unit (B).
|
|
|
|
Frequent inhalation of brake shoe dust, regardless of material composition,
could be hazardous to your health.
|
|
Avoid breathing dust particles.
|
|
|
|
Never use an air hose or brush to clean brake assemblies.
Use an OSHA-approved vacuum cleaner.
|
|
|
1.
|
Install the brake drum (A).
|
|
NOTE:
|
|
|
Before installing the brake drum, clean the mating
surfaces between the hub bearing unit and the inside
of the brake drum.
|
|
|
|
After installation, press the brake pedal several
times to make sure the brakes work and self adjust
the brake shoes. Do not drive the vehicle before
doing this procedure.
|
|
|
|
|
 15mmumum 15mmumum
|
|
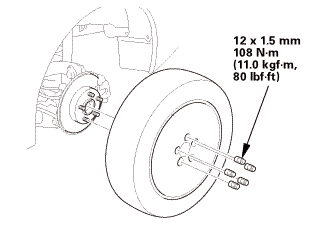
1.
|
Install the rear wheel.
|
|
NOTE: Before installing the wheel, clean the mating surfaces
between the brake disc or the brake drum and the inside of the wheel.
|
|
|
|
For proper inspection and adjustment of the wheel alignment,
do these checks:
|
|
1.
|
Release the parking brake to avoid an incorrect measurement.
|
|
2.
|
Make sure the suspension is not modified.
|
|
3.
|
Make sure the fuel tank is full, and that the tire repair kit,
the spare tire, the jack, and the tools are in place on the vehicle.
|
|
4.
|
Check the tire size and tire pressure according to tire information.
|
|
|
|
Use commercially available computerized four wheel alignment
equipment to measure wheel alignment (caster, camber, toe, and turning
angle). Follow the equipment manufacturer's instructions.
|
|
1.
|
Check the camber angle.
|
|
USA and Canada models
|
Camber angle:
|
| |
Except Si:
|
| |
|
Front:
|
0 ° 00 ’±30 ’
|
| |
|
Rear:
|
-0 ° 45 ’±45 ’
|
| |
Si (Without 18 inch wheel):
|
| |
|
Front:
|
-0 ° 04 ’±30 ’
|
| |
|
Rear:
|
-0 ° 52 ’±45 ’
|
| |
Si (With 18 inch wheel):
|
| |
|
Front:
|
-0 ° 18 ’±30 ’
|
| |
|
Rear:
|
-0 ° 45 ’±45 ’
|
|
(Maximum difference between the front right and
left side: 0 ° 45 ’)
|
|
|
|
|
Mexico models
|
Camber angle:
|
| |
Front:
|
0 ° 20 ’±30 ’
|
| |
Rear:
|
-0 ° 22 ’±45 ’
|
|
(Maximum difference between the front right and
left side: 0 ° 45 ’)
|
|
|
|
|
|
If the measurement is within specification, measure
the toe-in.
|
|
|
|
If the measurement for the front camber is not
within the specification, go to front camber adjustment.
|
|
|
|
If the measurement for the rear camber is not
within the specification, check for bent or damaged
suspension components.
|
|
|
|
|
|
Use commercially available computerized four wheel alignment
equipment to measure wheel alignment (caster, camber, toe, and turning
angle). Follow the equipment manufacturer's instructions.
|
|
1.
|
Release the parking brake to avoid an incorrect measurement.
|
|
2.
|
Check the toe.
|
|
Rear toe-in: 2+2-1 mm (0.08+0.08-0.04 in)
|
|
|
If adjustment is required, go to the rear toe
adjustment.
|
|
|
|
If no adjustment is required, go to front toe
inspection.
|
|
|
|
411123 LEFT
411126 RIGHT
411120 BOTH
1.
Vehicle Lift
1.
Raise the vehicle on a lift, and make sure it is securely sup ...
417126 LEFT
417131 RIGHT
417121 BOTH
1.
Rear Spring Exploded View
Exploded View
cusmoucheckorandlowersunand
NOTE: Refer to the ...
 Rear Brake Drum Removal and Installation
 Rear Spring Removal and Installation (Drum Brake except Natural Gas models)