Honda Civic Service Manual: ECM/PCM Removal and Installation (Except K24Z7 and R18Z1 (CVT))
1211K3

|

|
|
NOTE: For specific operations, refer to the user's manual that
came with the Honda Diagnostic System (HDS). Make sure the HDS is
loaded with the latest software.
|
|
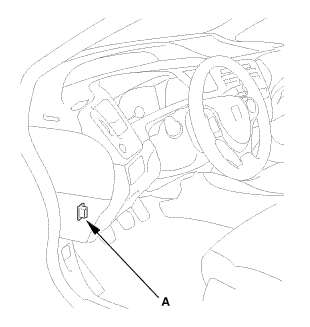
1.
|
Connect the HDS to the data link connector (DLC) (A) located
under the driver's side of the dashboard.
|
|
2.
|
Turn the ignition switch to ON (II).
|
|
3.
|
Make sure the HDS communicates with the vehicle. If it does not
communicate, go to the DLC circuit troubleshooting.
|
|
|
|
1.
|
Select the REPLACE ECM/PCM MENU, then select READ DATA and follow
the screen prompts.
|
|
NOTE:
|
|

|
Doing this step copies (READS) the engine oil
life data from the original PCM so you can later
download (WRITES) it into the new ECM/PCM.
|
|
|
|
If READ DATA indicates FAILED, continue with
this procedure.
|
|
|
|
|
|
1.
|
Turn the ignition switch to LOCK (0).
|
|
2.
|
Jump the SCS line with the HDS.
|
|
|
|
|
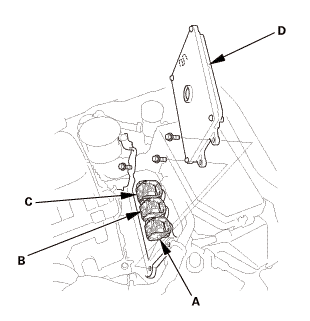
2.
|
Disconnect ECM/PCM connectors A, B, and C.
|
|
NOTE: ECM/PCM connectors A, B, and C have symbols (A=□, B=△,
C=○) embossed on them for identification.
|
|
3.
|
Remove the ECM/PCM (D).
|
|

|
|
|
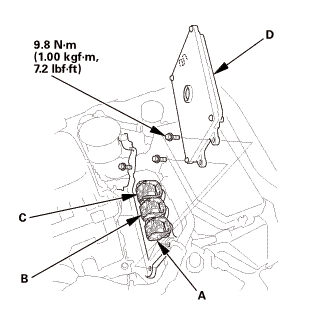
1.
|
Install the ECM/PCM (D).
|
|
2.
|
Connect ECM/PCM connectors A, B, and C.
|
|
NOTE: ECM/PCM connectors A, B, and C have symbols (A=□, B=△,
C=○) embossed on them for identification.
|
|
|
|
|
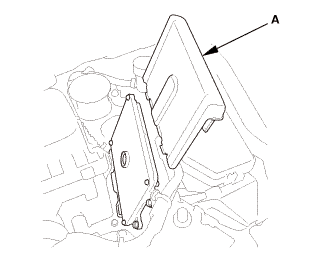
3.
|
Install the cover (A).
|
|
|
|
|
1.
|
Connect the HDS to the data link connector (DLC) (A) located
under the driver's side of the dashboard.
|
|
2.
|
Turn the ignition switch to ON (II).
|
|
3.
|
Make sure the HDS communicates with the vehicle. If it does not
communicate, go to the DLC circuit troubleshooting.
|
|
|
|
1.
|
Turn the ignition switch to ON (II).
|
|
2.
|
Manually input the VIN to the ECM/PCM with the HDS.
|
|
NOTE: DTC P0630 VIN Not Programmed or Mismatch may be stored
because the VIN has not been programmed into the ECM/PCM; ignore
it, and continue this procedure.
|
|
|
|
1.
|
If the READ DATA (engine oil life) failed in removal procedure,
go to immobilizer key registration procedure. Otherwise, go to next
step.
|
|
2.
|
Select the PGM-FI system with the HDS.
|
|
3.
|
Select the REPLACE ECM/PCM MENU, then select WRITE DATA, and
follow the screen prompts.
|
|
NOTE: If the WRITE DATA indicates FAILED, continue with this
procedure.
|
|
| 5. |
Immobilizer Key Registration - Programming Control Unit |
|
|
1.
|
Select IMMOBI system with the HDS.
|
|
2.
|
Enter the immobilizer code using the ECM/PCM replacement procedure
in the IMMOBI MENU of the HDS; it allows you to start the engine.
|
|
| 6. |
ECM/PCM Read Data and Write Data |
|
|
1.
|
If the READ DATA failed in removal procedure or the WRITE DATA
failed, replace the engine oil, and the engine oil filter, then
go to next step.
|
|
|
|
1.
|
Update the ECM/PCM with the HDS if it does not have the latest
software.
|
|
|
|
1.
|
Reset the ECM/PCM with the HDS while the engine is stopped.
|
|
2.
|
Turn the ignition switch to LOCK (0).
|
|
3.
|
Turn the ignition switch to ON (II) and wait 30 seconds.
|
|
|
|
Start the engine. Hold the engine speed at 3,000 rpm without
load (A/T in P or N, M/T in neutral) until the radiator fan comes
on, then let it idle.
|
|
|
|
1.
|
Let the engine idle for about 5 minutes with the throttle fully
closed.
|
|
NOTE: If the radiator fan comes on, do not include its running
time in the 5 minutes.
|
|
| 11. |
CKP Pattern Clear/CKP Pattern Learn |
|
|
1.
|
Select CRANK PATTERN in the ADJUSTMENT MENU with the HDS.
|
|
2.
|
Select CRANK PATTERN CLEAR, and clear the CKP pattern.
|
|
3.
|
Select CRANK PATTERN LEARNING with the HDS, and follow the screen
prompts.
|
|
847100
SRS components are located in this area. Review the SRS component locations
and the precautions and procedures before doing repairs or service.
1.
Batt ...
11010A
1.
Vehicle Lift
1.
Raise the vehicle on a lift, and make sure it is securely supported.
...
See also:
Honda Civic Owners Manual. Making a Call
You can make calls by inputting any phone
number, or by using the imported
phonebook, call history, speed dial entries, or
redial.
Making a Call
Any voice-tagged speed dial entry can be dialed by
voice from most screens.
Press the button and say
the voice tag name.
...
 Carpet Removal and Installation (4-door A/T)
 Engine Removal and Installation (R18Z1 (A/T, M/T))