Honda Civic Service Manual: Clutch Disc Removal, Installation, and Inspection (K24Z7)
2101D7

Removal
|

|
|
1.
|
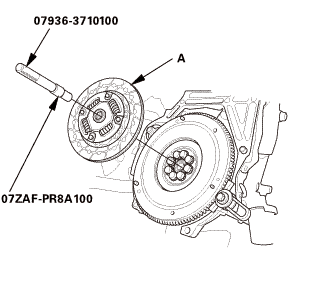
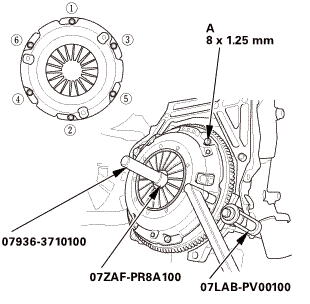
Install the ring gear holder.
|
|
2.
|
Install the clutch alignment shaft and the remover handle.
|
|
3.
|
To prevent warping, loosen the pressure plate mounting bolts
(A) in a crisscross pattern in several steps.
|
|
4.
|
Remove the pressure plate (B).
|
|
|
|
|
1.
|
Remove the clutch disc (A), the clutch alignment shaft, and the
remover handle.
|
|
 Inspection
| 1. |
Clutch Disc Inspection |
|
|
|
1.
|
Inspect the lining of the clutch disc for signs of slipping or
oil. If the clutch disc looks burnt or is oil soaked, replace the
clutch disc and the pressure plate as a set. If the clutch disc
is oil soaked, find and repair the source of the oil leak.
|
|
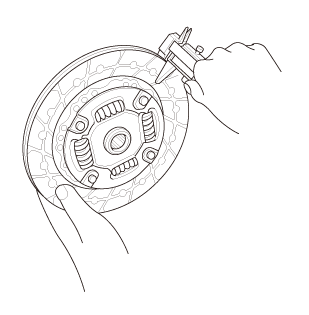
2.
|
Measure the clutch disc thickness. If the measurement is less
than the service limit, replace the clutch disc.
|
|
|
Standard (New):
|
8.25-8.95 mm
(0.3248-0.3524 in)
|
|
Service Limit:
|
6.95 mm
(0.2736 in)
|
|
|
|
|
|
|
|
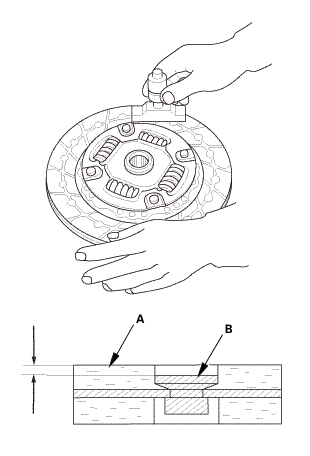
3.
|
Measure the depths of the rivets from the clutch disc lining
surface (A) to the rivets (B) on both sides. If the measurement
is less than the service limit, replace the clutch disc.
|
|
|
Standard (New):
|
1.2-1.7 mm
(0.047-0.067 in)
|
|
Service Limit:
|
0.7 mm
(0.028 in)
|
|
|
|
|

Installation
|
 (pm (pm
|
|
1.
|
Temporarily install the clutch disc onto the splines of the transmission
mainshaft. Make sure the clutch disc slides freely on the mainshaft.
|
|
2.
|
Apply super high temp urea grease (P/N 08798-9002) to the splines
(A) of the clutch disc (B).
|
|
NOTE: Wipe off any excess grease.
|
|
3.
|
Install the clutch disc using the clutch alignment shaft and
the remover handle.
|
|
|
|
|
1.
|
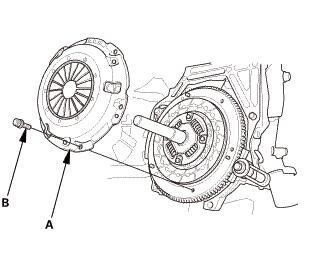
Install the pressure plate (A) and the mounting bolts (B) finger-tight.
|
|
|
 lx125mm lx125mm
|
|
2.
|
Torque the pressure plate mounting bolts (A) in a crisscross
pattern.
|
|
NOTE:
|
|

|
Tighten the bolts in several steps to prevent
warping the diaphragm spring.
|
|
|
|
Make sure that there is no clearance between
the pressure plate and the flywheel.
|
|
|
|
|
Specified Torque:
|
26 N·m (2.7 kgf·m, 19 lbf·ft)
|
|
|
|
|
3.
|
Remove the ring gear holder.
|
|
4.
|
Remove the clutch alignment shaft and the remover handle.
|
|
5.
|
Make sure the diaphragm spring fingers are all the same height.
|
|
211010
Bleeding
NOTE:
Do not reuse the drained fluid. Always use Honda DOT 3 Brake
Fluid from an unopened container. U ...
210105
Removal
1.
Pressure Plate
1.
Install the ring gear holder.
...
See also:
Honda Civic Owners Manual. To Cancel
To cancel ACC with LSF, do any of the
following:
Press the CANCEL button.
Press the MAIN button.
ACC with LSF indicator goes off.
Depress the brake pedal.
When the LSF function has stopped the
vehicle, you cannot cancel ACC with LSF
by dep ...
 Clutch Hydraulic System Bleeding (M/T)
 Clutch Disc Removal, Installation, and Inspection (R18Z1 M/T)