Honda Civic Service Manual: Navigation System Symptom Troubleshooting Rearview camera image does not change when selecting different views ('13)
Rearview camera image does not change
NOTE:
|
|
You can select three different rearview camera angles for backing up. If there is no camera image on the display, go to Rearview camera image does not come on or work properly troubleshooting. |
|
|
Check the connectors for poor connections or loose terminals. |

|
1. |
Problem verification: Problem verification
|
Does the rearview camera image change properly?
| YES |
Intermittent failure, the system is OK at this time.¦ |
||
| NO |
The failure is duplicated, go to step 2. |
|
2. |
Shorted wire check (CAMERA BIT0 line, CAMERA BIT1 line): Shorted wire check (CAMERA BIT0 line, CAMERA BIT1 line)
|
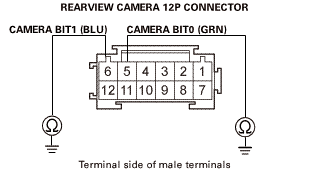 izpam(sunmm121110eade
Is there continuity?
| YES |
Repair a short to body ground in the wire(s) between the rearview camera and the audio-navigation unit.¦ |
||
| NO |
The CAMERA BIT0 and the CAMERA BIT1 wires are not shorted to ground. Go to step 3. |
|
3. |
Shorted wire check (CAMERA BIT0 line, CAMERA BIT1 line): Shorted wire check (CAMERA BIT0 line, CAMERA BIT1 line)
|
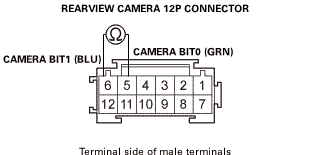 am[sun
Is there continuity?
| YES |
Repair a short in the wires between the rearview camera and the audio-navigation unit.¦ |
||
| NO |
The CAMERA BIT0 and the CAMERA BIT1 wires are not shorted. Go to step 4. |
|
4. |
Open wire check (CAMERA BIT0 line, CAMERA BIT1 line): Open wire check (CAMERA BIT0 line, CAMERA BIT1 line)
|
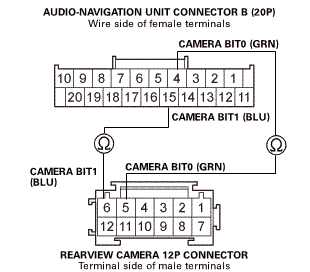 mm10amr:
Is there continuity?
| YES |
The CAMERA BIT0 and the CAMERA BIT1 wires are OK. Go to step 5. |
||
| NO |
Repair an open in the wire(s) between the rearview camera and the audio-navigation unit.¦ |
|
5. |
Audio-navigation unit check: Audio-navigation unit check
|
Does the symptom go away?
| YES |
Replace the original rearview camera.¦ |
||
| NO |
Replace the audio-navigation unit.¦ |
Top of Page
- EBSCO Support Site
- Privacy Policy
- Terms of Use
- Copyright
© 2013 EBSCO Industries, Inc. All rights reserved
EBSCO Publishing Green Initiatives
| Email from: | |
| Email to: | Separate each email address with a comma. |
| Subject: | |
| Comments: | |
 Driver Assist
...
 Rearview Camera Removal and Installation ('13-'14)
1.
Trunk Lid Trim Panel
1.
Remove the trunk lid trim panel (A).
2.
...
See also:
Honda Civic Owners Manual. Lane Keeping Assist System (LKAS)
Provides steering input to help keep the vehicle in the middle of a detected
lane and
provides tactile and visual alerts if the vehicle is detected drifting out of
its lane.
Lane Keeping Assist System (LKAS)
Important Safety Reminders
The LKAS is for your convenience only. ...
