Honda Civic Service Manual: Fuel Filter A Removal and Installation (R18A9)


Compressed natural gas is flammable and highly explosive. You could be killed
or seriously injured if leaking natural gas is ignited.
Stop the engine, and keep heat, sparks, and flames away.
|
|
1.
|
Raise the vehicle on a lift, and make sure it is securely supported.
|
|
| 2. |
Fuel Pressure - Relieving (Between the engine and the manual shut-off
valve) (Natural Gas Model) |
|
|
Compressed natural gas is flammable and highly explosive. You could be
killed or seriously injured if leaking natural gas is ignited.
Stop the engine, and keep heat, sparks, and flames away.
|
This procedure should be done outside in a well-ventilated area
or in a properly equipped CNG shop.
|
|
This procedure will allow you to safely work on any part of the
fuel system downstream of the manual shut-off valve, such as fuel
pressure regulator P1 or the fuel injectors.
|
|
1.
|
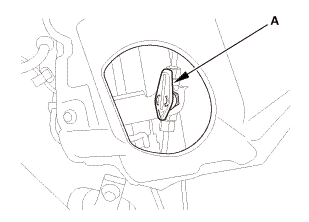
Close the manual shut-off valve (A).
|
|
2.
|
Start the engine, and let it idle.
|
|
3.
|
After a few minutes, the engine will stall.
|
|
4.
|
Turn the ignition switch to LOCK (0).
|
|
| 3. |
Rear Floor Undercover (Natural Gas Model) |
|
|
|
1.
|
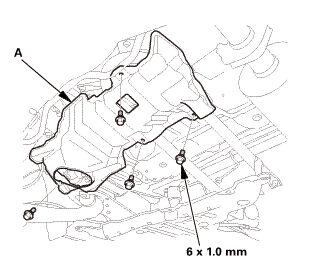
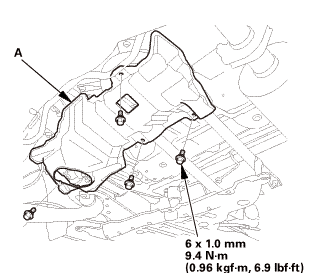
Remove the rear floor undercover (A).
|
|
| 4. |
Fuel Filter A (Natural Gas Model) |
|
|
|
1.
|
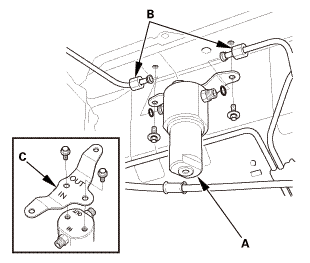
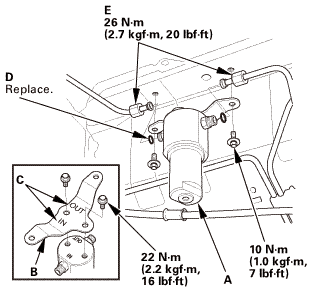
Remove the fuel lines (B) and the stay (C). Replace fuel filter
A. Make sure the arrow is pointing towards the engine.
|
|
NOTE: Always use two wrenches when removing the fuel line nuts.
|
|

Compressed natural gas is flammable and highly explosive. You could be killed
or seriously injured if leaking natural gas is ignited.
Stop the engine, and keep heat, sparks, and flames away.
| 1. |
Fuel Pipe Connector O-Ring (Natural Gas Model) |
|
|
|
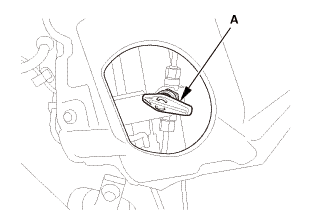
1.
|
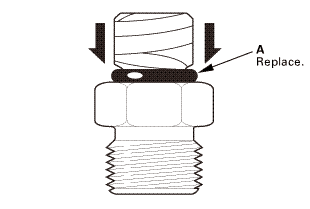
Wrap vinyl tape around the threads, and coat the surface of the
tape with silicone oil or grease.
|
|
NOTE: Wrap the vinyl tape (A) so that there is no stepped portion.
|
|
|
|
|
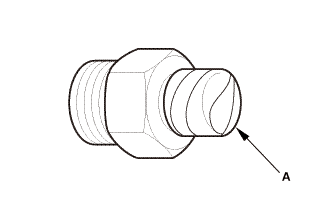
2.
|
Install a new O-ring (A) into the groove.
|
|
NOTE: Be careful not damage the sealing face of the O-ring.
|
|
3.
|
Using a small brush, apply silicone oil or grease to the outer
surface of the O-ring.
|
|
4.
|
Remove the vinyl tape.
|
|
| 2. |
Fuel Filter A (Natural Gas Model) |
|
 max... max...
|
|
1.
|
Install the stay (B).
|
|
NOTE: When assembling the stay and fuel filter A, make sure the
IN and OUT marks (C) are visible.
|
|
2.
|
Apply silicone grease (Shinetsu Silicone GR 10M) to the new O-rings
(D), and carefully install them into their proper positions.
|
|
3.
|
Install fuel lines (E) and fuel filter A.
|
|
NOTE: Always use two wrenches when installting the fuel line
nuts.
|
|
| 3. |
Rear Floor Undercover (Natural Gas Model) |
|
 ioumm ioumm
|
|
1.
|
Install the rear floor undercover (A).
|
|
| 4. |
Manual Shut-off Valve - Open (Natural Gas Model) |
|
|
|
1.
|
Open the manual shut-off valve (A).
|
|
| 5. |
Fuel Supply System Leak - Inspection (Natural Gas Model) |
|
|
|
Check for a gas leak if there is an odor coming from the vehicle.
Compressed natural gas (CNG) can only be smelled, not seen.
|
|
1.
|
Open the hood and the fuel fill door.
|
|
2.
|
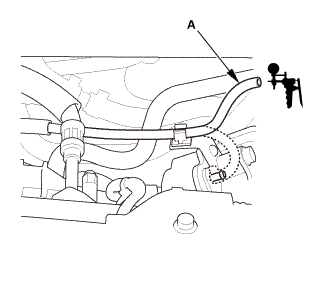
Connect a vacuum pump/gauge, 0-30 inHg, to the hose (A) from
fuel pressure regulator P1, and apply 67.7 kPa (20.0 inHg, 508 mmHg)
of vacuum.
|
|
3.
|
If fuel pressure regulator P2 does not hold vacuum, replace it
before continuing to the next step.
|
|
4.
|
Inspect the fuel lines and hoses under the hood for kinks, abrasion,
and other signs of damage.
|
|
5.
|
With the manual shut-off valve open, turn the ignition switch
to ON (II), but do not start the engine.
|
|
6.
|
After the fuel pressure regulator shut-off solenoid valve/fuel
tank internal solenoid valve operates for about 2 seconds, the fuel
pressure in the fuel lines rises.
|
|
7.
|
Turn the ignition switch to LOCK (0).
|
|
8.
|
Repeat this two or three times.
|
|
|
|
|
9.
|
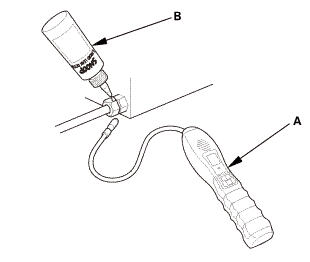
Within 1 minute, check for any damaged lines with a leak detector
(A) (Snap-on Combustible Gas Leak Detector or Snoop Liquid Leak
Detector (B)).
|
|
|
|
|
10.
|
If no damage was noticed during the inspection, turn the ignition
switch to ON (II) for 2 seconds, then turn the ignition switch to
LOCK (0).
|
|
11.
|
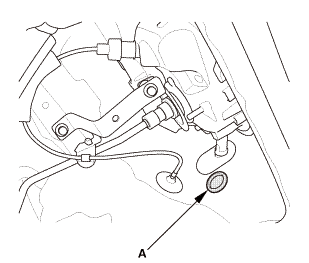
Within 1 minute, check for a leak at the vent hose outlet inside
the fuel pipe protector (A).
|
|
12.
|
If you detect a leak, remove the vent hose, and check the fuel
lines and fittings at the in-tank solenoid valve and the join block
with a leak detector.
|
|
13.
|
If you cannot find the leak, raise the vehicle on a lift, remove
the under-floor cover.
|
|
14.
|
Inspect all the fuel lines under the vehicle, visually, and with
a leak detector.
|
|
15.
|
If you still cannot find the leak, remove the rear seat, then
check all fuel lines and fittings at the fuel tank and the fuel
joint block.
|
|
1.
Vehicle Lift
1.
Raise the vehicle on a lift, and make sure it is securely supported.
2. ...
Compressed natural gas is flammable and highly explosive. You could be killed
or seriously injured if leaking natural gas is ignited.
Stop the engine, and keep heat, sparks, and flames away.
...
 Manual Shut-off Valve Removal and Installation (R18A9)
 Fuel Filter B Element Removal and Installation (R18A9)